How do I set up the Direct Pay module?
Direct Pay.
The Direct Pay module is an add-on that you can purchase to allow utility customers to make an electronic payment to pay a utility bill. That gives your customers the option of using an electronic fund transfer to pay a bill instead of using cash, check, or a credit card.
After you purchase the Direct Pay module, you need to set up the bank account and transaction information for processing the electronic payment, verify the customer's direct pay information with the bank, and then start processing electronic payments for the customer. You can do this on your own or you can call a client relationship manager for assistance at (800) 228-9851.
Contents
Watch a video
Setting up Direct Pay
1. Open Connect Utility Management > Organization > Organization.
2. Click to select the Direct Pay tab.
3. Enter the Offset Bank.
The offset bank is the bank the organization is using to receive electronic payments from direct pay customers.
4. Select the Offset Transaction Type.
The offset transaction type is the transaction type the system will use to record the payments made by customers to the organization. Usually, the offset transaction type is a deposit to a checking account.
5. Enter the Bank Header.
The bank header is the first line that prints in the ACH file. The ACH file is the file that is sent to the bank to process electronic payments.
6. Set up the section titled File Header Information.
The file header record provides information for processing the direct deposit file to the bank. It is the first record in the file.
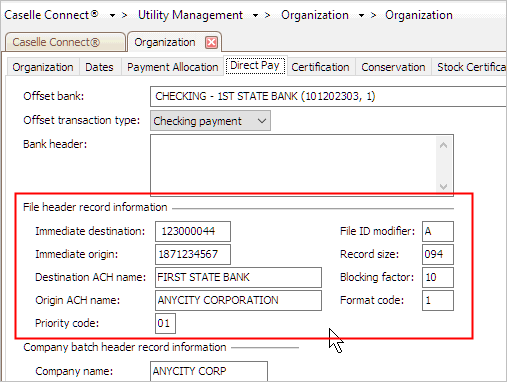
File header record information
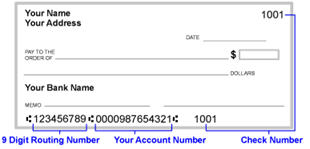
Immediate Destination
This is the ID assigned to the financial institution preceded by a single space. Press the Space bar to insert a blank space. Type the immediate destination ID or the Receiving Point of Entries ID.
Immediate Origin
Type the number 1 followed by the employer’s Federal Employer ID number.
Destination ACH Name
Type the destination ACH for the input files (up to 23 characters).
Origin ACH Name
Type the origin name for output files (up to 23 characters). Example: Originating Company Name
Priority Code
This is the code for handling priority files. Normally, this field displays 01. Type the priority code (up to 2 characters).
File ID Modifier
This is the modifier that allows the creation of multiple files that use the same date and participants. Type the file ID modifier (1 character). Normally, this field displays A.
Record Size
This field displays the number of characters in each record. Type the number of characters in a record (up to 3 digits). Normally, this field displays 094.
Blocking Factor
This is the blocking factor for magnetic tape. Type the blocking factor for magnetic tape (up to 2 digits). Normally, this field displays 10.
Format Code
This field displays the format code. Type the format code (1 character). Normally, this field displays 1.
7. Set up the section titled Company Batch Header Record Information.

Company batch header record information
Company Name
This is the company’s name. Type the company’s name (up to 16 characters).
Discretionary Data
This field allows a company to include codes that are only significant to them and will enable special handling of all subsequent entries in the batch. Type the company’s discretionary data (up to 20 characters).
Company ID
This is the employer’s ID preceded by the number 1. Type the number 1 followed by the organization’s ID.
Entry Class
This field displays the standard entry class. Select PPD (Pre-arranged Payments and Deposits) or CCD (Cash Concentration Disbursement). Normally, this field is PPD.
Entry Description
This field provides an explanation of the entry for the receiver and customer. Example: Util Pmt. Type a description of the entry (up to 10 characters).
Originator Status Code
This is the originator status code. Type the originator status code (1 character). Normally, this field is 1.
Originating DFI ID
This is the code that identifies the originating DFI entries in a batch. Type the originating DFI ID (up to 8 characters). Normally, this is the financial institution’s routing number followed by the transit number minus the check digit.
Service Class Code
This is the 3-character service class code. Type 200 for Debits and Credits, 220 for Credits Only, and 225 for Debits Only.
8. Click Save  (CTRL+S).
The direct pay properties are set up. You're ready to set up customers with direct pay. More.
202105, 2021Jun10
Setting up direct pay customers
Add the customer's bank account and transction information to the Direct Pay tab in the customer record in Modify Existing Customers. More
Creating an ACH prenotification file
Create the ACH prenotification file. The ACH prenotification file is a list of the customers who have been set up as a new direct pay customer. You should follow the instructions from the bank for sending the ACH prenotification file to them. The bank will test the customer's bank account to make sure the customer's information is correct and the money is being withdrawn from the correct bank account. More
Changing customer's ACH status to active
After the bank verifies the customer's bank account, you're ready to change the customer's ACH status from prentoification to active. The active status means the customer will be included in the actual ACH file that will withdraw an amount and record it as a direct pay transaction. More
Creating an ACH file
When it's the appropriate time, usually this is a step in your checklist, create the ACH file. You should follow the instructions from the bank for sending the ACH file to them. More
Updating electronic payments
Copyright © 2025 Caselle, Incorporated. All rights reserved.