Step 4. Set Up ACA Annual Reporting
ACA (Step 4 of 4)
You’re done setting up the ACA options in Timekeeping, Human Resources, and Payroll. Now you’re ready to import the employee’s ACA information into the ACA Reporting module, verify the employee’s ACA information is correct, and print Forms 1094/1095. If your organization needs to file ACA Forms 1094/1095 electronically, you’ll also need to complete the section titled Create Electronic File.
Videos
[MP4]
A. Convert year-end ACA information
The ACA Reporting module does not share data with the rest of the Connect applications. When you use the ACA Reporting module, you will need to import the information that you will use to report ACA information from Timekeeping, Human Resources, and Payroll into the ACA Reporting module.
Important! The changes that you make to the data in the ACA Reporting module will not be updated to the data source. You can make the changes in the ACA Reporting module and update the source application with the new information or you can update the source application and re-convert the ACA information.
Can I reconvert data for a specific employee? Yes, you can set up the Convert Year-end ACA Information routine to convert data for a single employee. Use the Selection Criteria to enter the employee’s name or number. Be aware that any changes that you have manually entered in Government Reporting will be replaced by reconverting ACA year-end information.
Do this...
1. Open Connect Payroll > Government Reporting > Convert Year-end ACA Information.
2. Use the Convert Employee Data for Tax Year menu to select the ACA reporting year.

Convert employee data for tax year box
3. Click GO  (CTRL+G).
The ACA information for the selected year is available in the ACA Reporting module. This routine will print a report of the converted information.
202011, 2020Dec08
B. Set up ACA information
This is a visual check to make sure the ACA default information is saved correctly in the Government Reporting application.
Have you converted W-2s or 1099s?
-
Yes, I have converted W-2s or 1099s. Chances are good that you entered the federal ID number when you printed W-2s or 1099s. You’re good to go.
-
No, I have not converted W-2s or 1099s. You need to enter your organization’s federal ID number in the field titled Federal ID Number. Click here for instructions.
How do I enter the federal ID number?
Your organization’s Federal ID number will print on Forms 1094/1095. If you need to file Forms 1094/1095 electronically, you will not be able to use the Affordable Care Act Information Returns (AIRS) portal without entering your organization's Federal ID number in the Government Reporting Organization table.
Do this...
1. Open Connect Payroll > Government Reporting > Organization.
2. Click to select the Federal tab.
3. Use the Federal ID Number box to enter your organization’s federal ID number.

Federal ID number box
4. Click Save  (CTRL+S).
The ACA forms will use the Federal ID number that you have entered.
202011, 2020Dec08
Do I need to file electronically?
The number of full-time equivalent employees that are employed by the organization will determine if the IRS requires you to file electronically.
Remember, you may not have as many full-time equivalent employees as regular employees so you may not need to file ACA Forms 1094/1095 electronically even if you did file W-2s and 1099s electronically.
How many full-time equivalent employees do you have in your organization?
-
I have less than 10 full-time equivalent employees. You do not need to file electronically. If want to file electronic ACAs and you filed electronic W-2s, you’ve probably already set up the necessary fields for filing electronically. You’re good to go.
-
I have 10 or more full-time equivalent employees. The IRS wants you to file electronic ACAs. If you filed electronic W-2s in the past, then the electronic filing information may already be set up in the Government Reporting application. Either way, you will need to complete this section to enter or review the electronic filing settings.
Are you filing ACAs electronically? You’ll need to enter the Federal ID number because the AIRS portal will not accept the electronic ACA file without it. You’ll also need a TCC (Transmitter Control Code) from the IRS. This is a different TCC from the TCC for filing 1099s.
Have you purchased the Electronic Filing module?
-
Yes, we purchased the Electronic Filing module. You’re good to go.
-
No, we have not purchased the Electronic Filing module AND we are filing electronically. Contact your Client Relationship Manager (CRM) at (800) 243-8275.
-
No, we do not need to file electronically. Make sure you have ordered Forms 1094/1095 from www.irs.gov. You’ll need enough to print one copy for each employee and one copy for the IRS.
Is this a different Electronic Filing module from the Electronic Filing module that I use for W-2 and 1099 Reporting? No, this is the same Electronic Filing module. If you have purchased the Electronic Filing module for W-2 and 1099 Reporting, you are ready to file electronic ACAs.
Do you have a Transmitter Control Code (TCC)?
-
Yes, we have a TCC to file ACA electronically. Remember, you cannot use the same TCC that you used to file W-2s and 1099s electronically to file ACA Forms 1094/1095 electronically. However, you can use the TCC for filing ACA electronically from the previous year.
-
No, we do not have a TCC to file ACA electronically. Go to www.irs.gov to apply for a TCC. Applying for a TCC usually takes about 30 days.
Do this...
1. Open Connect Payroll > Government Reporting > Organization.
2. Click to select the Federal tab.
3. Click to select the Electronic Filing subtab.
4. Fill in all of the fields on the Electronic Filing subtab.
The Government Reporting module shares the W-2 and 1099 electronic filing information with the ACA electronic file. If you need help, contact customer support for assistance at (800) 243-8275 or email us at support@caselle.com.
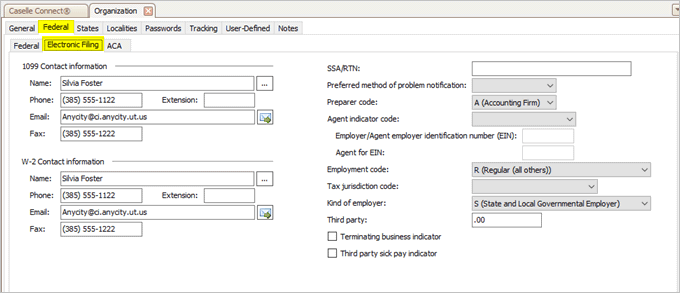
Electronic Filing subtab
5. Click Save  (CTRL+S).
The electronic filing information is saved.
202011, 2020Dec08
Is your employer a Designated Governmental Entity (DGE)?
A Designated Governmental Entity (DGE) is a “person or persons that are part of or related to the Governmental Unit that is the ALE Member and that is appropriately designated for purposes of these reporting requirements.” [www.irs.gov/pub/irs-pdf/i109495c.pdf]
Is your employer a Designated Governmental Entity?
-
Yes, my employer is a Designated Governmental Entity. You’ll need to fill in the name, address, ID number, and contact information for person or entity that will function as the DGE.
-
No, my employer is NOT a Designated Governmental Entity. You can skip the section titled Designated Government Entity on the ACA Organization form.
Do this...
1. Open Connect Payroll > Government Reporting > Organization.
2. Click to select the Federal tab.
3. Click to select the ACA subtab.

ACA subtab
4. Verify your organization's contact name and telephone number for ACA.
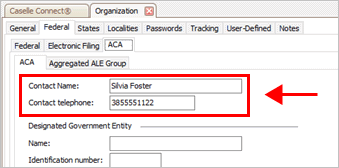
Contact name and telephone
5. Find the section titled Designated Government Entity.
If your organization is part of a state agency or federal agency or an indian tribe, then your organization may be part of a designated government entity and you will need to fill in this section.

Designated Government Entity
Name
Enter the name of the government entity receiving the ACA reporting.
Identification number
Enter the identification number of the government entity.
Address, City, State/Province, Zip/Postal Code, and Country/Region
Enter the address for the government entity.
Contact name
Enter the name of the person at the government entity who is the ACA contact. Remember to use the Contact Name box in the Designated Government Entity section instead of the Contact Name box at the top of the form.
Contact telephone
Enter the telephone number of the ACA contact.
10. Click Save  (CTRL+S).
The designated government entity’s name, address, and contact information is recorded. The reports will print this information on the ACA reports that show the designated government entity’s information.
202011, 2020Dec08
How do I choose the certifications of eligibility?
You will need to talk to your tax accountant to determine the appropriate checkbox to select for your organization. This is where you will record any certifications of eligibility in the Government Reporting application. It's located on the Federal tab in the Organization table (Government Reporting > Organization > Organization).
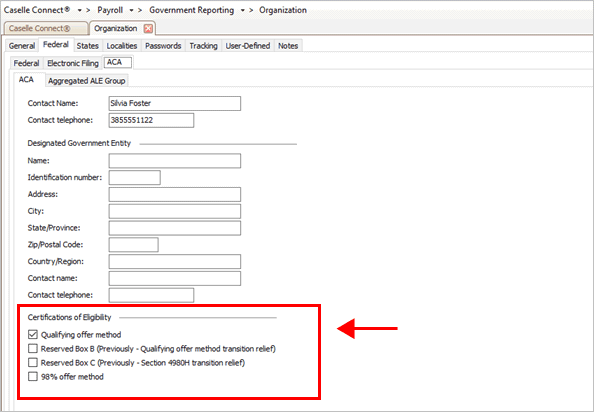
Certifications of Eligibility
C. Run ACA Checkout
Run Checkout ACA Employees to search the ACA data to make sure the required information is ready for ACA reporting.
Do this...
1. Open Connect Payroll > Government Reporting > Checkout ACA Employees.
2. Select 2022 as the Tax Year.
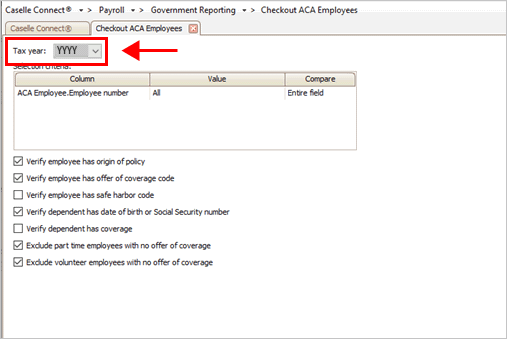
Tax Year in Checkout ACA Employees
3. Select the following checkboxes.
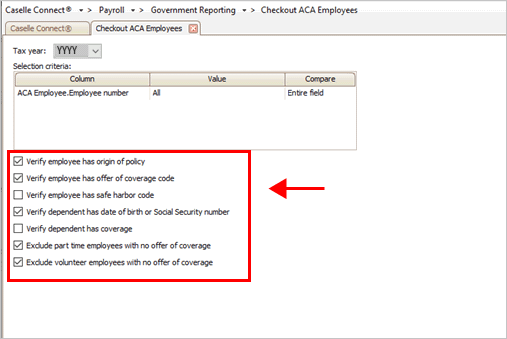
Checkout ACA checkboxes
Verify employee has origin of policy
Select this checkbox unless your organization is self-insured or your organization does not use origin of policy.
Verify employee has offer of coverage code
Select this checkbox.
Verify employee has safe harbor code
If your organization uses a safe harbor code, select this checkbox. Checkout will search for employees who have not been assigned to a safe harbor code.
If your organization does not use a safe harbor code, do not select this checkbox.
Verify dependent has date of birth or Social Security number
If your organization is self-insured, select this checkbox.
Verify dependent has coverage
If your organization is self-insured, select this checkbox.
Exclude part-time employees with no offer of coverage
Employers are not required to provide part-time employees with an offer of coverage. Select this checkbox to remove part-time employees from the selection criteria.
Exclude volunteer employees with no offer of coverage
Employers are not required to provide volunteer emplolyees with an offer of coverage. Select this checkbox to remove volunteer employees from the selection criteria.
4. Click GO  (CTRL+G).
Connect searches the ACA information for errors and prints an error report. You’ll want to review the report to see if any errors were reported.
Did the Checkout ACA Employees Report list any errors?
-
Yes, the Checkout ACA Employees Report had errors. You’ll want to fix the errors in the ACA Employees table (Government Reporting > Organization > ACA Employees) before you continue. Make a note of the fixed items so you can update the employee’s information in the source application (Human Resources, Payroll, or Timekeeping).
-
No, the Checkout ACA Employees Report was error-free. You’re ready for the next step: Verify Employee Information to Check Status and Offer Coverage.
202111, 2021Nov05
D. Verify Employee Information to Check Status and Offer of Coverage
Complete this section for all eligible employees. For each eligible employee, check the employee status and offer of coverage.
In this section...
-
How do I check the employee status?
-
How do I verify the offer of coverage?
-
How do I verify self-insured employees?
How do I check the employee status?
If the organization has been using the Position Type box in Payroll (Modify Existing Employees > Position tab) to record the employee position type, use the full time employee count on Forms 1094-B and 1094-C to show the correct offer of coverage. The value saved in the Status box in the Government Reporting application is converted based on all active positions and the amount of time worked by the employee.
Do this...
1. Open Connect Payroll > Government Reporting > ACA Employees.
What if I can't open ACA Employees? Start by checking the Identification Number that's saved on the benefit for characters (A-Z). The a valid identification number includes numbers (0-9) and symbols, not characters (A-Z). The benefit identification number is saved in Connect Human Resources > Organization > Benefits. After you change the identification number, reconvert the ACA year-end information and you should be able to open ACA Employees.
2. Click to select the Offer and Coverage tab.

Offer and Coverage tab
3. Review the employee status for each month.
The Status column shows the employee status as full time or part time for each month of the year.
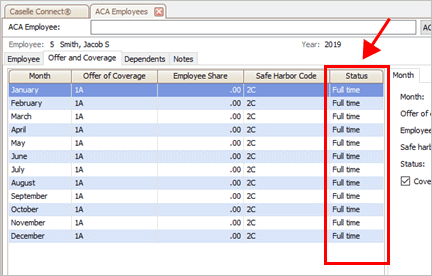
Status column
Is the employee’s status full-time or part-time?
-
Yes, the employee’s status is full-time or part-time. Great!
-
No, the employee’s status is not full-time or part-time. Use the Status drop-down menu to change the employee’s status to full or part-time for each month.
4. Find the Covered checkbox.
For self-insured employers, where the employee was offered coverage but the employee waived coverage, Government Reporting can't tell the difference between an enrolled employee or an employee that waived coverage. For those employees who are self-insured and employees who have waived coverage, you need to deselect the Covered checkbox. Clearing the checkbox means the employee will receive a 1095 Form, but the employee will not be included in the list of employees with health coverage.
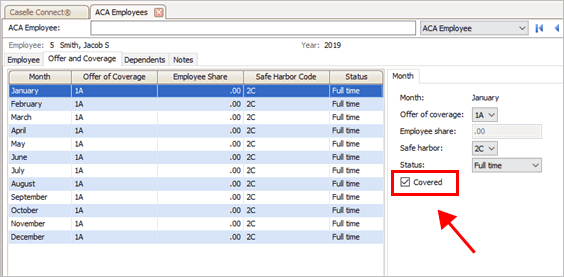
Covered checkbox
Is the employer self-insured or did the employee waive coverage?
-
Yes, the employee is self-insured. Click to select the month or months the employee was self-insured and clear the checkmark from Covered checkbox.
-
Yes, the employee waived coverage. Click to select the month or months the employee waived coverage and clear the checkmark from Covered checkbox.
-
No, the employer was not self-insured and the employee did not waive coverage. Verify the Covered checkbox is selected for each month the employee was insured by the organization.
What if I make changes to the employee position in Government Reporting? The changes that you make in the Government Reporting application will only be saved in Government Reporting. None of the changes that you make in Government Reporting will be saved in the Payroll application.
When you have checked the status on each employee, you’re ready to verify the Offer of Coverage.
202011, 2020Dec08
How do I verify the Offer of Coverage?
Check each employee to verify the employee has received an offer of coverage for each month of the reporting year that the employee was eligible to receive an offer of coverage.
Tip! This step is easier to complete if you wait until you run the last payroll. Running the last payroll will also fill in the health insurance information for the month of December.
Do this...
1. Open Connect Payroll > Government Reporting > ACA Employees.
2. Use ACA Employees box to enter the employee name or number. Press Enter.

ACA Employee box
3. Click to select the Offer and Coverage tab.

Offer and Coverage tabs
4. Review the column titled Offer of Coverage.
You should find an Offer of Coverage code listed for each month.
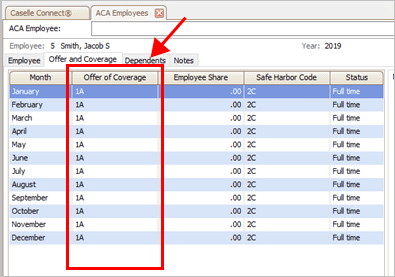
Offer of Coverage column
Does each month show an Offer of Coverage code?
-
Yes, there’s an Offer of Coverage code listed for each month. You’re ready to review the Offer of Coverage codes for the next employee.
-
No, one or more of the months does not show an Offer of Coverage code. Click to select the month that is missing the Offer of Coverage code and then use the Offer of Coverage field on the Month subtab to select a code.
5. Repeat these steps to review the Offer and Coverage for each employee.
You have reviewed the Offer and Coverage for each employee. Each employee has an Offer of Coverage code recorded for each month of the reporting year.
202011, 2020Dec08
How do I verify self-insured employees?
If the employee is self-insured, you’ll need to verify the dependent has coverage. Health insurance must be set up on the dependents.
E. Print Employee Forms 1094/1095
After you verify and check the employee information in the ACA Employees table, you’re ready to print Forms 1094/1095. Form 1094 is the transmittal report that includes your organization’s information, contact information, and the number of forms. Form 1095 is the form that the organization is required to submit on the employee’s behalf to show proof of coverage.
How many employees are employed by your organization?
-
We employ 49 employees or less AND we are self-insured. Use Forms 1094/1095-B.
-
We employ 49 employees or less AND we are NOT self-insured. No filing is required.
-
We employ more than 50 employees AND we are self-insured. Use Forms 1094/1095-C.
-
We employ more than 50 employees AND we are NOT self-insured. Use Forms 1094/1095-C.
Preparation
-
You will need Forms 1094/1095 paper. You can obtain the preprinted forms from www.irs.gov.
First, print Forms 1094/1095 to plain paper
Print Forms 1094/1095 to plain paper to make sure the correct information will print in the right place on the form.
Do this...
1. Open Connect Payroll > Government Reporting > 1094/1095s.
2. Load plain paper in the printer.
3. Use the Title menu to select 1094/1095s - 1095-C and 1094-C [Caselle Master].

Title box
4. Use the Tax Year menu to select the reporting year.
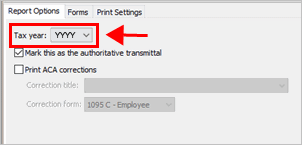
Tax year box
5. Click to select the checkbox titled Mark This As the Authoritative Transmittal.

Mark this as the authoritative transmittal checkbox
6. Click to select the Forms tab.
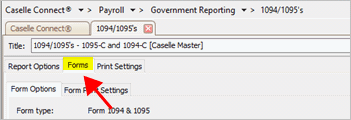
Forms tab
7. Use the 1094 Form menu to select the 1094 form that you’ll be printing.
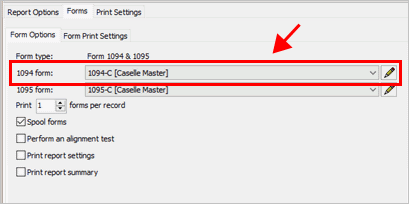
1094 Form box
8. Use the 1095 Form menu to select the 1095 form that you’ll be printing.

1095 Form box
Remember... If your organization does not want to print Form 1095, you can choose to print the 1095 information to a Substitute 1095-C. The Substitute 1095-C should NOT be submitted to the IRS, it is for the employer’s records. You can also distribute the Substitute 1095-C to employees.
If you use the Substitute 1095-C instead of printing Form 1095-C, you are required to provide the entire Substitute 1095-C, including the Instructions for Recipient, to each employee.
9. Use the Print x Forms per Record box to enter the number 1.
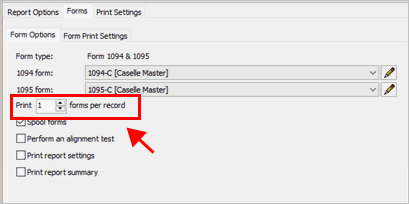
Print x Forms per Record box
10. Click to select the checkbox titled Spool Forms.
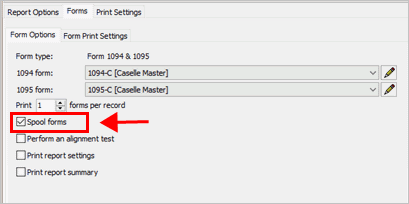
Spool Forms checkbox
11. Click Print  (CTRL+P).
The Print Forms dialog box displays.
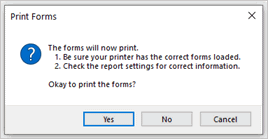
Print Forms dialog box
12. Click Yes.
The Print Setup (Forms) dialog box displays.

Print Setup (Forms) form
13. Clear the checkbox titled Close Program After Printing and then click OK.

Close program after printing checkbox
Forms 1094/1095 print to plain paper. The last page of the report prints the number of forms and total count of employees. Form 1094-C prints the total number of forms on line 18. It also prints the count of employees on line 20.
202011, 2020Dec08
Second, review the printed Forms 1094/1095
Check the form alignment for Form 1094 and 1095. Place the first printed page on top of the actual Form 1094 and hold both pages up to a light source. You should be able to see if the values on the printed page show up in the right boxes on the Form 1094. To learn more about form alignment, click here.
Did the fields on the printed page print in the right place on Form 1094?
-
Yes, the fields print in the right place. That’s great news. Move on to the next step.
-
No, the fields did not print in the right place. You may need to adjust the printer alignment, reprint a page of the 1094s, and then repeat the alignment check. If you need assistance with printer alignment, contact Caselle support at (800) 228-9851.
Now, place the first printed page for the 1095 on top of the actual Form 1095. (You do not need to answer the next question if you are using the Substitute 1095-C instead of Form 1095-C.)
Did the fields on the printed page print in the right place on Form 1095?
-
Yes, the fields print in the right place. That’s great news. Move on to the next step.
-
No, the fields do not print in the right place. You may need to adjust the printer alignment, reprint a page of the 1095s, and then repeat the alignment check. If you need assistance with printer alignment, contact Caselle support at (801) 243-8275.
Third, print actual Forms 1094/1095
Now that the information prints in the correct place on the form, you’re ready to print the 1094/1095 information to the actual Forms 1094/1095.
Do this...
1. Open Connect Payroll > Government Reporting > 1094/1095s.
2. Load Forms 1094/1095 in the printer.
3. Use the same settings that you used to print Forms 1094/1095 to plain paper.
4. Click Print  (CTRL+P).
The employee information prints to Forms 1094/1095. The printed Forms 1094/1095 is the information that you will give to the employee.
202011, 2020Dec08
F. Create Electronic File
This section will show you how to create an electronic file for ACA Reporting. Not all organizations need to submit an electronic file and not all organizations have the same number of employees and full-time equivalent employees.
How many employees are in your organization?
-
We have less than 250 full-time equivalent employees. You are not required to file electronically.
-
We have more than 250 full-time equivalent employees. You are required to file electronically.
Preparation
-
You will need a TCC (Transmitter Control Code) from the IRS. If you filed W-2s or 1099s electronically, you cannot use the same TCC that you used to file W-2s and 1099s. You can use the same TCC to file electronic ACAs as you used last year. To apply for a TCC to file electronic ACAs , go to www.irs.gov and log into the eServices site to fill out the TCC application form for ACA.
-
You will need a Federal ID number saved in the Government Reporting Organization table.
-
You will need to set up the ACA electronic filing information in the Government Reporting Organization table.
-
You will need to purchase and install the Electronic Filing module in Caselle. Contact your Client Relationship Manager (CRM) to purchase the Electronic Filing module at (800) 243-8275.
Do this...
1. Open Connect Payroll > Government Reporting > Create Electronic ACA File.
2. Use the Tax Year menu to select the ACA reporting year.
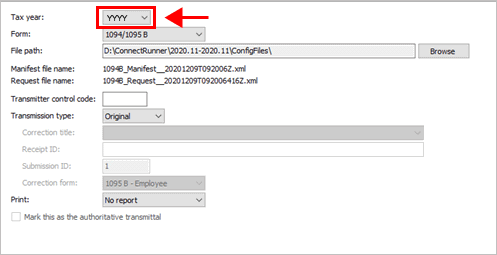
Tax year box
3. Use the Form menu to select the same form that you used to print Forms 1094/1095.

Form box
4. Use File Path box to enter the destination directory.
The File Name box displays the file path to the directory where the electronic ACA file will be created. You do not need to enter a file name. Connect uses the instructions from the IRS to create the file name for the ACA electronic file.

File path box
5. Use the Transmitter Control Code box to enter your organization’s Transmitter Control Code (TCC).
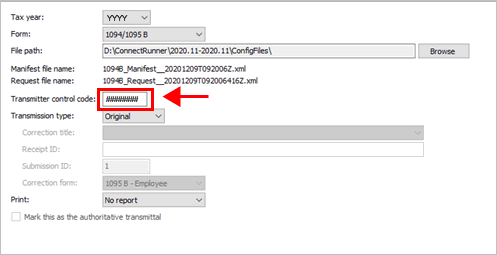
Transmitter control code box
6. Use the Transmission Type menu to select Original.
What if this my first time using Connect Government Reporting to create file for filing ACAs electronically? You will need to create a test transmission file and then follow the instructions on the IRS website for submitting a test electronic file. If you have already used Connect Government Reporting to submit ACAs electronically, then choose Original as the transmission type.
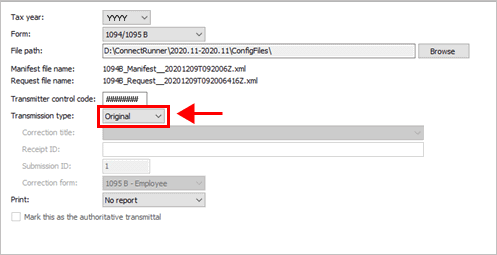
Transmission type box
7. Use the Print menu to select No Report.
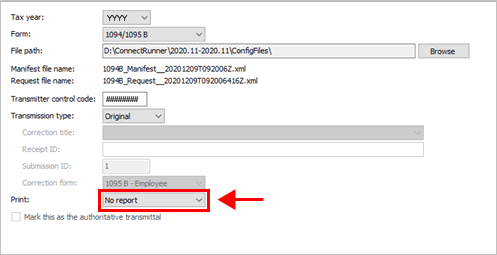
Print box
8. Click GO  (CTRL+G).
Connect creates the electronic file for the selected ACA Form 1094/1095 in the destination file. The next step is to use the Affordable Care Act Information Returns (AIR) website to upload the eFile to send to the IRS.
You have completed the ACA Checklist. You’re done!
202311, 2023Dec21
Related topics
What if my ACA electronic file is rejected?
What if my ACA electronic file is accepted with errors?
Copyright © 2020 Caselle, Incorporated. All rights reserved.