How do I resubmit electronic ACA files to the IRS?
ACA
Follow these instructions to re-submit electronic ACA files to the IRS when the original submission is rejected. You will need to recreate the entire submission file because the IRS does not keep any files from the previous submission.
Which file do I need to create?
-
My submission status is rejected. You need to create and submit a replacement file, go to Create and Submit a Replacement File.
-
My submission status is accepted with errors or partially accepted. You need to create and submit a correction file, go to Create and Submit a Correction File.
-
My submission status is accepted. You’re done. You don’t need to submit any additional files.
-
I don’t know my submission status. Go to Check My Submission Transmission Status.
Contents
Before you get started
-
Replacements are filed when the transmission or submissions are rejected by the IRS.
-
Corrections can only be made to previous transmissions that have been Accepted, Accepted with Errors, or Partially Accepted.
Important!
-
If any submissions were rejected by the AIR System, you have 60 days to submit a replacement.
-
Use Internet Explorer 8, 9, or 10 (e-services now supports up to Internet 11); Microsoft Edge, Firefox, Safari 9, or Chrome.
-
Download the Acknowledgment File. Use the AIR Check Transmission Status screen to download the Acknowledgment File. You can use the Acknowledgment File to identify the rejected information in the submission. Use the instructions in Check My Submission Transmission Status to download and print the Acknowledgment File.
What is an Acknowledgment report? The Acknowledgment report lists the errors found in the electronic ACA test file that was sent to the IRS. If you need help, go to www.irs.gov or contact Caselle support at (800) 243-8275 for assistance.
Check My Submission Transmission Status
Find out if the IRS has accepted, accepted with errors, or rejected an ACA submission file. The transmission status will tell you if you need to create a replacement file or a correction file.
Checking the transmission status
1. Use Internet Explorer 8 or higher to navigate to www.irs.gov/for-Tax-Pros/Software-Developers/Information-Returns/Affordable-Care-Act-Information-Return-AIR-Program
2. Use the navigation menu on the right to find the section titled UI Channel Link.

IRS AIR website
3. Click the link titled AIR UI Channel Login - Production.
A confirmation dialog box displays.
4. Log in to the website.
Enter your user name and password.
This is the same user name and password that you use to log in to the IRS e-Services website.

IRS AIR Login page
Click Login.
The Select Organization page displays.
6. Navigate to the Transmission Status Record page.

TCC and Receipt ID Search Option on IRS AIR website
Enter your TCC and Receipt ID.
The Receipt ID is printed on the confirmation page that you printed when you submitted the electronic ACA files.
Click Find.
The Transmission Status Detail page displays.

Transmission Status on IRS AIR website
7. What is the transmission status?
-
The transmission status is Accepted. Great job! You’re done and you don’t need to create a replacement file or correction file.
-
The transmission status is Accepted with Errors. Click Download to save the acknowledgment file to the Downloads folder. You need to create and submit a correction file, go to Create and Submit a Correction File.
-
The transmission status is Rejected. Click Download to save the acknowledgment file to the Downloads folder. The error file name begins with “ACK...” and may be helpful to understand why the electronic ACA test file was rejected and what you can do to fix it. You need to create and submit a replacement file, go to Create and Submit a Replacement File.
Create and Submit a Replacement File
Use a replacement file when the transmission status is rejected. These instructions will show you how to review the employer information and employee information, and create and submit a replacement file to the IRS.
In this section
Step 1: Reviewing the employer’s information
1. Open Connect Payroll > Government Reporting > Organization.
2. Review the information on the General tab.
3. Review the information on the Federal tab.
4. Review the information on the ACA subtab on the Federal tab.
The Organization table is verified and correct.
Step 2: Reviewing the employee’s information
1. Open Connect Payroll > Government Reporting > ACA Employees.
2. Review the information on each tab.
The ACA employee records are verified and correct.
Step 3: Creating the replacement files
1. Open Connect Payroll > Government Reporting > Create Electronic ACA File.
2. Enter the Tax Year.
This is the tax year for the ACA information this file will replace.
3. Enter the ACA Form.
For assistance selecting a form type, follow the instructions on the www.irs.gov website for employers.
4. Enter the File Path.
This is the drive and folder where you want to save the ACA electronic file.
5. Enter the ACA Transmitter Control Code (TCC).

Transmission Control Code in Create Electronic ACA File
6. Use the Transmission Type menu to select Replacement.

Transmission Type in Create Electronic ACA File
7. Use the field titled Original Receipt ID to enter the receipt ID assigned to the rejected file.
Use the field titled Original Receipt ID to enter the receipt ID assigned to the rejected file.
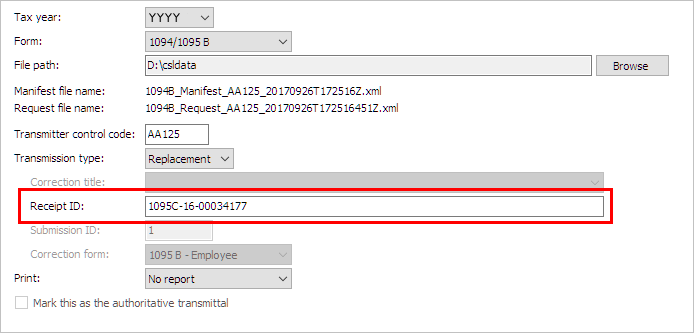
Receipt ID in Create Electronic ACA File
Where can I find the Receipt ID?
You can find the Receipt ID on the confirmation page and in the acknowledgment file.
8. Set up the checkbox titled Mark This As the Authoritative Transmittal.
What is an Authoritative Transmittal? “Every company with an EIN files an Authoritative Transmittal. You may file more forms if your organization is really large and responsibility is dispersed, but you must still have “one form to rule them all” (Colleen Stroh).

Mark This as the Authoritative Transmittal in Create Electronic ACA File
Are your ACA employees also reported on another entity’s ACA information return?
-
Yes, my ACA employees are also reported on another entity’s ACA information return. Do not select the checkbox titled Mark This As the Authoritative Transmittal.
-
No, my ACA employees are not reported on another entity’s ACA information return. Click to select the checkbox titled Mark This As the Authoritative Transmittal.
9. Click GO (CTRL+G).
Connect creates the electronic ACA files and an error log if errors exist. The electronic ACA files include two parts: (1) the manifest file includes the employer and software information and (2) the request file includes information for each reported employee.
Remember to fix any errors listed in the error log before you submit the replacement file to the IRS.
Create and Submit a Correction File
Use a correction file when the transmission status is Accepted, Accepted with Errors, or Partially Accepted. These instructions will show you how to use the Acknowledgment File to correct errors in the employer information, correct errors in the employee information, and create and submit a correction file to the IRS.
Note: Do not change values in the ACA Employee section after the original file has been transmitted to the IRS. The data for each employee must match the original information that was sent. Instead, make corrections in the ACA Corrections area.
In this section...
Step 1: Reviewing the Acknowledgement File
1. Download the Acknowledgement File from the Status page and open it using a text editor or browser.
2. Open the Request File that caused the “Accepted with Errors” status.
You can use the Unique Record ID from the Request File to view the file with the error. There may be more than one error in a single record.
Tip: Employee errors are marked with a <UniqueRecordID> that has three parts separated by a pipe ( | ) symbol.
Example: <UniqueRecordID>Part-1| Part-2| Part-3</UniqueRecordID>
How do I enter the record ID? The Acknowledgment File uses these variables [ReceiptID] | [UniqueSubmissionID] | [RecordID] to identify each record. If the Acknowledgment File shows [<UniqueRecordID>1095C-16-00034177|1|10</UnqiueRecordID>, then the Record ID displays in this position: 1095C-16-00034177|1|10
What does each part mean?
-
Part-1 is the Receipt ID
-
Part-2 is the Submission ID
-
Part-3 is the Record ID
What’s the difference between employee errors and employer errors?
Employer errors have a <UniqueSubmissionID> followed by only two parts where employee errors have three parts.
Example: <UniqueSubmissionID>1095C-16-00034177|1</UniqueSubmissionID>
3. Find the <RecordID> in the original Request File that matches the Record ID in the Acknowledgement File.

Record ID in the Acknowledgement File
4. Make note of the employee’s name in the section titled <EmployeeInfoGrp>.
This is the employee record that needs correction. You can find the section titled <EmployeeInfoGrp> in the Request File.

EmployeeInfoGrp in Acknowledgement File
5. To find the error type, find the section titled <ErrorMessageDetail>.
You can find the section titled <ErrorMessageDetail> in the Acknowledgement File.

ErrorMessageDetail in Acknowledgement File
Now that you know the employee and error type, you’re ready to correct the errors in the ACA file.
Step 2: Setting up the ACA correction file
1. Open Connect > Payroll > Government Reporting > ACA Corrections.
2. Select the Tax Year that needs correcting.
3. Enter a Correction Title.
The Correction Title is a description that you assign to the corrections that will be submitted together.
4. Enter the Receipt ID.
This is Part 1 of the UniqueRecordID or UniqueSubmissionID in the Acknowledgement
File. Example: 1095C-16-00034177
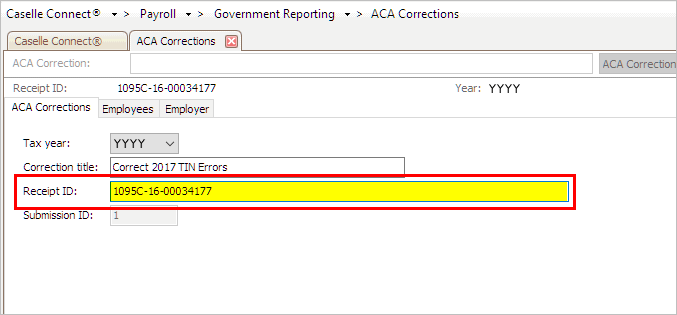
Receipt ID in ACA Corrections
You have set up the ACA Correction File, the next step is to correct the employee records. Leave the form open so you can complete the next step.
Step 3: Correcting employee records
1. Click to select the Employees tab.
2. Click Add ACA Employees.
3. Select the employee record that needs correcting.
4. Enter the Record ID from the Acknowledgement File.
5. Review each field and make corrections to the items that were identified in the Acknowledgement File.
Example: In the example error, employee with RecordID number 2 is Wanda Souter. She has the error “TIN Validation Failed” in the request record’s first field called IRS:SSN.
Follow the IRS instructions (see Publication 1586) to fix a TIN error:
-
Make an initial solicitation of individual and covered individuals’ TIN at an individual’s first enrollment or, if already enrolled by September 17, 2015, the next open reasons.
-
If you do not receive TINs, make the second solicitation at a reasonable time thereafter.
-
If TINs are still not provided, make a third solicitation by December 31 of the year following the initial solicitation.
Example (continued): Add Wanda Souter to the Correction File and then type in Wanda’s correct Social Security number.
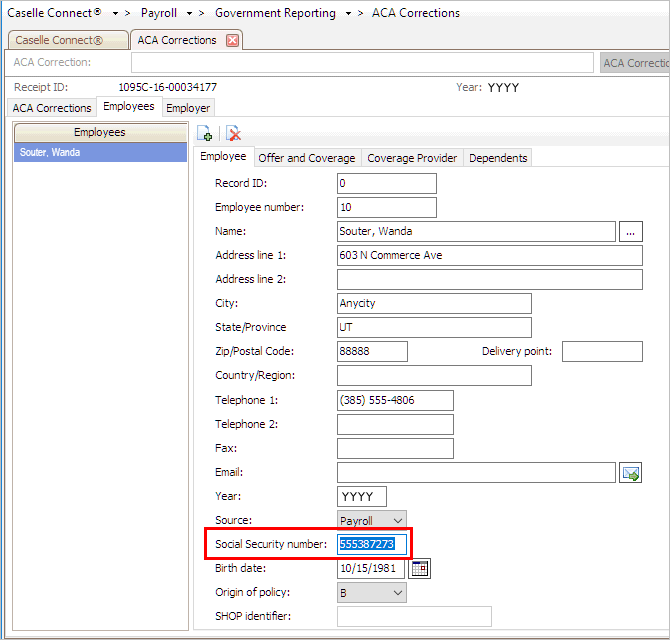
Social Security Number in ACA Corrections
Important! Do not close ACA Corrections if you need to add any corrections to the employer record.
Step 4: Correcting employer record
1. Select the Employer tab > ACA tab.
2. Review each field and make corrections to the files that were identified in the Acknowledgement File.
In the example of the employee Wanda Souter, the employer is identified as the Designated Government Entity’s Name of Person to Contact Is Missing. After a review of the employer’s information, the clerk discovers the Designated Government Information that displays in the field is not correct.
Remember, Designated Government Entity (DGE) information only applies if you are part of a larger government unit and you need to associate yourself with that larger designated government entity.
To correct the file when the DGE is wrong, you’ll need to remove the information in the section titled Designated Government Entity. Like this...

Designated Government Entity in ACA Corrections
3. Click Save (CTRL+S) and then click Close (CTRL+F12).
The ACA Correction File is saved and ready to submit to the IRS.
Step 5: Creating electronic files for submission to the IRS
1. Open Connect Payroll > Government Reporting > Create Electronic ACA File.
2. Select the tax year in need of correcting.

Tax Year in Create Electronic ACA File
3. Select the Form.

Form in Create Electronic ACA File
4. Enter the File Path.
This is the location where you want to save the corrected electronic ACA file.

File Path in Create Electronic ACA File
5. Enter the Transmitter Control Code (TCC).

Transmitter Control Code in Create Electronic ACA File
6. Select Correction as the Transmission Type.

Transmission Type in Create Electronic ACA File
7. Select Correction File as the Correction Title.
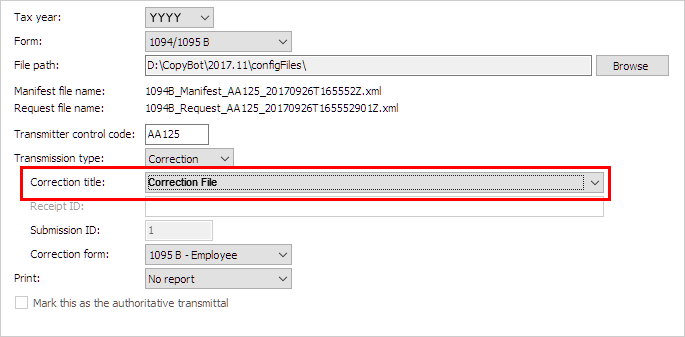
Correction File in Create Electronic ACA File
8. Verify the ReceiptID that displays in the Receipt ID field is correct for the selected correction file.

Receipt ID in Create Electronic ACA File
9. Use the field titled Correction Form to select the tax form that is being corrected.
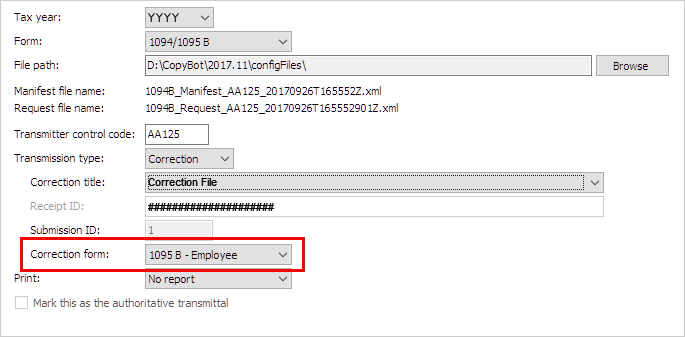
Correction Form in Create Electronic ACA File
10. Select the report option.
You can use this report to create the electronic ACA file, create the electronic ACA file and print a report; or print the electronic ACA file as report without creating the electronic ACA file.

Print in Create Electronic ACA File
What do you want to do?
-
Create the electronic ACA file. Use the Print menu to select No Report.
-
Create the electronic ACA file and print a report. Use the Print menu to select Report.
-
Print the electronic ACA file as report; do not create the electronic ACA file. Use the Print menu to select Report Only.
11. Click GO (CTRL+G).
Connect generates a set of files. To file electronically using AIR, click here for instructions.
Are you using Connect Human Resources?
Remember to update the employee files in Human Resources (Human Resources > Employees > Modify Existing Employees) with the changes that you’ve made to the employee files in the ACA Corrections table in Government Reporting.
Updated 26Sep2017
Copyright © 2020 Caselle, Incorporated. All rights reserved.