How do I set up a job?
Add a new job.
The options in Setup New Jobs and Modify the Existing Jobs will pull information from the entire Project Accounting application, which includes Materials Management and Asset Management, as well as retrieving customer information from Accounts Receivable.
Contents
Setting up a new job
1. Open Connect Project Accounting > Jobs > Setup New Jobs.
2. Fill in the options on each tab.
Job 1
Description/Detailed Description
Job 2
Invoice customer for project costs
Steps
Completed | Completed by } Completed date
Locations
Location number | Location description | Tax district | Map number | XYZ coordinate
Additional Costs
Pull List
Displays inventory on the project pull list.
Retirement
Displays retired inventory for the project.
3. Click Save (CTRL+S).
The job is saved.
2019.02
Options
Additional Costs
The options on the Additional Costs tab display the records that are related to the selected job. An additional cost refers to an estimated cost that is not linked to a job assembly or job location.
How do I add an additional cost?
On the Additional Costs tab, click Add a New Cost Item. Now, fill in the fields on the Additional Cost subtab.
How do I remove an additional cost?
On the Additional Costs tab, click to select an item from the Additional Costs list. Then, click Remove the Selected Cost Item.
Additional Parts
An additional part is an inventory item required by the job but has not been included in the assemblies that have been selected for the job. Use the options on this tab to add or remove additional parts from the Pull List.
Note: The options on the Additional Parts tab are available when the Materials Management interface is set to Caselle 4.x.
How do I add an additional part?
On the Locations tab > Additional Parts subtab, click Add Additional Parts.
How do I remove an additional part?
On the Locations tab > Additional Parts subtab, click to select an additional part from the Additional Parts list. Then, click Remove the Selected Additional Parts.
Approved budget
The approved budget is the dollar amount that has been authorized for this job.
As of date
The As of Date is the date the system will use to record the entry.
Do you want to use the current date as the transaction date?
-
Yes, I want to use the current date. Continue to the next step.
-
No, I want to use a different date. Click on the As of Date field to enter a MM/DD/YYYY.
Assembly code
An assembly code is a unique number name to an assembly.
Assemblies
An assembly is composed of many inventory items. For example, a water main uses a couple of meters, couplings, meg lugs, and about 1,500 feet of PVC pipe. All of those items - the meter, couplings, meg lug, and pipe - are recorded as individual inventory items but you can use an assembly to group those items together so you can issue all of the inventory that is needed to create a water main simply by requesting the assembly code that is labeled water main.
Use the options on the Locations tab to record the assemblies that are in use at the physical location.
Add an assembly
On the Locations tab > Assemblies subtab, click Add a New Assembly.
Remove an assembly
On the Locations tab > Assemblies subtab, click to select an assembly from the Assemblies list. Then, click Remove an Assembly.
Authorized by
The name listed in the authorized by field is the name of the individual who is responsible for approving the job.
What do you want to do? Choose an option.
-
Select the name of the individual from the Authorized By list. The Authorized By field is a self-validating field. Names that have been added to the list are saved.
-
Add a new name to the Authorized By list. You can click on the Authorized By field to type in a name.
-
Leave the Authorized By field blank. This field is not required. You can leave this field empty.
Authorized date
The authorized date is the MM/DD/YYYY when the job was authorized.
Completed
Steps can be waiting to be completed or completed. A completed task is a task that is finished.
What is the step status?
-
This step needs to be completed. Leave blank the Completed checkbox.
-
This step is finished. Click to select the Completed checkbox. Then, fill in the Completed By and Completed Date.
Completed by
Completed by is the name of the individual that is responsible for finishing the task.
Completed date
The completed date is the date the system will use to record the completed job/task.
Customer
A customer is an individual or organization that pays for project costs on a job.
What is the customer name?
-
I know the customer's name or number. Use the Customer field to enter the name or number of the customer being billed.
-
I don't know the customer's name. Use the Customer menu
 , to select Search to look
up a customer name.
, to select Search to look
up a customer name. -
I need to add a new customer. Use the Customer menu to select Add New.
-
I need to update a customer record. Use the Customer menu to select Modify.
-
Show me more information about the customer. Use the Customer menu to select Additional Information.
Customer type
A customer type is a label that defines the behavior for a customer group. The light blue background means the field is a self-validating field, in other words, you can use the items listed in the drop-down list, or you can add a new item.
What is the customer type?
-
I want to select an existing customer type. On the Job 2 tab, use the Customer Type drop-down list to select an option.
-
I want to add a new customer type. On the Job 2 tab, use the Customer Type field to enter a new customer type.
Description and detailed description
A description is a word or ph5ase that describes the character or features of the record. A detailed description allows you to enter a longer description, up to 250 characters, to provide additional context.
Find the Description field on these tabs:
-
Job 1 tab
-
Locations tab
-
Additional Costs tab
Find the Detailed Description field on this tab:
-
Job 1 tab
Department
A department is a section of an organization that handles a particular job or functions in a particular manner.
Is the invoice assigned to a department?
-
Yes, the invoice is assigned to a department. Use the Department field to select a department name.
-
No, the invoice is not assigned to a department. Select <blank> as the Department
Estimate
The estimate displays the projected amount for the additional cost.
Estimated Costs
An estimated cost is a cost that has been estimated or projected for a particular job. Use the options on the Locations tab > Estimated Costs subtab to view the projected costs for labor, equipment, material, and other.
General Ledger account
A GL account is an account in the General Ledger that records credits and debits. The General Ledger Account is located on the Job 1 tab.
What is the GL account to be billed?
-
I know the GL account. Use the GL Account field to type in a valid GL account.
-
I need to look up the GL account. Use the GL Account menu to select Search.
Includes non-mass units
A mass unit is construction asset that is created from similar inventory items. A power pole or cross arm is an example of a mass unit. A non-mass unit is an inventory item that is not part of a mass unit.
Does this job include non-mass units?
-
Yes, the job includes non-mass units. On the Job 1 tab, click to select Includes Non-mass Units.
-
No, the job does not include non-mass units. On the Job 1 tab, click to deselect Includes Non-mass Units.
Invoice customer for project costs
Use Invoice Customer for Project Costs to bill the cost of the job to a customer. This option will use the customer record from the Accounts Receivable database. When the Accounts Receivable interface is set to Caselle 4.x, this option is available.
What do you want to do?
-
I want to bill a customer. On the Job 2 tab, click to select Invoice Customer for Project Costs. Then, use the Customer field to enter a customer name or number.
-
I do not want to bill a customer. On the Job 2 tab, click to deselect Invoice Customer for Project Costs.
Inventory number
Inventory is the goods that you purchase to resell or goods that are used in the process of constructing. The inventory number is a unique number assigned to an inventory item.
Issued by
Issued by is the name of the individual who released the job.
Issued date
The Issued Date is the MM/DD/YYYY when the job is released.
Job number
A job number is a unique number that is assigned to the job. When you set up a new job, make sure the new job number fits the Job Number Mask.
Job type
A job type defines the accounting behavior for the related job. Examples of commonly used job types include: Construction, Contribution, Cost of Removal, Maintenance, and Retirement. You can associate a job type with a specific command, or action, that the system will perform when this job type is selected. If a job type incurs an overhead, you can set up the job type to apply the additional overhead fees.
What is the job type?
Use the Job Type field, on the Job 1 tab, to select an option.
Location description
Use Location Description to include additional information regarding the location.
Location number
A location number identifies each location with an associated project.
Locations
Use the options on the Locations tab to record the physical location for each assembly or inventory items.

How do I add a location?
On the Locations tab, click Add a New Location. Then, fill in the options on the subtabs for Location, Assemblies, Additional Parts, Estimated Costs, and Notes.
How do I change the properties on an existing location?
On the Locations tab, click to select a location from the Locations list. The location properties are displayed on the subtabs. Now, you can update the location properties.
How do I remove a location?
On the Locations tab, click to select a location from the Locations list. Now, click Remove the Selected Location.
Map number
The map number is a series of letters and numbers that have been assigned to a lot to help with identification. In most counties every parcel is assigned to a map number.
The light blue background means the field is a self-validating field, in other words, you can use the items listed in the drop-down list, or you can add a new item.
What do you want to do?
-
I want to use an existing map number. Use the Map Number drop-down list to select the number assigned to the parcel.
-
I want to add a new map number. Use the Map Number field to enter the series of letters and numbers in the map number that identify the parcel.
Pull list
When the Job Type is construction, use the options on the Pull List tab to select the inventory items for the job.
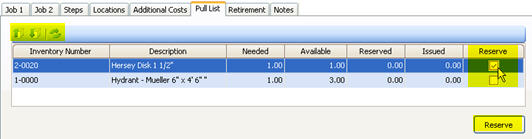
Reserve checkbox on the Pull List tab
How do I reserve the inventory?
Select the inventory to reserve by selecting the Reserve checkbox or click Select All. Then, click Reserve.
How do I select/deselect inventory?
-
To select inventory items one by one, click to select the Reserve checkbox located in the far-right column.
-
To select all of the inventory on the pull list, click the Select All button on the Pull List toolbar.
-
To deselect inventory, click to clear the checkbox or click Deselect All to clear all of the checkboxes.
How do I refresh the pull list?
If an assembly or inventory is added to the job, click Refresh to update the pull list with the new information.
Quantity
The quantity is the number of items.
What is the quantity?
Use the Quantity field to enter the quantity.
Recurring job
A recurring job is a job, including the related costs for labor and inventory, that needs to be recreated each year.
What do you want to do?
-
I want to create this job each year. On the Job 1 tab, click to select Recurring Job.
-
I will only use this job once. On the Job 1 tab, click to deselect Recurring Job.
Report-only jobs
A report-only job captures and tracks costs in Project Accounting. Report-only jobs will not create asset records or create closing entries in General Ledger.
Is this a report-only job?
-
Yes, this is a report-only job. On the Job 1 tab, click to select Report-only Jobs.
-
No, this is a standard job. On the Job 1 tab, click to deselect Report-only Jobs.
Required
A required task must be completed before the job can be closed.
Retirement
Use the options on the Retirement tab to retire assets from the job.
Note: The options on the Retirement tab will only be available if the Asset Management interface is set to Caselle 4.x.
How do I retire assets?
On the Retirement tab, use the Action drop-down list to select Retire.
How do I delete assets?
On the Retirement tab, click to select an asset from the Asset Number list. Then, click Remove Asset.
Start date
The start date is the day the job is initiated.
Status
The status is the state or condition of the job. A job is active when the job is in progress. A job is canceled when approval was not granted. A job is pending when the job is waiting for approval.
What is the job status?
-
The job is in progress. Select Active as the Status.
-
The job was not approved. Select Canceled as the Status.
-
The job is waiting for approval. Select Pending as the Status.
Step
A step is the description assigned to the task. For example, City XYZ's steps to complete are (1) Initial Setup, (2) Order materials, (3) Pull and deliver materials, (4) Construction phase, (5) Close project. When City XYZ creates a steps list in Project Accounting, it looks like this...

Steps tab in Setup New Job
Steps
The Steps show you the tasks in a series, or process, to set up, execute, and complete a job.
How do I add a step?
1. On the Steps tab, click Add a New Job Step.
2. Fill in the properties.
3. The routine will add the new job step to the bottom of the existing Steps list.
How do I remove a step?
1. On the Steps tab, click to select the step to remove.
2. Now, click Remove the Selected Job Step.
How do I change the display order?
1. On the Steps tab, click to select the step.
2. Click Move the Selected Step Up/Down until the step appears in the correct display order.
Tag number
A tag number is an identification number that is assigned to an asset. The purpose of a tag number is to track the asset.
Is the assembly assigned to the tag number?
Use the Tag Number field, on the Locations tab > Assemblies subtab, to enter the tracking number that is assigned to the assembly.
Tax district
The tax district is the physical area where the job will be completed. The light blue background means the field is a self-validating field, in other words, you can use the items listed in the drop-down list, or you can add a new item.
Location: This field is located on the Job 2 tab and Locations tab > Location subtab.
What do you want to do?
-
I want to select an existing tax district. Use the Tax District drop-down list to select an option.
-
I want to add a new tax district. Use the Tax District field to enter the name of a tax district.
Total estimated costs
The total estimated costs is the sum of the Total Estimated Additional Costs and Total Estimated costs for all locations.
Total estimated additional costs
The total estimated additional costs is the sum of the records that are displayed in the Additional Cost grid.
Total estimated costs for all locations
The total estimated costs for all locations is the sum of the equipment cost, equipment overhead, labor cost, labor overhead, material cost, material overhead, and other cost.
Type
A type defines the accounting behavior for the related additional cost. Use the Type drop-down list to define the additional cost.
X, Y, Z coordinate
A rectangular coordinate system that uses a horizontal axis (x), a vertical axis (y), and a third dimension (z), like this...

If your organization uses X, Y, Z coordinates to map a parcel, use the X Coordinate, Y Coordinate, and Z Coordinate fields to enter the measurements.
Location: These fields are located on the Locations tab > Assemblies subtab.
Copyright © 2025 Caselle, Incorporated. All rights reserved.