How do I void a check?
Checks
Create a reversing check entry to void a check. A void check is a check that is printed or partially printed that is canceled or deleted by the maker of the check before the check has been cashed.
Void a check when a check is issued for the wrong amount, issued to the wrong vendor, issued to a paid invoice, or issued and the check remains outstanding. You can also void a check that has been damaged or failed to print during the check printing process.
What's new?
-
Updated the look and feel of the view. Renamed the Reverse Invoice checkbox and named it the Void Invoices checkbox. The checkbox works exactly as it did in earlier versions. (2023.08)
Watch a video
-
Voiding a check without reversing the invoice vs. voiding a checking and reversing the invoice (8m6s) (which GL period to use, which option to use for cash or accrual basis, adding the bank number to prompt for value, and using Vendor Inquiry to verify a voided check.)
-
Fixing a voided check with an invoice that should be reversed (4m2s) (using adjust invoices to reverse an invoice, choosing the right GL period, and using Vendor Inquiry to verify the reversed invoice.)
-
Viewing different types of void checks on Check Register (1m42s)
-
Updating void checks to the General Ledger (2m24s) (reviewing GL Update report for encumbrances, invoice transactions, void checks, and impact to the GL.)
Option 1: Voiding a check using reset for reprint (Checks Report)
Use this option to reprint a check that was destroyed during the print process. For example, Jenny sends checks to the same printer that Pete is using to print a report. The report prints on the check stock. Now, Jenny needs to keep the check numbers from the destroyed checks for audit purposes and she needs to assign new check numbers and reprint the checks. Jenny uses void check number and reset for reprint.
Important! DO NOT use this option if the checks have been updated to the General Ledger.
Do this...
1. Open Connect Accounts Payable > Invoices and Payments > Print Checks.
2. Click  .
.
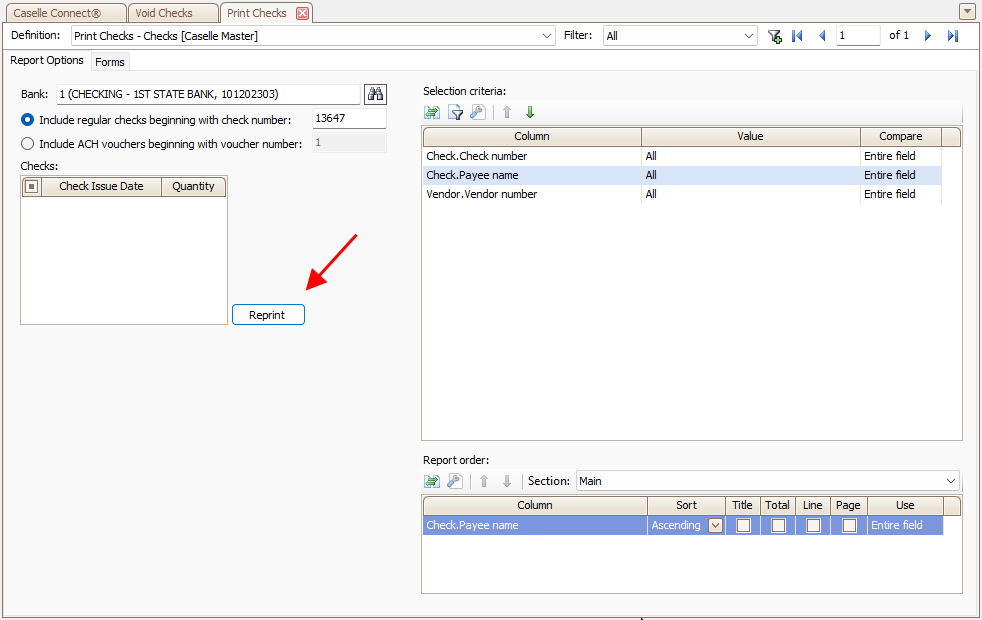
Reprint button
3. Select the damaged checks.
Click the checkbox to select a printed check to void.
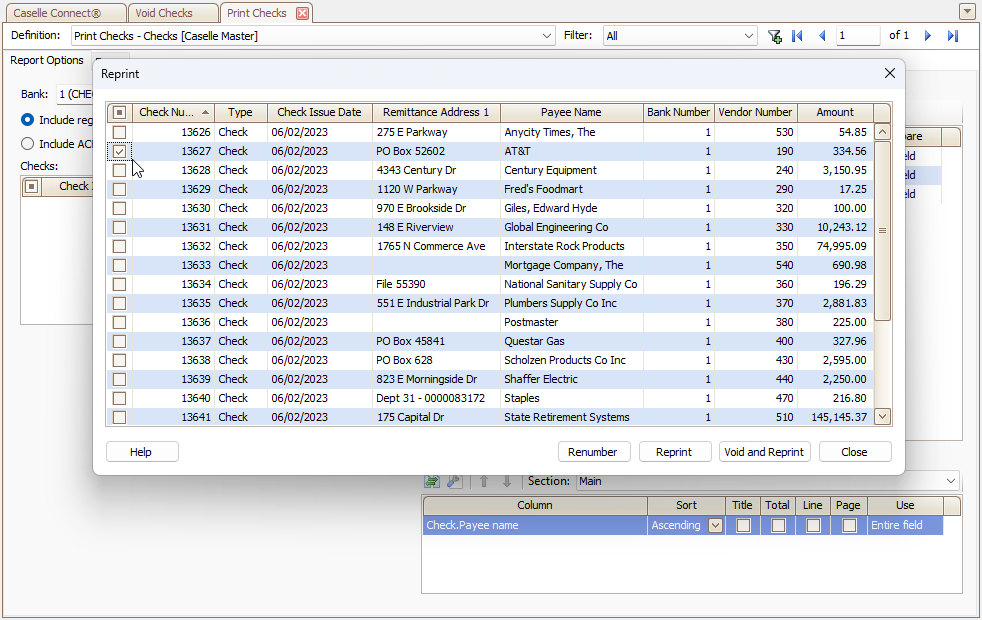
Reprint window
4. Click  .
.
Using this option will keep the check numbers in the system. But the check numbers will not be assigned to the vendor, which means that you won't be able to use Vendor Inquiry to look up the check numbers. The void check number will show up on the check register report in the check list for audit purposes. The void check number was never assigned to the vendor, so the vendor doesn't need to be tracked but the check number that was voided does need to be tracked.
5. Click  .
.
The check issue date for the void check will be displayed in the Checks box. The quantity column will show the number of checks that are waiting to print.
6. Click Print (CTRL+P) to print the check.
The check is voided and a new check prints.
202308, 2023Jun02
Option 2: Voiding a check without reversing the invoice
Use this option when
-
A check has been lost in the mail and you need to print a new check.
-
A check was printed for an incorrect amount.
-
A check was printed with the wrong address.
-
A check needs to be reissued using the original invoice.
Do this...
1. Open Connect Accounts Payable > Invoices and Payments > Void Checks.
2. Verify the Transaction Date is the current date.
The current date is the default date. The current date is the date that you want to use to record a voided check.
3. Do not select the Void Invoices checkbox.
Doing this will void the check without voiding the invoice. This means that you can use the same invoice to issue payment and you're not making any changes to the expenditure balance. The original expense remains in the period in which it was recorded.
4. Click GO  (CTRL+G).
The Enter Values form will ask for the check number and check issue date.
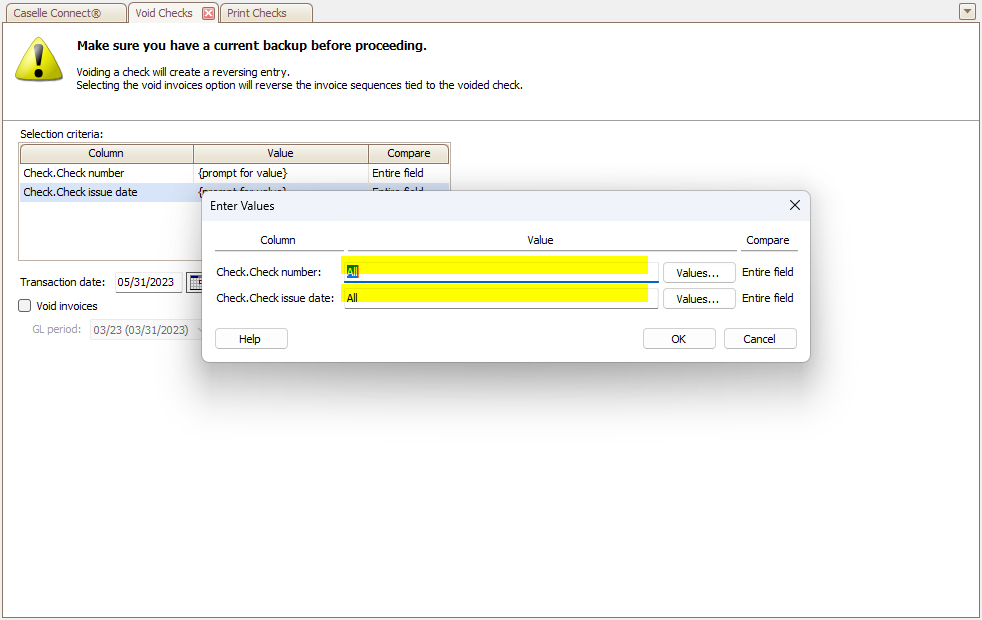
Enter Values form
5. Enter the check number and check issue date for the check that you are voiding.
If you're using the default settings for the selection criteria, then you will be prompted to enter the check number and check issue date. To restore the default settings, select Settings > Restore Caselle Settings.
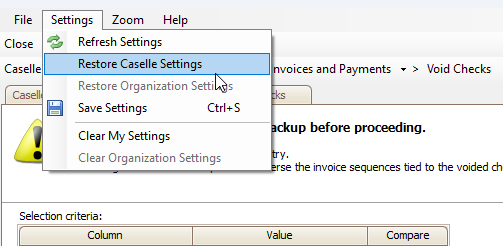
Settings menu
6. Click  .
.
Connect voids the check number that was created on the check issue date.
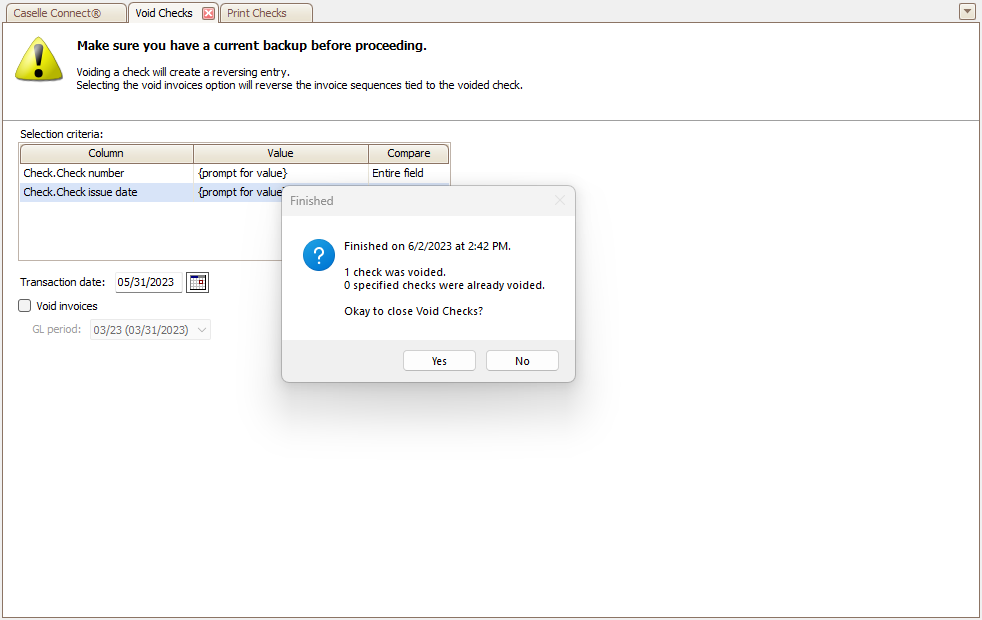
Finished dialog box
7. Now, you're ready to reprint the check.
-
Option 1: Use Select Invoices for Payment to reselect the invoice and print a new check.
-
Option 2: Use Enter Invoices to add another sequence to the invoice to correct the paid amount. Then, use Select Invoices for Payment to select the corrected invoice and print a new check.
8. At the appropriate time, update the voided check transaction to the general ledger.
Run Organization > Update General Ledger to post the voided check transaction to the general ledger. [More]
202308, 2023Jun02
Option 3: Voiding a check and reversing the invoice
Use this option when
-
A check was created for the wrong vendor.
-
A vendor was already paid and a check isn't needed.
-
A vendor did not need to be paid.
Important! Do use this option if any of the above apply AND you have updated the check to the general ledger.
Do this...
1. Open Connect Accounts Payable > Invoices and Payments > Void Checks.
To find the check issue date, GL period, amount, and so on, use Vendor Inquiry to look up a check number.
2. Verify the Transaction Date is the current date.
The current date is the correct date for recording voided checks. Do not change the date. This date is not related to the check issue date. Click this link for more information.
3. Select the Void Invoices checkbox.
This option will void the check AND void the invoice.
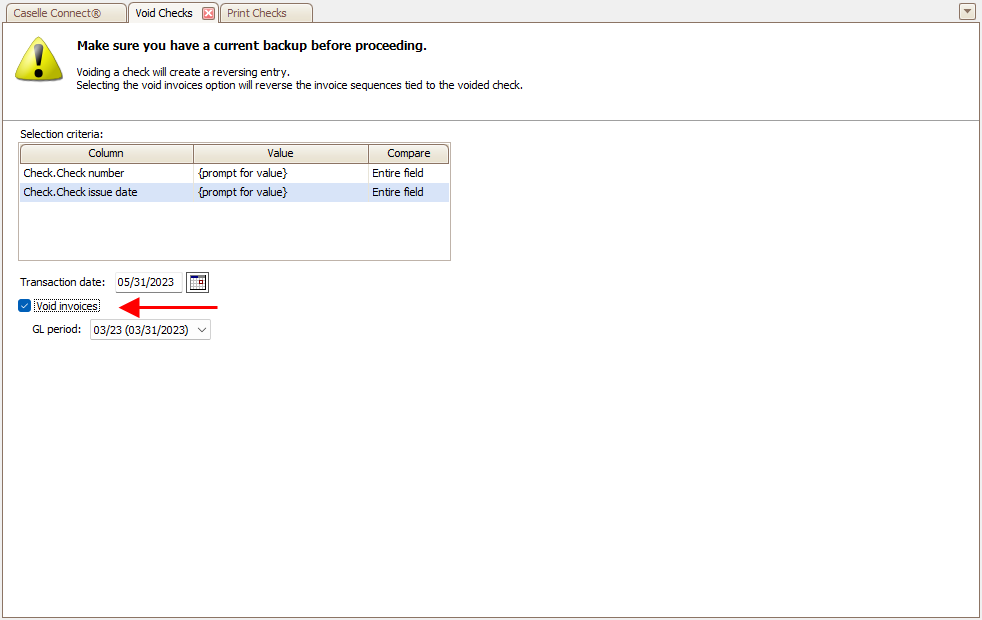
Void invoices checkbox
4. Select the GL period.
This is the GL period where the invoice will be voided. Usually, it's the current month that's open in the general ledger.
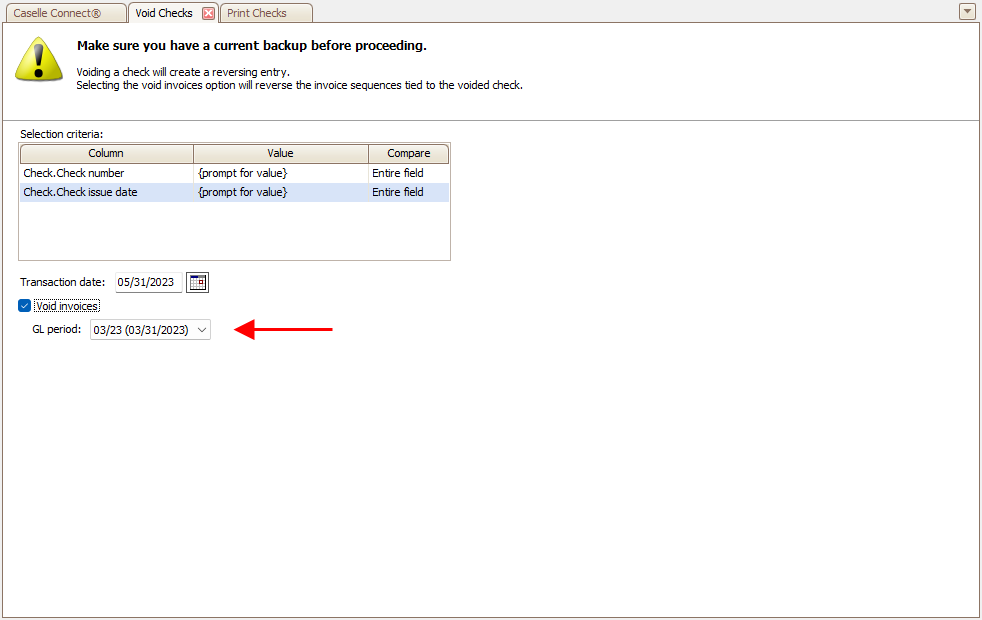
Void invoices, Gl period
5. Click GO  (CTRL+G).
The Enter Values form prompts for the check number and check issue date.
6. Enter the check number and check issue date for the check that you are voiding.
This step may be different for your organization. It depends on how your organization has set up the selection criteria. To restore the default settings, select Settings > Restore Caselle Defaults.
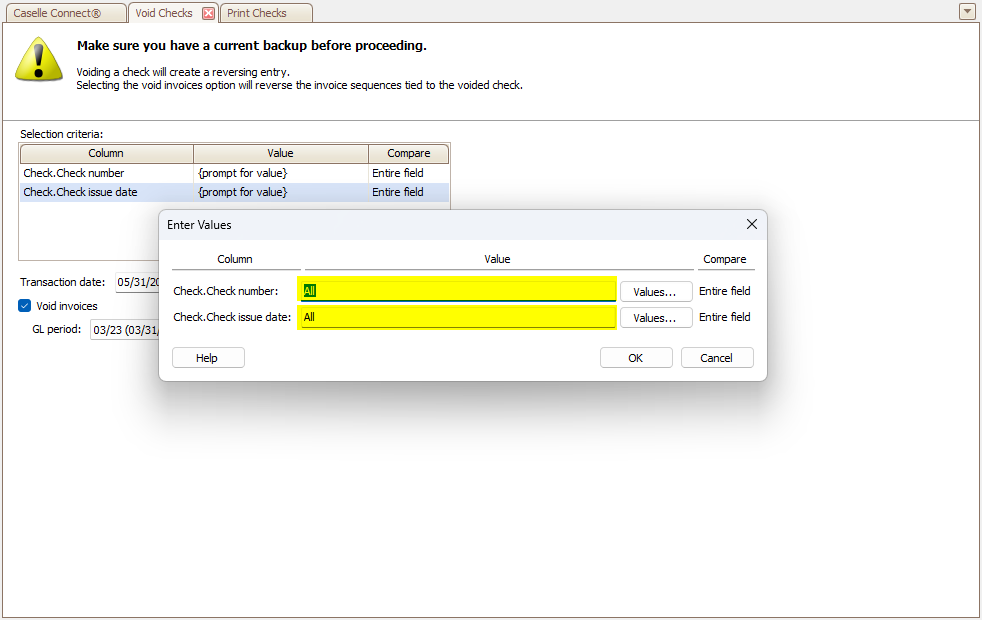
Enter Values form
7. Click  .
.
The check is voided and a reversing entry is recorded to void the invoice in the selected GL period. The dialog box will tell you how many checks were voided. Connect will add an adjustment entry to the check transaction that you can see on the Invoices tab > Single tab in Vendor Inquiry. Now, you have the original check sequence and a voided check sequence. There is no open balance for the invoice.
8. At the appropriate time, update the voided check transaction to the general ledger.
Run Organization > Update General Ledger to post the voided check and invoice transaction to the general ledger. [More]
202308, 2023Jun02
Why is the check issue date listed?
There are only two reasons why there is a check issue date showing in the Check Issue Date field. First, you just selected invoices for payment and now you're going to print the checks. Second, you are resetting for reprint or voiding and resetting for reprint.
Updated 14Jun2018
How does Print Checks assign check numbers?
When checks are selected, Connect assigns the check to a "0" check number. Connect will not look at the check numbers in Payroll or Check on Demand. It will only use the check numbers that have been assigned to checks in Accounts Payable. When you're ready to print checks, make sure the check number that you enter in the Beginning Check Number field matches the check number that is assigned to the first check in the check stock that is waiting to be printed.
Updated 14Jun2018
Why are there check numbers listed on the Reprint tab?
The Reprint tab will only display the checks that have not been updated to the general ledger.
Updated 18Jun2018
What is "reset for reprint"?
Use this option (on the Reprint tab) to clear off a check number. Connect processes the check as if it had never been processed before. The check number that has been reset for reprint will be displayed in the Check Issue Date field on the Report Options tab.
Updated 18Jun2018
How do I review voided checks?
Print the Check Register to review voided checks. You'll need to set up the Selection Criteria to include voided checks. See the help topic titled How do I include voided checks?
Updated 18Jun2018
How do I update the void check account?
The void check account is saved in the Organization table. Go to Connect Accounts Payable > Organization > Organization and then click on the Interfaces tab. The account that is saved in the Void Check Account field is the account that Connect will use to record the check numbers that you void and reset for reprint. The normal void check account will use the same account that is assigned to the invoice and bank account.
Updated 18Jun2018
I voided a check. Why doesn't the voided check display on my bank reconciliation?
If you printed and voided a check in the same GL period, Connect will not display the voided check on your bank reconciliation. But the voided check numbers will be included on the list of check numbers (see the section on How do I review voided checks?).
18Jun2018
When would I want to change the Transaction Date?
When you run Void Checks, the transaction date will default to the current date. In most cases, this is exactly as it should be. The general rule is to void checks in the working period. There is an exception, for example, if you have started a new period and you want to void a check from the prior period and the prior period is still open.
Warning! Using a period that occurs before the prior period will affect the bank reconciliation. If a check is voided in a period before the prior period, you will need to reconcile that period again.
18Jun2018
How do I add a prompt to the Void Check routine?
When you run Void Checks, you will be prompted to enter the check number, check issue date, and bank number. You can also add or remove information from the prompt by updating the Selection Criteria. Double-click on the Column header row to show the Selection form. Then, select the information to request. For example, City XYZ uses more than one bank to process checks. To make it easier to void checks, Jane adds Bank to the Selection Criteria and sets the value to {Prompt for Value}. Jane clicks the Save button and she chooses to save her changes for the entire organization. When any user runs Void Checks, the user will be prompted to enter the bank number in addition to the other information that is set up in the Selection Criteria.
18Jun2018
What if I forgot to check the Reverse Invoices checkbox?
If you forgot to check the Reverse Invoices checkbox, the invoice will show up in Select Invoices for Payment as an unpaid invoice. Determine how do you want to handle this situation?
-
If you're going to issue a payment, use Select Invoices for Payment to select the invoice and click GO. Next, run Print Checks to print the check.
-
If you're not going to issue payment and you want to remove the invoice so it is never paid, you need to record an adjustment entry to void the invoice. An adjustment entry will cancel the invoice from being paid. See the help topic titled How do I adjust invoices? The general rule is to record invoice adjustments in the current working period.
18Jun2018
Copyright © 2020 Caselle, Incorporated. All rights reserved.