How do I change my attachments location?
Attachments
By default, the files that you add as attachments use the file path to a specific location on a specific drive. To organize attachments for Connect, you can create a single folder to store the attachments. Attachments can be stored on a hard drive, network drive, or online drive. If you move where attachments are stored on a computer, network, or online drive, follow these instructions to change the location where attachments are stored.
Before you get started
-
Before proceeding, back up the current files. Always make a back up of the database BEFORE running routines that modify or delete transactions. See the help topic titled How do I back up the database?
-
Copy the attachments to the new location. For best results, don't change the location of the folders inside it.
Changing where attachments are stored on PC
You can change where your attachments are stored on a computer or network drive.
Locate your attachment files
-
Use Windows Explorer to navigate to the attachments directory on your computer, or
-
Use the Attachments view in Connect to look up the file path to the attachments directory on your computer.
Change where an attachment is stored - test
Replace the location of a single attachment with the new location to see if the new location shows the attached file. If the new location shows a "file not found" message, try checking the destination location and make sure it's typed in correctly in as the file name.
In this example, City ABC moved the attachment location from the c:\ drive to the d:\ drive. To test the new location, Jane replaces c:\attachments\um\acme_202103_utilitybill.pdf with the path to the new location: d:\attachments\um\acme_202103_utilitybill.pdf After she changes the file name, she sees the attachment pane shows the file that it finds in the new location so she knows the new location works.
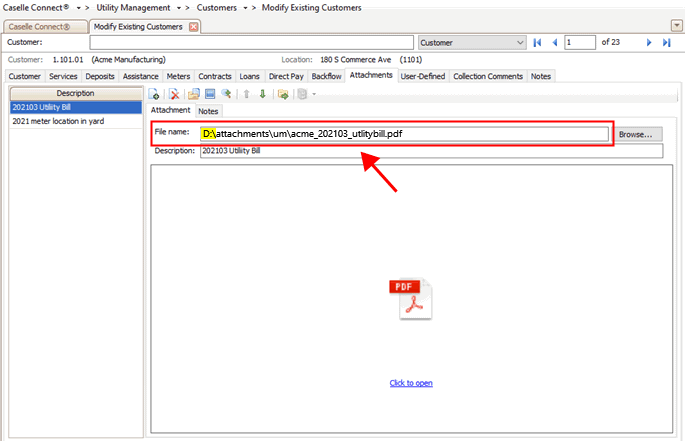
File name box
Change where an attachment is stored
Find and replace the file path on all of the attachments in an application with the new location. You can make changes to one application at a time.
Important! Make sure you have a backup before you continue.
Do this...
1. Open Connect System Management > Modify Data.
2. Select [application name].
3. Click Find and Replace a Field Value, and then click Next.

Find and replace field value option
Click Attachment.

Tables list
Click Filename.
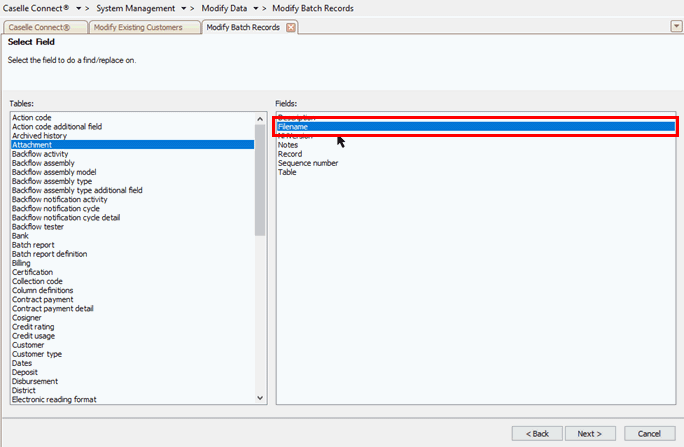
Fields list
Click Next.
4. Click Find Value.
Use the Find Value box to enter the attachments location.
-
Include the drive letter, file path, and backslash (\). Example: c:\attachments\
-
Do not include the file name. Example: c:\attachments\filename.pdf
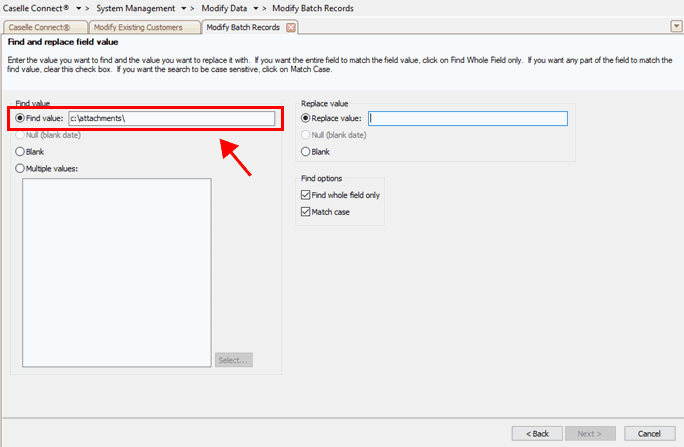
Find value box
Click Replace Value.
Use the Replace Value box to enter the new attachments location.
-
Include the drive letter, file path, and backslash (\). Example: d:\attachments\
-
Do not include the file name. Example: d:\attachments\filename.pdf
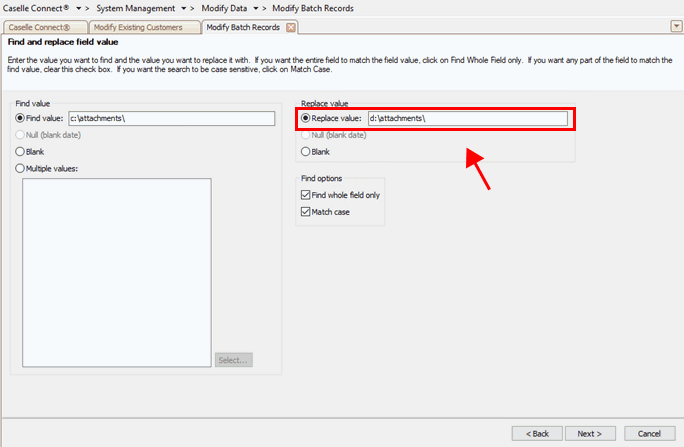
Replace value box
In Find Options, remove the checkmarks from the Find Whole Field Only and Match Case checkboxes.
Important! Do not run this routine without unchecking the Find Whole Field Only checkbox and Match Case checkbox. If these options are selected and the routine runs, you will need to use the backup file to restore the location.

Find options
Click Next.
5. Do not set up the selection criteria. Click Next.

Criteria window
7. Check the find value and replace value, and then click Continue.

Find and replace values window
Changing where attachments are stored on online drive
You can change where your attachments are stored on an online, cloud, or hosted drive.
Locate your attachment files
-
Use Windows Explorer to navigate to the attachments directory on the online drive.
Change where an attachment is stored - test
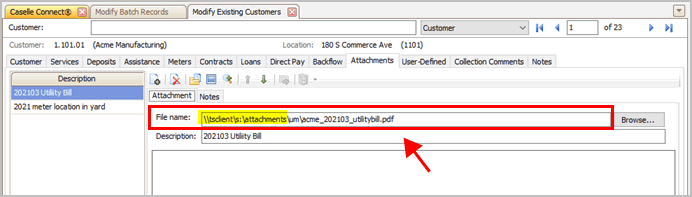
Replace the location of a single attachment with the new location on the online drive to see if the new location shows the attached file. If the new location shows a "file not found" message, try checking the destination location and make sure it's typed in correctly in as the file name.
In this example, City ABC moved the attachment location from the c:\ drive to an online drive. To test the new location, Jane replaces c:\attachments\um\acme_202103_utilitybill.pdf with the path to the new location: \\tsclient\s:\attachments\um\acme_202103_utilitybill.pdf After she changes the file name, she sees the attachment pane shows the file that it finds in the new location so she knows the new location works. (In some instances, the drive letter may exclude the colon (:): s\attachments\)
File name box
Change where an attachment is stored
Find and replace the file path on all of the attachments in an application with the new location. You can make changes to one application at a time.
Important! Make sure you have a backup before you continue.
Do this...
1. Open Connect System Management > Modify Data.
2. Select [application name].
3. Click Find and Replace a Field Value, and then click Next.
Find and replace field value option
Click Attachment.
Tables list
Click Filename.
Fields list
Click Next.
4. Click Find Value.
Use the Find Value box to enter the attachments location.
-
Include the drive letter, file path, and backslash (\). Example: c:\attachments\
-
Do not include the file name. Example: c:\attachments\filename.pdf
Find value box
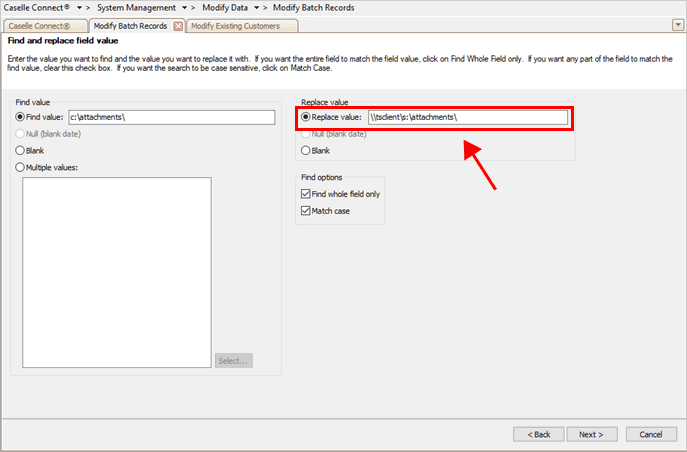
Click Replace Value.
Use the Replace Value box to enter the new attachments location.
-
Include the file path, drive letter, and backslash (\). Example: \\tsclient\s:\attachments\
-
Do not include the file name. Example: \\tsclient\s:\attachments\filename.pdf
Replace value box
In Find Options, remove the checkmarks from the Find Whole Filed Only and Match Case checkboxes.
Important! Do not run this routine without unchecking the Find Whole Field Only checkbox and Match Case checkbox. If these options are selected and the routine runs, you will need to use the backup file to restore the location.

Find options
Click Next.
5. Do not set up the selection criteria. Click Next.
Criteria window
7. Check the find value and replace value, and then click Continue.
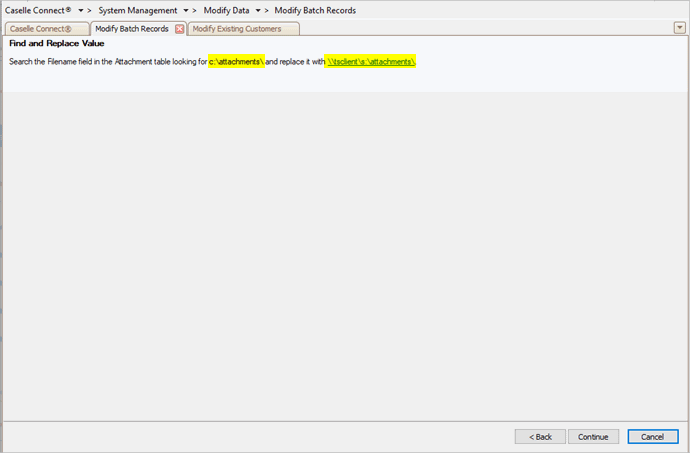
Find and replace values window
202102, 2021Jan25
Copyright © 2025 Caselle, Incorporated. All rights reserved.