
2020 ACA (Step 3 of 4)
Set up the ACA Reporting tools in the Human Resources application. ACA Reporting uses the information from Human Resources to show an employee’s benefits and record when an employee was offered coverage.
In this Topic Hide
Step 3. Set Up Human Resources
B. Set up and verify health insurance information
How do I add a benefit record for health insurance?
How do I verify health insurance information?
C. Print Pay Code Transaction Report for health insurance to review annual benefits
D. Add benefit level to employees
How do I add health benefits to employees?
How do I add health benefits to terminated employees?
F. Set up employee contact information
G. Print Benefit Enrollment Report
Step 1: Print the Benefit Enrollment Report for Active Employees
Step 2: Print the Benefit Enrollment Report for Terminated Employees
Videos
Learning how to set up ACA options in Human Resources. Watch a video (11m05s)
IRS requests the name of a person in the organization to use as the ACA contact. If the IRS has any questions regarding the ACA forms submitted by the organization, the IRS will contact this individual. The contact’s name and telephone number will print as the contact name and telephone number on the ACA forms that the organization will print for the IRS and employees.
Do this...
1. Open Connect Human Resources > Organization > Organization.
The contact information displays on the Organization tab in Organization.
Human Resources > Organization > Organization
2. Enter the Contact Name.
The contact name is the name of the person the IRS will use as the ACA contact for the organization.
3. Enter the Contact Number.
This is a ten-digit telephone number.
4. Click  .
.
The ACA contact information is saved.
202011, 2020Dec03
ACA Reporting pulls the employee’s benefit information from the Human Resources module. If you do use Human Resources, you’ll need to add a benefit record for health insurance and verify the health insurance benefit is assigned to each employee who has health insurance.
Does your organization use Human Resources for ACA Reporting?
Yes, my organization uses Caselle Human Resources for ACA Reporting. If your organization has already set up a benefit record for each health insurance provider, verify the contact information for the health insurance provider has been recorded correctly. See the section titled How do I verify health insurance information?
Yes, but Caselle Human Resources is not set up for ACA Reporting. You’ll need to complete this section to set up a benefit record for each health insurance provider and add the benefit record for health insurance to employees with health insurance. See the section titled How do I add a benefit record for health insurance?
No, my organization does not use Caselle Human Resources. You can manually complete the ACA Reporting information. Or you can contact your Client Relationship Manager (CRM) at (800) 243-8275.
Add a benefit record for each health insurance provider that your organization uses to provide health insurance.
Videos
Using the Self Insured checkbox. Watch a video (1m19s)
Understanding Self Insured. Watch a video (0m58s)
Entering insurance/coverage provider and adding plans for employees. Watch a video (1m44s)
Do This...
1. Open Connect Human Resources > Organization > Benefits.
2. Click New  (CTRL+N).
You’re going to add a new benefit called Health Insurance.
3. Enter the Description.
Click to select the field titled Description and then enter “Health Insurance”.
If you will create a benefits record for more than one health insurance provider, add the provider’s name to the description. For example, Health Insurance - ETNA, Health Insurance - Blue Cross/Blue Shield, and so on.
4. Set up the health insurance options.
You’ll need to set up the benefit to allow dependant benefits and flag the benefit as health insurance. Click to select the checkbox titled Allow Dependent Benefits and the checkbox titled Health Insurance.

Health insurance options
5. Set up the Insurance/Coverage Provider.
This section stores the name and contact information of the health insurance provider.
Remember... You need to add a benefit record for each health insurance provider. Which means if your organization uses more than one health insurance provider, you will have more than one benefits record. For example, Organization ABC uses ETNA and Blue Cross/Blue Shield, so Organization ABC creates two benefit records: one benefit record for ETNA and a second benefit record for Blue Cross/Blue Shield.

Insurance/Coverage Provider
6. Set up the health insurance levels.
Use the options on the Levels tab to add a level for each plan provided by the health insurance provider.

Benefit levels
To add a level, click Add a New Benefit Level
 . After you add a description, use the Pay Code box
to select the pay code for the health insurance level. Human Resources
will use the pay code information from Connect Payroll to fill in the
employee and employer sections.
. After you add a description, use the Pay Code box
to select the pay code for the health insurance level. Human Resources
will use the pay code information from Connect Payroll to fill in the
employee and employer sections.

Add a New Benefit Level button
Waived Coverage Level: You will also need to add a level for waived coverage.
Repeat the instructions in this section to add another level to the health insurance provider. When all of the levels have been added to the benefit, you’re ready to move on.
If your organization has already set up a benefits record for each health insurance provider, use the instructions in this section to make sure the saved benefit information is correct.
Videos
Using position types and benefits in Human Resources. Watch a video (1m50s)
Do this...
1. Open Connect Human Resources > Organization > Benefits.
2. Use the HR Benefit box to enter the health insurance name. Press Enter.

HR Benefit box
3. Review the information that is saved on the Benefit tab.

Benefit tab
4. Review the information that is saved on the Levels tab.
You’ll want to click on each level to review the pay code, employee portion, and employer portion.

Levels tab
5. If you have more than one health insurance provider, review the next benefits record for health insurance.
For example, if your organization uses more than one health insurance provider, then you will have a benefit record for each health insurance provider.
Is there another benefit record for health insurance?
Yes, there’s another benefit record for health insurance. Repeat steps 2 through 5 to verify the health insurance information on the next benefit record.
No, I’ve checked every benefit record for health insurance. You’re done with this section.
Print the Pay Code Transaction Report for ACA Year End to verify the employee and employer deductions. In this step, you’re checking to see if you have added the benefit pay codes to all of your employees.
Videos
Using the Pay Code Transaction Report to review annual benefits. Watch a video (2m06s)
Do this...
1. Open Connect Payroll > Employees > Pay Code Transaction Report.
2. Use Title box to select Pay Code Transaction Report - ACA Year End.
What if the Pay Code Transaction Report - ACA Year End is missing from the report menu? The Pay Code Transaction Report - ACA Year End report is a custom report that you will need to import, set up, and save. To learn how, see How do I set up the Pay Code Transaction Report - ACA Year End?
3. Change the report date range to select the calendar year.
Find the section titled Report Dates and click the Advanced Options link.

Payroll > Employees > Pay Code Transaction Report
When the Report Dates Advanced form displays, use the options on the form to select calendar year date as the Beginning Date Type and Ending Date Type.

Report Dates Advanced Form
Click OK.
4. Click Print  (CTRL+P).
The report generates.

Pay Code Transaction Report - Health Insurance
5. Review the report.
Does the report include all of the employees that are insured or were insured by the organization for the calendar year?
Yes, all of the employees in the organization are listed on the report. Great! Move on to the next question.
No, the report is missing employees. You’ll need to review the employee records for the employees who are missing from the report (Payroll > Employees > Modify Employees). You want to make sure the employee is assigned to a health insurance benefit pay code.
Does the report show that each employee is assigned to a health insurance benefit?
Yes, all of the employees are assigned to a health insurance benefit pay code. That’s good news. Go on to the next step.
No, some employees have not been assigned to a health insurance benefit pay code. You’ll need to review the employee records for the employees who are missing from the report (Payroll > Employees > Modify Employees). You want to assign the employee to a health insurance benefit pay code.
Remember, you can assign employees who have denied an offer of coverage to the level titled Denied Coverage or Waived Coverage.
You’ve checked the health insurance benefit pay code on each employee and now you’re done with this step.
If you're using Connect to file ACA, will need to check the position type and benefits.
If you have terminated employees with continuing health coverage, fill in the COBRA options on the Termination tab in Human Resources.
If your organization is self insured, fill out the contact information for your employees, add the employee's dependents (SSN, Dependent, or Lifetime Dependent), and then add the dependent's benefit. Adding this information will ensure the correct information converts to the 1095 Forms.
Important! Assign each full time or applicable employee in the organization to a benefit level.
In this section...
How do I add health benefits to employees?
How do I add health benefits to terminated employees?
Videos
Printing Benefit Enrollment Form. Watch a video (2m55s)
Adding benefits to employees, adding benefits to terminated employees, and adding benefits to employees on COBRA. Watch a video (2m17s)
Setting up ACA Requirements on a benefit, including examples of origin of policy. Watch a video (5m34s)
Adding benefits to terminated employees. Watch a video (1m09s)
Explaining the purpose of the Termination tab (Human Resources) for ACA. Watch a video (1m03s)
If an employee has not been assigned to a benefit level, follow the instructions in this section to add a benefit level to an employee’s record. You can also use the Pay Code Transaction Report to identify which employee records in the Human Resources application are missing the health insurance benefit pay code. Each eligible employee needs to be assigned to a health insurance benefit level.
Do this...
1. Open Connect Human Resources > Employees > Modify Existing Employees.
2. Use Employee box to enter an employee’s name or number. Press Enter.
3. Click the Positions tab.

Positions tab in Modify Existing Employees
4. Verify the position type is correct.
Make sure the position type shows a full time position as Full Time. The ACA Form 1095 will count all non-full time positions (part time, seasonal, and volunteer) as part time.

Position Type box
5. Click to select the Benefits tab.
Follow these instructions to add a new health insurance benefit to an employee. If the benefit level for health insurance has already been added to the employee, you can skip to step 10.

Benefits tab in Modify Existing Employees
6. Click Add a New Benefit Level .

Add a New Benefit Level button
The Add Employee Benefit dialog box displays.

Add Employee Benefit
7. Use the Benefit menu to select Health Insurance.

Selecting Health Insurance as the Benefit.
8. Use the Benefit Level menu to select the benefit level to assign to the employee.
When you select Health Insurance as the benefit, the only benefit levels that show up in the Benefit Level menu are the benefit levels that are assigned to the selected benefit.

Assigning a benefit level to a benefit.
9. Skip the Start and End Dates.
You do not need to enter a start or end date on a benefit level. Connect applies the start and end date to the pay code in Payroll to determine when to calculate the benefit.
Videos
Learn more about entering a start date on a benefit level. Watch a video (1m29s)
10. Click to select the ACA Requirements subtab.
You’ll need to verify the Date, Origin of Policy, SHOP Identifier, Offer of Coverage, Employee Share, Safe Harbor Code, and Employee Status.
Videos
Setting up ACA Requirements on a benefit, including examples of origin of policy. Watch a video (5m34s)

ACA Requirements subtab on the Benefits tab
Date
Use this field to enter the date when the health benefit begins. When you add a new benefit, Connect will use the current date as the default date. You can replace the default date with the date when the health insurance benefit began.
Origin of Policy
This field is required to file the 1094 and 1095-B Forms.
(A) Small Business Health Options Program (SHOP)
(B) Employer-sponsored coverage
(C) Government-sponsored program
(D) Individual market insurance
(E) Multiemployer plan
(F) Other designated minimum essential coverage
What if I don't know the origin of policy for my organization? Contact your health insurance provider. Caselle cannot tell you which origin of policy is correct for your organization.
SHOP Identifier
If an employee uses the Small Business Health Options Program (SHOP) to find their own health insurance provider, whoever they use to obtain health insurance will provide the employee with a SHOP Identifier code. This is the field where you will record the employee’s health options program.
Note: This field is only available if the Origin of Policy is (A) Small Business Health Options Program (SHOP).
Line 14: Offer of Coverage (Post-employment (non-COBRA) Coverage)
See 2019 Instructions for Forms 1094-C and 1095-C, page 11 at www.irs.gov (https://www.irs.gov/pub/irs-pdf/i109495c.pdf).
Employee Share
If the Offer of Coverage is 1A, skip this field.
If the Offer of Coverage is not 1A, use the field titled Employee Share to enter the minimum premium cost.
What is the minimum premium cost? This is the lowest cost of coverage for employee-only coverage. If the employer offers 100% coverage per employee, the Employee Share is 0 (zero).
What If an employee selects a more expensive plan to cover their family? This is not the amount that you will use as the Employee Share. Enter the lowest cost of coverage paid by the employer for the employee.
Line 16: Safe Harbor Code (Code Series 2—Section 4980H Safe Harbor Codes and Other Relief for ALE Members)
See 2019 Instructions for Forms 1094-C and 1095-C, page 12 at www.irs.gov (https://www.irs.gov/pub/irs-pdf/i109495c.pdf).
When you have assigned a benefit level to each employee, you’re ready to move on to the next step: Set Up Employee ACA Information
Form 1095 uses this information to show how many months the terminated employee had health insurance coverage.
Videos
Explaining the purpose of the Termination tab (Human Resources) for ACA. Watch a video (1m03s)
Do this...
1. Open Connect Human Resources > Employees > Modify Existing Employees.
2. Use the Employee box to enter an employee name, and then press Enter.

Employee box
3. Go to the Termination tab > COBRA tab.

Cobra tab
4. Enter the following information.
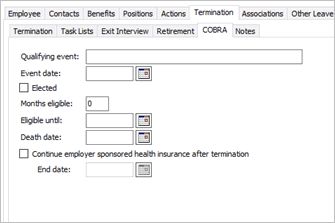
Cobra information
Qualifying Event
Enter a description of the qualifying event.
Event Date
Enter the termination date.
Elected
Select this checkbox.
Months Eligible
Enter the number of months the terminated employee is eligible to receive COBRA.
Eligible Until
Enter the end of the date range the terminated employee is eligible to receive COBRA. .
Death Date
If the employee died and the employee's spouse or family is eligible for COBRA, enter the employee's death date.
Continue Employer Sponsored Health Insurance After Termination
Select this checkbox and enter the End Date. The End Date is the date when the benefit expires.
Form 1095 uses this information to show how many months the terminated employee had health insurance coverage.
5. Click Save  (CTRL+S).
The health insurance benefit is set up for a terminated employee.
202011, 2020Dec08
The Employee ACA Information is the employee’s contact information for employer’s who are self-insured.
Videos
Waiving coverage and self insured. Watch a video (1m27s)
Is the employer self-insured?
Yes, the employer is self-insured. The employer is required to submit the employee and their dependent’s contact information and the benefits to the insured. Use the list of self-insured employees to complete the next step: Set Up Employee Contact Information.
No, the employer is not self-insured. If the employer is not self-insured, then the employer does not need to add the employee’s contact information. You're ready to print the Benefit Enrollment Report. Go to the section titled G: Print Benefit Enrollment Report.
14Dc2017
For each employee who is self-insured, add the employee’s contact information for the employee’s dependents and the benefits to the insured to the employee’s record in Human Resources.
Does this person qualify as a dependent?
This person is under the age of 26 years. Yes, this person is a dependent.
This person lives with the employee as a dependent. Yes, this person is a dependent.
This person is over the age of 26 OR does not live at home. No, this person is not a dependent.
Remember, individuals under the age of 26 qualify as a dependent and individuals who are living in the home qualify as a dependent.
Videos
Adding contact information for self-insured employees. Watch a video (2m11s)
Do This...
1. Open Connect Human Resources > Employees > Modify Existing Employees.
2. Use the Employee box to enter an employee name, and then press Enter.
Employee box
3. Click to select the Contacts tab.

Contacts tab
4. Click Add a New Contact .

Add a New Contact button
5. Enter the dependent’s name and contact information.

New contact form
Name, Address, Telephone, and Email
Enter the dependent’s name, address, telephone number, and email address. If the dependent's address is the same as the employee's address, click to select the Use Employee Address checkbox.
Relationship
Select the dependent’s relationship to the employee.
Birth date
Enter the dependent’s date of birth. This field is required. Format: MM/DD/YYYY
Social Security number
Enter the dependent’s Social Security number. Do not key the dashes.
The IRS prefers a Social Security number AND a date of birth. However, if a SSN is not available, the date of birth will be sufficient. If you enter a SSN and a date of birth, only the SSN will be included on the 1095 Form.
Use Employee Address
Select this checkbox if the dependent lives at the employee's address.
Emergency Contact
If the dependent is the employee’s primary contact in case of emergency, click to select the checkbox titled Emergency Contact.
Dependent
Click to select this checkbox. You will not be able to add benefits to the dependent unless this checkbox is selected.
Lifetime
If the dependent is over the age of 26 and the dependent will continue to depend on the employee for care throughout the life of the dependent, click to select the checkbox titled Lifetime. (For example, a spouse is an example of a lifetime dependent.)
Beneficiary
If the dependent will receive any payout or restitution from the health insurer should the employee be unable to receive the payout or restitution, click to select the Beneficiary checkbox.
6. Enter the dependent’s benefits.
Click to select the Benefits subtab and click
Add a New Benefit (use the toolbar on the Benefits
subtab instead of the main toolbar).
Remember... You can only add benefits to a dependent if the Dependent checkbox is selected and the employee has the benefit.

Add a New Benefit button
When the Add a Benefit form displays, use the Benefit menu to select the benefit to add to the dependent.

Add a Benefit form
Use the Begin and End dates to track the dates when a dependent starts or stops using a benefit.

Begin date box, End date box
7. Does the employee have other dependents?
Yes, the employee has another dependent. Use the Contact form in Modify Existing Employees to add the next dependent.
No, all of the dependents for the employee are listed as a contact. You’re ready to enter the dependents for the next employee. Continue to enter the dependents for all of the employees in the organization.
You have recorded the dependents for all of the employees who are self-insured. You’re ready to Print Benefit Enrollment Report.
202011, 2020Dec08
The next step is to print the Benefit Enrollment Report to make sure that all of the employees have health insurance and are recorded in Caselle as having health insurance.
You will print the Benefit Enrollment Report twice. Once for active employees and again for terminated employees.
Do this...
1. Open Connect Human Resources > Employees > Benefits Enrollment Report.
2. Use the Title menu to select Benefit Enrollment Report [Caselle Master].
3. Use the default report dates as the report date range.
4. Change the Benefits to include only Health Insurance.
Find the field titled Benefits to Include and click Select.

Human Resources > Employees > Benefit Enrollment Report > Benefits to Include Field
Use the Selection form to remove all benefits except for the health insurance benefit, and then click OK.

Benefit Enrollment Report > Selection Form: Select Health Insurance as the only benefit.
5. Do not select the checkbox titled Include Terminated Employees.

Include terminated employees checkbox
6. Click Print (CTRL+P).
The Print Setup form displays.
7. Click to deselect the checkbox titled Close Program After Printing.
You will run this report again for terminated employees. Deselecting this checkbox will keep the report open with the report settings that you have selected.

Close program after printing checkbox
8. Click OK.
The Benefit Enrollment Report shows all active employees. Employees with the health insurance benefit will read Active under the Status column and the employes without the health insurance benefit will read Not Added.
202011, 2020Dec08
Use the same report set up that you used to print the Benefit Enrollment Report for active employees to print the report for terminated employees. Make sure you select the checkbox titled Include Terminated Employees.
Do this...
1. Open Connect Human Resources > Employees > Benefits Enrollment Report.
2. Use the Title menu to select Benefit Enrollment Report [Caselle Master].
If the Benefits Enrollment Report is set up and open, you can skip to step 5.
3. Use the default report dates as the report date range.
4. Change the Benefits to include only Health Insurance.
5. Click to select the Include Terminated Employees checkbox.
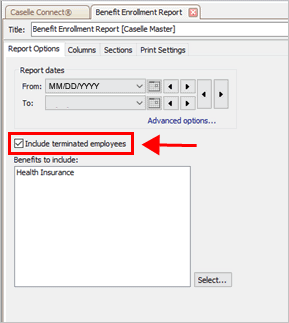
Include terminated employees checkbox
6. Click Print (CTRL+P).
The terminated employees for the ACA reporting year print on the report. You will use this information to include the employees who were terminated during the ACA reporting year on the ACA reports.
202011, 2020Dec08
Use the Benefit Enrollment Report for active employees to verify that each employee has health insurance. Do not worry about the benefit amount. Each employee that is listed on the report should also have a health insurance benefit.

Benefit Enrollment Report - Health Insurance
Does each employee with benefits have health insurance?
Yes, each employee has health insurance. Great! You’re ready for the next step.
No, there’s an employee who does not have health insurance. Write down the name of the employee who does not have health insurance and use Set Up and Verify Health Insurance Information to add a health insurance benefit to the employee.
Is the employee linked to the right health benefit?
Yes, each employee is linked to the correct health benefit. Move on to the next step.
No, there’s an employee who is linked to the wrong health benefit. Use Modify Existing Employees in Human Resources to update the health benefit that is assigned to the employee.
Begin and End Dates: Make sure that you enter the Begin and End Dates when you add a health benefit. Payroll needs these dates to calculate the correct amounts on the payroll check and benefits.
Does the report show any employees with a status of “Not Added”?
Yes, I have employees who are “Not Added”. You’ll need to check the employee’s record to verify that the employee doesn’t have employer sponsored coverage and should not be included or you’ll need to add a health insurance benefit to the employee (see Set Up and Verify Health Insurance Information to add a health insurance benefit to the employee).
No, I do not have any employees who are “Not Added”. Nice job. Go on to the next step.
When you finish this step, you have verified that each employee has health insurance and each employee is linked to the correct health benefit. Now you’re ready for Step 4: Set Up ACA Annual Reporting.
201911, 2019Dec23