How do I set up a loan?
Overview
A loan is used more often then not to set up a tap loan. A tap loan means the city is going to loan the customer the money because the city knows the customer cannot afford it. In this situation, the city sets up a loan and loan service.
Use a loan to add an extra amount to the account balance. Setting up a loan will record the frequency and number of payments the customer will pay each period or cycle.
Running Calculate Automatic Billings will create billing transactions that apply the billed amount to the Loan service.
Running the General Ledger Update updates loans to the General Ledger just like any other billing service; however, the original loan amount never updates to the General Ledger.
When the loan is repaid, the loan status changes to Paid Off and billing transactions will stop calculating.
Canceling the loan will not create any adjustments to the customer's account balance. The billed amount remains on the account and any un-billed amount will no longer be billed.
Contents
Watch a video
Before you get started
Set up a loan service in the Services table (Organization > Services). See the help topic titled How do I set up a loan service?
Guidelines
An account may have only one active loan for each service.
If more than one loan is set up on an account, you will also need to set up multiple loan services.
If a service, which has a loan tied to it, needs to be disconnected, you will need to cancel the loan first.
Important! If the amount is already included on the account, use a contract instead of a loan.
Loan Type: Fixed Amount vs. Number of Payments
Use fixed amount to select the payment amount. The routine will divide the loan amount by the payment amount to determine the loan length.
Loan Amount / Payment Amount = Loan Length
Use number of payments to select the loan length. The routine will divide the loan amount by the number of payments to calculate the payment amount.
Loan Amount / Number of Payments = Payment Amount
Setting up a loan for a fixed amount
Use fixed amount to select the payment amount. The routine will divide the loan amount by the payment amount to determine the loan length.
Loan Amount / Payment Amount = Loan Length
Do this...
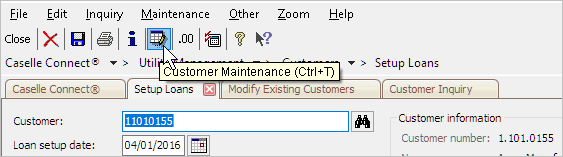
1. Open Connect Utility Management > Customers > Setup Loans.
2. Enter a Customer.
3. Enter a Description.
Example: Tap Loan
4. Select a Service.
This is the loan service that you set up in the Service table (Organization > Services).
5. Enter the Amount.
This is the loan amount.
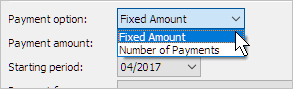
6. Select Fixed Amount as the Payment Option.
7. Enter the Payment Amount.
This is the amount to bill the customer each period.
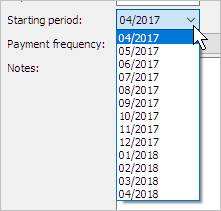
8. Select the Starting Period.
The default setting will start the loan in the current period, however, you can change the starting period to begin later in the year.
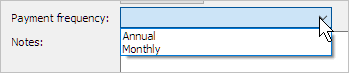
9. Select the Payment Frequency.
This is the frequency to bill the customer the payment amount.
10. Enter Notes.
You can use this space to enter any additional notes or comments about the contract.

11. Click Save (CTRL+S).
The loan for a fixed amount is set up. The loan amount is saved. You can look up the customer's contract in Customer Inquiry.
Setting up a loan for number of payments
Use number of payments to select the loan length. The routine will divide the loan amount by the number of payments to calculate the payment amount.
Loan Amount / Number of Payments = Payment Amount
Do this...
1. Open Connect Utility Management > Customers > Setup Loans.
2. Enter a Customer.
3. Enter a Description.
Example: Tap Loan
4. Select a Service.
This is the loan service that you set up in the Service table (Organization > Services).
5. Enter the Amount.
This is the loan amount.
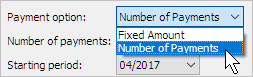
6. Select Number of Payments as the Payment Option.
Payment Option
7. Enter the Number of Payments.
The default setting will start the loan in the current period, however, you can change the starting period to begin later in the year.
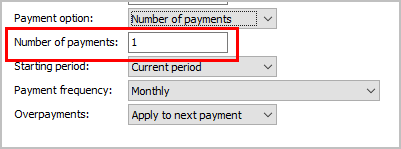
Number of Payments
8. Select the Starting Period.
This is the period when the loan begins.
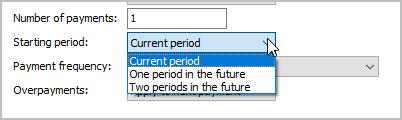
Starting Period
9. Select the Payment Frequency.
The default setting will start the contract in the current period, however, you can change the starting period to begin later in the year.
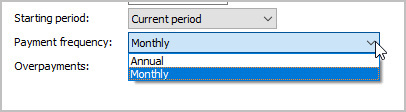
Payment Frequency
10. Select the Overpayments.
This setting determines how overpayments will be applied to the loan. Use Apply to Loan Balance to subtract the overpayment amount from the total loan balance. Use Apply to Next Payment to subtract the overpayment from the payment that is due the following month.
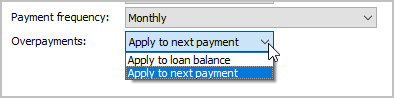
Overpayments
10. Enter Notes.
You can use this space to enter any additional notes or comments about the contract.

Notes
11. Click Save (CTRL+S).
The loan for the number of payments is set up. The loan amount is saved. You can look up the customer's contract in Customer Inquiry.
Updated 14Jun2018
Changing the default loan options
Use Options (F12) to set up the program's default properties. These properties give you a way to change how information is displayed and choose default settings.
Select the Default Cancel Option
Use Cancel the Loan to cancel the loan and cancel unbilled amounts. Use Cancel the Loan and Bill the Unbilled Amount to cancel the loan and add unbilled amounts to the customer balance. Use Permanently Delete the Loan to delete the loan and cancel unbilled amounts.
Stop at Notes tab
When the cursor moves through the fields, stop the cursor at the Notes tab so the user has an opportunity to enter a comment. The user can save the loan with or without adding notes.
Description
Enter the default value to display in the Description field.
Service
Select the default service to display in the Service field.
Amount
Enter the default loan amount to display in the Amount field.
Payment Option
Select the default payment option. Use Fixed Amount to bill a fixed amount each month until the loan is paid off. Use Number of Payments to divide the loan amount by the number of payments and then bill that amount each month.
Payment Amount
Enter the default payment amount for a fixed amount to display in the Payment Amount field. This value only displays when the payment option is fixed amount.
Number of Payments
Enter the default number of payments for number of payments to display in the Number of Payments field. This value only displays when the payment option is number of payments.
Starting Period
Select the default starting period for a loan.
Overpayments
Select the default setting for applying an overpayment. Use Apply to Next Payment to subtract the overpayment from the billed amount for the next month. Use Apply to Loan Balance to subtract the overpayment from the total loan amount.
Updated 14Jun2018
Billing a loan
Run Automatic Billings to bill loans. Usually, running Automatic Billings is part of the steps checklist for Utility Management. See the help topic titled How do I calculate automatic billings?
Automatic Billings will calculate the customer's normal billings for each month plus the contract billing.
Canceling a loan
You have three options.
1. Cancel a loan. This option will cancel the loan and cancel unbilled amounts.
2. Cancel the loan and bill the unbilled amount. This option will cancel the loan and add the unbilled amount to the customer balance.
3. Permanently delete the loan. This option will delete the loan and delete unbilled amounts.
Important!
Canceling a loan will not delete transactions from the current or past periods.
If a loan is canceled before it is billed, the Service field will be blank.
Do this...
1. Open Connect Utility Management > Customers > Modify Existing Customers.
2. Look up the customer account.
3. Click the Loans tab.
The customer's loan display in this pane.
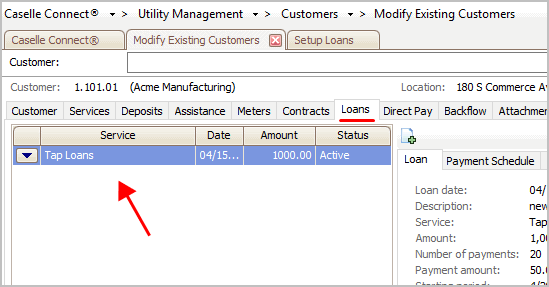
Loans
4.
Click the menu  button.
5. Select Cancel the Loan from the menu.
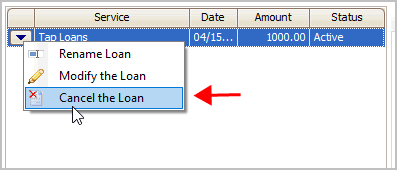
Cancel the Loan
You may be prompted to enter an Authorization Password.

Authorization Password
The Cancel Loans dialog box displays.

Cancel Loans dialog box
What do you want to do?
I want to cancel the loan and cancel unbilled amounts. Click Cancel the Loan.
I want to cancel the loan and add unbilled amounts to the customer balance. Click Cancel the Loan and Bill the Unbilled Amount.
I want to permanently delete the loan and delete it from the customer record. Click Permanently Delete the Loan.
Updated 14Jun2018
Printing Loans
Use the Loan List (Reports > Loan List) to print a list of customers with loans. See the help topic titled Loan List.
Updated 14Jun2018
Viewing loans in Customer Inquiry
You can view a customer's loan setup, payment schedule, payoff amount, and notes in Customer Inquiry.
Do this...
1. Open Customer Inquiry.
You can click the Customer Inquiry icon from any one of the Utility Management menus...

Inquiry button
...or click the Customer Inquiry button on the toolbar.
Customer Maintenance button
The status bar, located to the right of the toolbar, will show an icon when a customer has a contract or loan.
2. Enter a customer name or number. Press Enter.
If a customer has a contract and a loan, or multiple loans, a Multiple Contracts/Loan form displays on the screen. All of the customer's contracts and loans, by date, are shown. Click on the contract or loan which you wish to view and then click OK.
3. Click the Customer tab > Loans subtab.
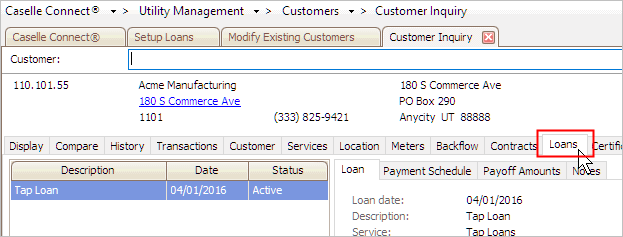
Loans tab in Customer Inquiry
How do I extend loan periods and adjust amounts?
You can set up a loan to manage customers who can't afford the current payment amount or need extra time to pay.
Updated 23Jul2018
How do I set up a loan on a final billed customer?
You can set up a loan on a customer who has been final billed.
Updated 23Jul2018
Copyright © 2025 Caselle, Incorporated. All rights reserved.