How do I enter manual billings?
Create a billing for an item that will only be billed once.
A manual billing is a billing that was created as a single, or one-off, bill. For example, Jane uses a manual billing to enter tax, interest, and penalty amounts.
Contents
Entering manual billing
1. Open Connect Utility Management > Customers > Enter Manual Billings.
2. What is the customer name or number?
-
I know the customer name or number. Use the Customer field to enter the name or number.
-
Help me find the customer name or number. Click Search.
3. Is the transaction date correct?
-
Yes, the date is correct. Press Enter to continue to the next step.
-
No, the date is not correct. Click on the Date field to enter a different date.
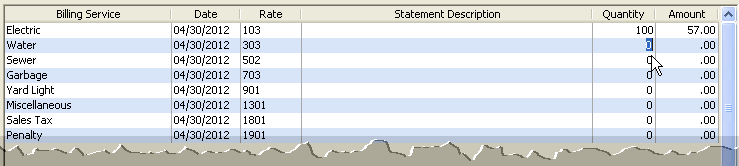
4. The Billing Services grid displays the customer's services, the date the service was billed last, and the rate at which the service was billed.
5. Complete the following information to bill a service.
-
Statement description. Enter a transaction description (optional).
-
Quantity: Enter the quantity to bill.
-
Amount: Enter the amount to bill.
6. Press Enter to move through the remaining fields.
7. Click Save (CTRL+S).
The manual billing is saved.
Deleting manual billings
1. Open Connect Utility Management > Customers > Enter Manual Billings.
2. In the Customer field: Enter a valid customer name or number. You can Search this field.
3. In the Date field: Enter the date the manual billing was created.
4. Click Delete (CTRL+D).
The manual billing is deleted.
Options
Billing service grid
Use the Billing Service grid to enter the quantity and amount to bill for each billing service. Use the Statement Description field when you want to display a different description on the manual billing statement.
Columns to stop at
In this instance, a column refers to a column in the Billing Service grid. Billing Service, Date, Rate, Statement Description, Quantity, and Amount are examples of columns. Use Columns to Stop At to prompt the user to enter a value by stopping the cursor at the selected column. You can change the default setting on the form, or you can use the mouse to click on each column.
Do you want to change the default setting to stop at columns?
-
Yes, I want to stop at columns. Click Options (F12). Use the options in Columns to Stop At to select the checkbox that corresponds to the column name. When a user press Enter or Tab to move to the next field, the cursor will stop at the selected column.
-
No, I do not want to stop at columns. Click Options (F12). Use the options in Columns to Stop At to deselect the checkbox that corresponds to the column name. When a user press Enter or Tab to move to the next field, the cursor will skip the selected column.
Customer
A customer is an individual or organization that purchases a commodity or service.
What is the customer name?
-
I know the customer's name or number. Use the Customer field to enter the name or number of the customer being billed.
-
I don't know the customer's name. Click Search to look up a customer name.
Date
The Input Date is the date the system will use to record the transaction.
Do you want to use the current date as the input date?
-
Yes, I want to use the current date. Continue to the next step.
-
No, I want to use a different date. Click on the Date field to enter a MM/DD/YYYY.
Display all/selected services
Use this option to choose the services to display in the Billing Service grid.
What do you want to do?
-
Show all services. Click Options (F12). Click Display All Services.
-
Let me select the services to display. Click Options (F12). Click Display Selected Services. The list displays all of the available services. Press and hold CTRL, and then click to select the services to include in the Billing Services grid.
Troubleshooting
How do I change the date?
Explanation: Dates for manual billings that are entered using the current system date will shift to the final bill date when the account is closed.
This text displays in the comments section, "This transaction was originally dated on MM/DD/YYYY and it has already been updated to the General Ledger before the final bill was completed."
Action: You can change the date to any date that occurs within the current period/cycle. However, the manual bill date will be adjusted to the final or temporary disconnect date when using certain routines.
Copyright © 2025 Caselle, Incorporated. All rights reserved.