How do I insert digits to a customer number segment?
Expand a segment in an existing customer number.
Use Insert Digits to a Customer Number Segment to add an extra digit to the existing customer number.
Contents
Before you get started
-
Back up the database. See the help topic titled How do I back up the database?
Inserting a value in a customer number segment
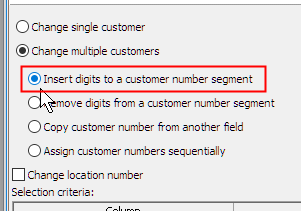
1. Open Connect Utility Management > Customers > Change Customer Numbers.
2. Click Change Multiple Customers.
3. Click Insert Digits to a Customer Number Segment.
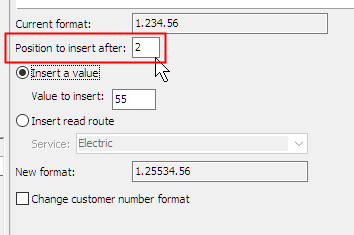
4. Enter the Position to Insert After.
The Current Format displays the customer number as it presently appears in the database. Each position in the segment is assigned to a number. Position 1 is 1, position 2 is 2, position 3 is 3, and so on. Therefore in the customer number that displays in the Current Format, there are three segments. Segment 1 is one digit and starts with position 1 and ends with position 1; segment 2 is three digits and starts with position 2 and ends with position 4; and segment 3 is two digits and starts with position 5 and ends with position 6.
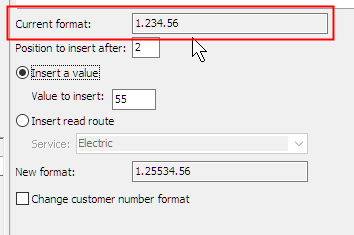
Use Position to Insert After to enter the digit that occurs before the location where you wish to insert the new digit. Example: If the current customer number format is 1.2345.6 and you want to insert the number(s) between 2 and 3, then you would enter the number 2 in the Position to Insert After field.
5. Click Insert a Value.
When you Insert Digits to a Customer Number Segment, you can insert a value or reading route. Use value when you want to define the number. Use Reading Route to insert the customer's reading route into the current customer number.
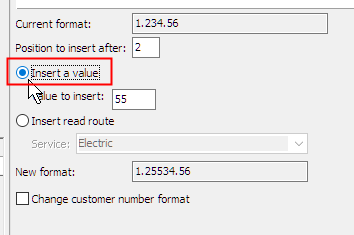
6. Enter the Value to Insert.
Use this field to enter the value that you want to insert into the customer number.
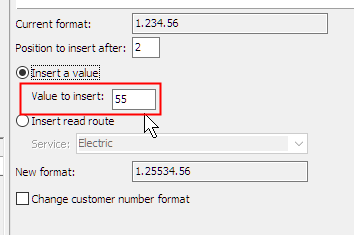
7. Verify the New Format.
The New Format field uses the options that you have selected to display the new customer number format. In the image above, the settings insert "55" at position 2: 1.25534.56. If the new customer number format is not correct, change the settings until the new customer number format is formatted correctly.
8. When the New Format displays correctly, click GO (CTRL+G).
The routine adds the value to the selected segment in the customer numbers.
Inserting read route in a customer number segment
1. Open Connect Utility Management > Customers > Change Customer Numbers.
2. Click Change Multiple Customers.
3. Click Insert Digits to a Customer Number Segment.
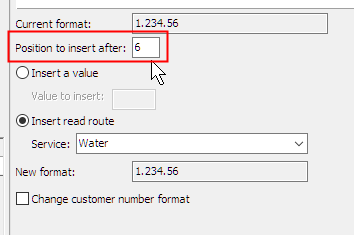
4. Enter the Position to Insert After.
The Current Format displays the customer number as it presently appears in the database. Each position in the segment is assigned to a number. Position 1 is 1, position 2 is 2, position 3 is 3, and so on. Therefore in the customer number that displays in the Current Format, there are three segments. Segment 1 is one digit and starts with position 1 and ends with position 1; segment 2 is three digits and starts with position 2 and ends with position 4; and segment 3 is two digits and starts with position 5 and ends with position 6.
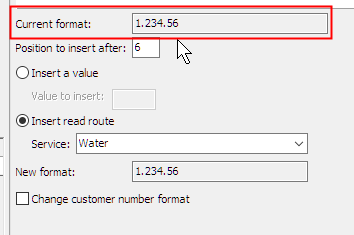
Use Position to Insert After to enter the digit that occurs before the location where you wish to insert the new digit. Example: If the current customer number format is 1.2345.6 and you want to insert the read route after position 6 then you would enter the number 6 in the Position to Insert After field.
5. Click Insert Read Route.
Select the metered service with the read route that you want to insert in the customer number.
6. Click GO (CTRL+G).
The routine adds the read route from the metered service to the position in the customer number format.
Copyright © 2025 Caselle, Incorporated. All rights reserved.