Payroll Year-end Checklist
Print the reports you’ll need to verify payroll transactions for the calendar year. You should be running the GL Update every pay period.
Videos
In this Topic Hide
Step 3: Verify year-to-date information
A. Verify the General Ledger updates for the calendar year
B. Print Payroll History for the calendar year
How do I print the Payroll History report?
C. Print the Annual 941 Report for the calendar year
How do I print the Annual 941 report?
D. Print the Employee Tax Summary for the calendar year
Compare the Annual 941 report totals to the Quarterly 941 report totals
Compare the Annual 941 report to the Payroll History report
Verify with your General Ledger person that all of the Payroll updates have posted correctly to the General Ledger for the entire year. If this is your responsibility, you will need to check each journal for duplicate entries.
If you missed an update, you would receive an error that tells you when a pay period has not been updated to the General Ledger.
Videos
You have two options to review journal entries...
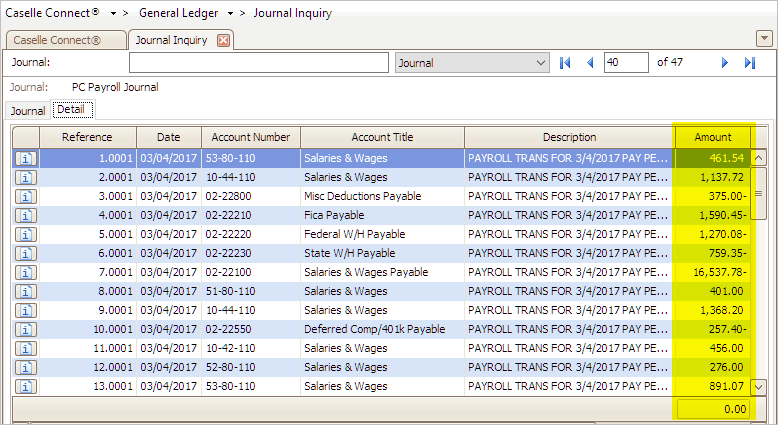
Use Journal Inquiry to review each journal for duplicate entries. Remember, you can use Journal Inquiry to view journal entries on the screen or you can print a report to view the journal entries on paper.
What if an update was updated more than once or deleted? The Checkout Report will not find this type of error. You’ll need to check the General Ledger for duplicate transactions or missing transactions.
Do this...
1. Open Connect General Ledger > Journal Inquiry.
2. In the Lookup bar, enter the desired journal code.
In other words, PC, PB, CDP, CDPT, or the corresponding journal codes used by your site.
CDP, Payroll Checks
CDPT, Transmittal Checks*
PB, Payroll Benefits
PC, Payroll Compensation
*Only review the CDPT journal if you use transmittals. If you don’t use
transmittals, you can skip reviewing the CDPT journal.
3. Click the Detail tab.

Journal Inquiry > Detail tab
4. Verify that no duplicate entries exist in the journal for any pay periods for the entire year being closed.
This should be straightforward. Any duplicates should already have been caught during General Ledger Bank Reconciliation.
5. Verify that the entries exist for each pay period.
6. Update missing entries and correct duplicate journal entries as needed.
7. Repeat steps 2 to 6 for each of the payroll journals that your site uses.
When there are no duplicate journal entries and all of the pay periods show the correct entries, you’re ready to print the Payroll History report.
If you prefer to review the journals on paper rather than on the screen, follow these steps to print the Journals report. If you used Journal Inquiry to review the journal entries, you can skip to the step to print the Payroll History report.
Do this...
1. Open Connect General Ledger > Reports > Journals.
2. In the Selection Criteria, double-click on the Value column heading.
3. Enter the desired journal code (in other words, PC, PB, CDP, or CDPT) in the Enter Value field.
4. Click Accept.
5. Double-click All for [Report].Date and set the beginning and ending dates for the entire calendar year being closed (01/01/YYYY - 12/31/YYYY).
6. Click Preview (Ctrl+Q) to preview the report, or Print (Ctrl+P) to print the report.
7. Verify that entries exist for each pay period.
8. Check the report for duplicate journal entries for any pay periods for the entire year being closed.
This should be straightforward. Any duplicates should already have been caught during General Ledger Bank Reconciliation.
9. Update missing entries and correct duplicate journal entries as needed.
When there are no duplicate journal entries and all of the pay periods show the correct entries, you’re ready to print the Payroll History report.
Updated 05Sep2018
The Payroll History report lists the entire year’s activity for each employee, including check numbers and year-to-date totals.
Use the Payroll History report to balance the Annual 941 report later. Comparing the data on these two reports will ensure that the information is correct, then you can move on to printing the W-2s.
You will also use this report again in Print W-2s to compare it with the data on the Payroll Conversion report.
Videos
Tip! The Payroll History report for the entire year can be quite lengthy. You may wish to start the print job just before you leave the office for the evening or at some other time when printer traffic is low.
Do not throw the Payroll History report away. State and Federal laws require that you keep payroll data for several years. After you have finished using the Payroll History, you should store this report in your archives.
Print the Payroll History report for the entire calendar year.
Do this...
1. Open Connect Payroll > Reports > Payroll History.
2. Select Payroll History—By Calendar Year from the Title drop-down list
3. Verify that the report dates select the entire calendar year.
How do I change the date range for annual reports?
4. Next, click Print (Ctrl+P).
5. When the Print Setup form displays, click OK.
6. Set the printed report aside. You’ll use it later to reconcile the Annual 941 report.
The Payroll History report prints for each employee. At the end of each employee, the report prints the employee’s year-to-date totals. The last page of the report shows you the grand total for all employees. Set the printed report aside. You’ll need it in a few more steps.
Updated Dec2016
The Annual 941 report is one more way to verify that your annual payroll data is in agreement:
Compare the Annual 941 report total with the total of all the Quarterly 941 reports for the year.
Compare the Year-to-Date totals from the 941 report with the totals found on the Payroll History.
Videos
Print the 941 report for the entire calendar year (01/01/YYYY to 12/31/ YYYY). Use this report for reconciling Payroll History and matching the W-3s. Do not mail this report.
Why do I need the Annual 941 report? Use the Annual 941 report to report wages/tips for this quarter, including those paid to qualified new employees on line 5a-5c.
Do this...
1. Open Connect Payroll > Reports > 941 Report.
2. Change the report Date Range to select the check issue dates for the entire calendar year being closed.
How do I change the date range for annual reports?
3. Click to remove the checkmark from the Print Detail Report checkbox.
4. Click to select the checkbox titled Print Form.
5. Click Preview (Ctrl+Q) to preview the report, or click Print (Ctrl+P) to print the report.
6. From the Printer Form screen, select the desired printer.
7. Verify the printer settings, and then, click GO (Ctrl+G).
The 941 Report prints.
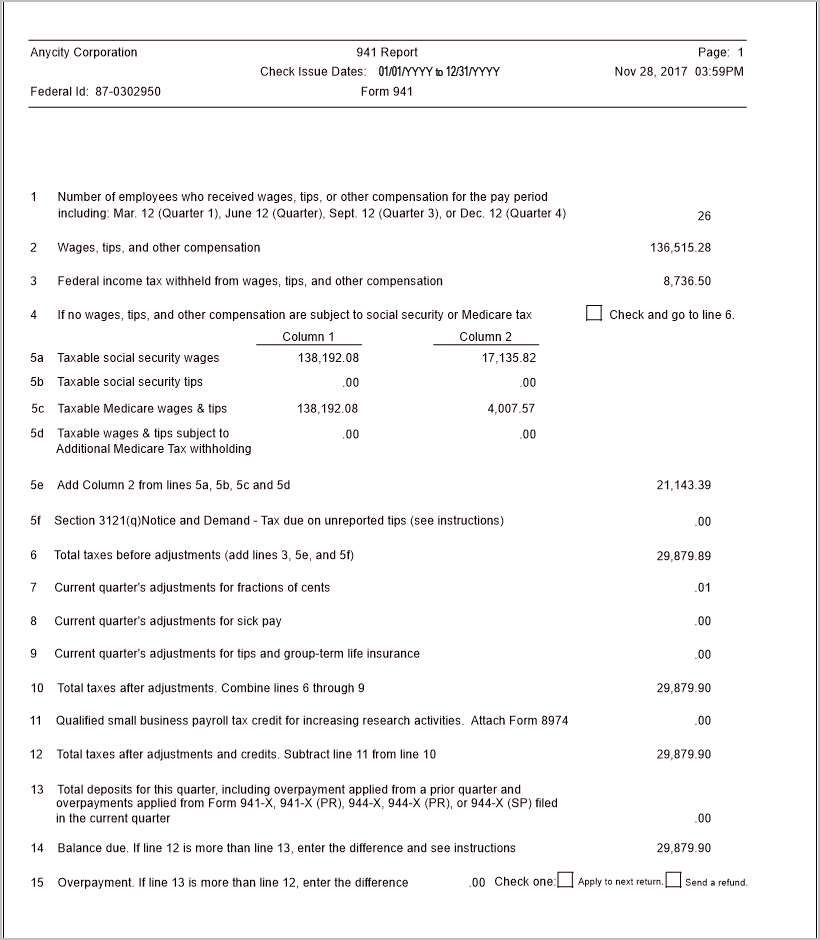
941 Form, Page 1 of 3
8. Set the report aside.
Later, you’ll use the first page of the report to compare
Line 2: Wages, Tips, and Other Compensation
Line 3: Federal Income Tax Withheld from Wages, Tips, and Other Compensation
Line 5a, Column 1: Taxable Social Security Wages
Line 5c, Column 1: Taxable Medicare Wages & Tips
Updated Dec2016
Print the employee tax summary for the current year for all of the employees who will receive a W-2. You can use this report to reconcile to your 941, it will show you the employee’s gross wages; all wages; federal wages and taxes withheld for federal wages; state wages and taxes withheld for state wages; Social Security and pre-tax deductions for Social Security; and Medicare and taxes withheld for Medicare. The last page shows you the grand totals.
Videos
Do this...
1. Open Connect Payroll > Reports > Employee Tax Summary.
2. Change the Report Dates to select the tax year (01/01/YYYY to 12/31/YYYY).
How do I change the date range for annual reports?
3. Click to select the checkbox titled Include Terminated Employees.
4. Click Print (CTRL+P).
The Employee Tax Summary prints. Set the report aside for later.
Now that all of the reports have been printed, you’re ready to compare the reports to make sure the transactions are in agreement.
You’ll need to...
Compare the Annual 941 report total with the total of all Quarterly 941 reports for the year.
Compare the Year-to-Date totals from the 941 report with the totals found on the Payroll History.
Take the Annual 941 report and compare the totals on the Annual 941 report against the totals on the Quarterly 941 reports. You want to add all of the Line 2s on Quarter 1, 2, 3, and 4 to see if the total matches the total on the Annual 941. You will also need to compare the totals on line 3, 5a-5 column 1 and 2.
Videos
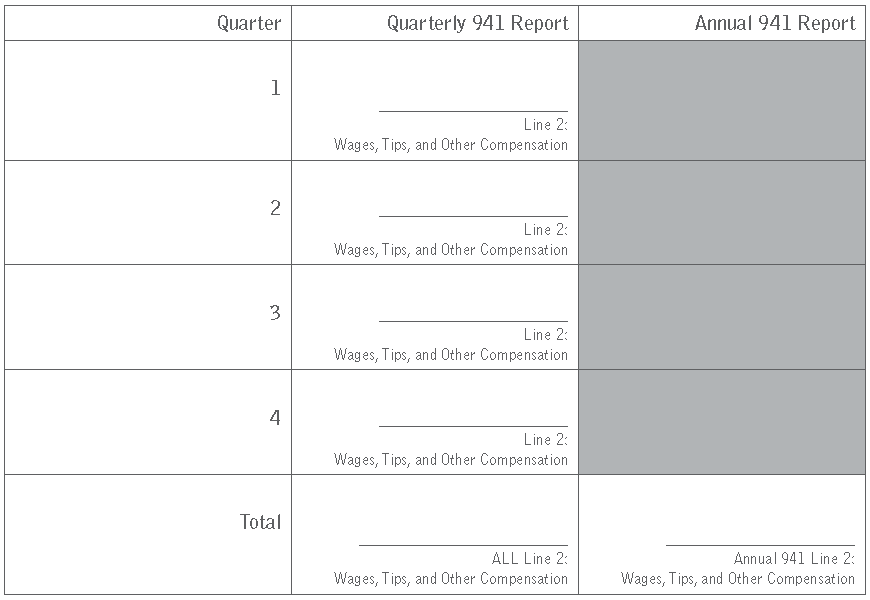
Do the totals match?
Yes, the totals match. You’re in good shape. Keep going!
No, the totals do not match. You’ll need to find the incorrect transaction and correct it before you continue. You can troubleshoot this issue by reprinting the 941 report for Quarter 1, Quarter 2, Quarter 3, and Quarter 4 and then compare it to the original 941 report that you mailed. Doing this will help you track the problem to a specific quarter.
Why don’t the totals match? This usually means there’s something wrong with the pay codes on an employee. For example, the pay codes on an employee could be marked as Do Not Calculate or another setting may be changed. A good way to troubleshoot this problem is to reprint the 941 report for each quarter. And then compare it to the original 941 report that you mailed to the IRS. This will help you find error.
Updated Dec2016
Take the Annual 941 report and compare the totals on the Annual 941 report against the totals on the Quarterly 941 reports. You want to add all of the Line 2s on Quarter 1, 2, 3, and 4 to see if the total matches the total on the Annual 941. You will also need to compare the totals on line 3, 5a-5 column 1 and 2.
Videos
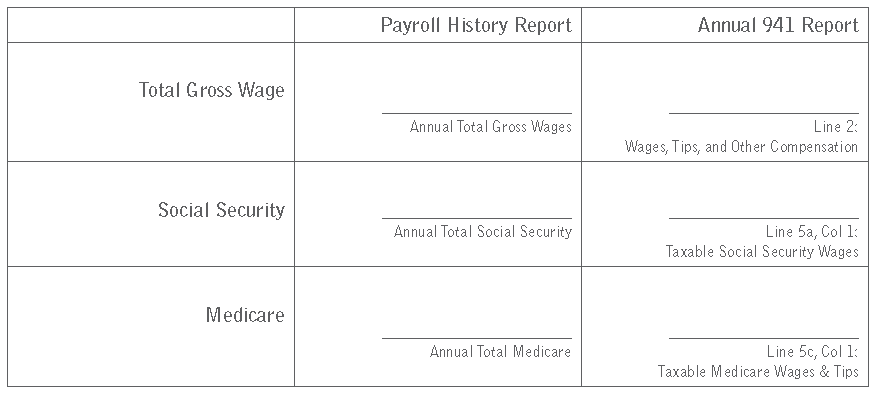
What if I can’t find the 941 amount on the Payroll History report? You may need to add taxable pay codes and subtract pretax deductions to calculate the 941 amount and reconcile the Annual 941 report.
Do the Total Gross Wages match?
Yes, the totals match. You’re done.
No, the totals do not match. Look for any pretax deductions for example, fringe benefits and 401k. You may need to add the taxable fringe benefit + 401k - Total Gross Wages on the Payroll History Report = Total Gross Wages on Annual 941 Report.
Do the Taxable Social Security Wages match?
Yes, the totals match. You’re done.
No, the totals do not match. Remember, Gross + Taxable Fringe Benefit - Wages for Employees Exempt from Social Security Tax = Social Security Wage. Use the Employee Tax Summary report to verify taxable Social Security for each employee. Look for employees who are exempt from Social Security.
Why don’t the Social Security totals match? Try looking for employees who are exempt from Social Security and employees who are missing the Social Security pay code.
Do the Taxable Medicare Wages match?
Yes, the totals match. You’re done.
No, the totals do not match. Remember, Gross + Taxable Fringe Benefits = Medicare Wage. Use the Employee Tax Summary report to verify taxable Social Security for each employee. Look for employees who are exempt from Social Security.
Why don’t the Medicare totals match? Try looking for employees who are exempt from Medicare and employees who are missing the Medicare pay code. Remember, to adjust the total for taxable fringe benefits.
When you’re done with this section, the year-to-date information for total gross wages, Social Security, and Medicare is correct.
Updated 30Nov2017
Next, print any annual payroll reports for the current year that are required for your site. This step is optional. These reports may come in handy when you verify totals, such as health insurance.
For example, these reports might include
12-month Pay Code Transaction report for all pay codes
12-month Pay Code Transaction report for health insurance pay codes
Tip! You can set up the Pay Code Transmittal Report to print annual reports.
Videos
Printing the Pay Code Transaction report for health insurance pay codes (2m33s).
Setting up a Pay Code Transaction Report - IRS Taxes Annual (1m33s).
Updated 20Dec2017
Print the Pay Code Transaction Report for the entire calendar year.
Do this...
1. Open Connect Payroll > Reports > Pay Code Transaction Reports.
2. Change the report Date Range to select the check issue dates for the entire calendar year being closed.
How do I change the date range for annual reports?
When should I select the checkbox to Include Terminated Employees on reports that allow it? You’ll want to include all employees who worked for you during the calendar year. If an employee was terminated during the year, using the checkbox to Include Terminated Employees will print the report for the employes that were terminated during the year, too.
3. Use the options on the Pay Codes tab to add the pay codes for
Social Security Employee Amount,
Social Security Employer Amount,
Medicare Employee Amount,
Medicare Employer Amount, and
FWT Employee Amount.
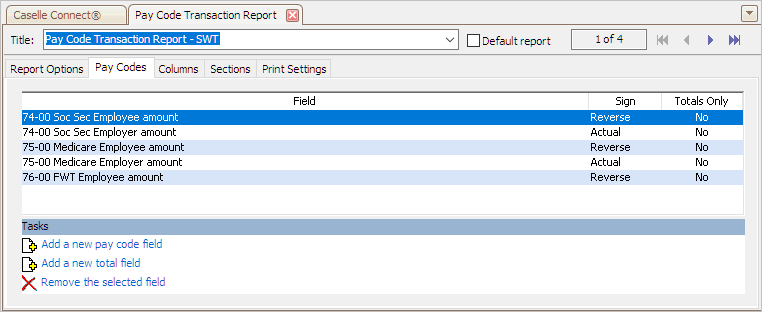
Pay Code Transaction Report > Pay Codes tab
4. Click Preview (Ctrl+Q) to preview and save the report, or click Print (Ctrl+P) to print the report.
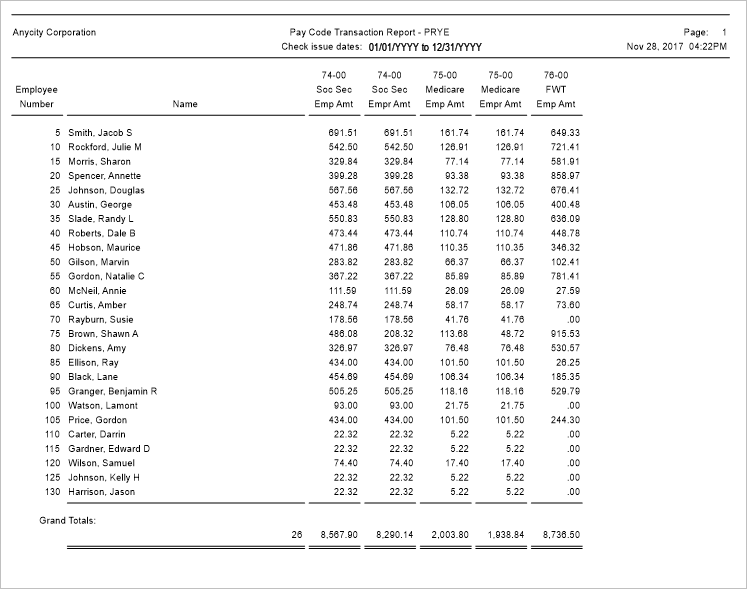
Pay Code Transaction Report for the calendar year
5. Review the information and amounts on the printed report.
If you need to print other annual reports that are specific to your site, you can print them now.
You are finished printing the reports that you will need to verify and reconcile amounts.
Updated 19Dec2017