Payroll Year-end Checklist
First, you’ll convert the year-end tax information and make sure it’s correct. Then you’ll print the W-2s and create the Electronic W-2 File.
IMPORTANT! If the actual W-2s will not be printed at this time, they should be printed as soon as possible after performing the year-end steps.
When you complete these tasks, the W-2s will be ready for printing. If the actual W-2s will not be printed at this time, they should be printed as soon as possible after performing the year-end steps as possible.
You may wish to schedule the print job for a time when printer traffic is low.
In this Topic Hide
A. Back up the current year's payroll
B. Convert year-end tax information
C. Check the conversion printout
Reconcile the grand totals on the Conversion report
D. Verify the organization's W-2 information
First, verify the organization’s information
Second, verify the pay codes subject to tax
Third, verify the converted W-2 information
F. Print sample W-2s to scratch paper
G. Enter corrections in the Payroll system
Back up the files created during the current year in Payroll. Follow these instructions to make a temporary copy of the Payroll database. You will need the backup copy if you need to restore transactions that will be deleted from the database.
How do I back up the Payroll database?
Videos
Updated 19Dec2017
Videos
Watch a video clip on converting year-end tax information (3m23s). The video clip shows the steps for the 2015 calendar year. You will need to substitute the current tax year for 2015.
Do this...
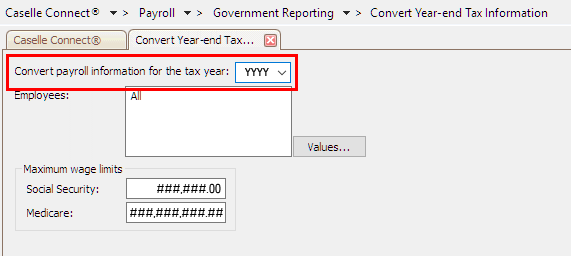
1. Open Connect Payroll > Government Reporting > Convert Year End Tax Information.
This will open the Caselle Connect Government Reporting application.
2. Verify the tax year is correct.

Convert Year-end Tax Information
3. Find the section titled Maximum Wage Limits.
4. Verify the Social Security limit.
5. Verify the Medicare limit.
6. Click GO (Ctrl+G).
The routine processes the employee information and prints a conversion report. You’ll also use the conversion report later to compare it to your Annual 941 and verify amounts.

Convert Year-end Tax Report
The W-2 information has been moved to the Government Reporting application.
Updated 29Nov2017
Compare the Conversion report to the employee amounts on the Annual 941 report and Payroll History report.
Videos
Reconciling totals on the Conversion report with the Annual 941 and Payroll History reports (4m41s). The last part of the video clip explains how to use the Employee Tax Summary to troubleshoot errors.
Reconciling the grand totals is a quick way to find out if there are any issues with the converted W-2 information. If the grand totals reconcile, then you’re good to go. But if the grand totals do not reconcile, you’ll need to track down the problem and fix it before you continue.
Do this...
1. Go to the last page of the Conversion report to verify your grand totals.

Why does the Annual 941 report show more taxes than the Conversion report? The Annual 941 shows taxes for the employer and employee while the Conversion report shows only the employee’s contribution.
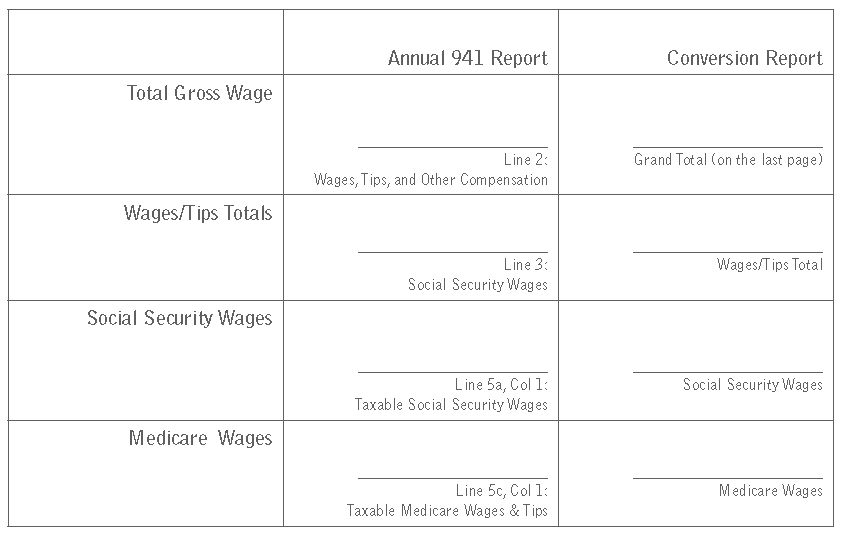
2. Compare Line 2 on the Annual 941 to the Wages/Tips Total on the Conversion report.
3. Compare Line 3 on the Annual 941 to the Federal Income Tax total on the Conversion report.
4. Compare Line 5a, Column 1 (Taxable Social Security Wages) on the Annual 941 to the Social Security Wages (Soc Sec Wages) on the Conversion report.
5. Compare Line 5d, Column 1 (Taxable Medicare Wages and Tips) on the Annual 941 to the Medicare Wages (Med Wages) on the Conversion report.
6. Go to the second to the last page of the Payroll History report.

7. Compare the State Withholding grand total on the Payroll History report to the State Income Tax on the Conversion report.
All of the totals listed above should reconcile exactly. If the totals do not reconcile, there’s a problem with the employee’s amounts or the pay code settings.
Do the grand totals on the Conversion report match the Annual 941 report and Payroll History report?
Yes, the amounts match. That’s good news.
No, the amounts do not match. You’ll need to track down the problem. You can print the Employee Tax Summary report and use it to compare employee’s tax amounts on the Conversion report. You need to find and fix the errors before you can continue.
What do I do if totals do not match? Use the Conversion report to review each employee. Compare the employee’s information on the Conversion report to the Employee Tax Summary report. Next, verify the amounts for each employee are correct.
Tip! When you print the Employee Tax Summary, change the print order to print by employee number so the printed report matches the Conversion report.
Updated 20Dec2017
Make sure the converted W-2 information is correct in the Government Reporting Organization table.
Videos
Watch a video clip on verifying the organization’s W-2 information in the Government Reporting application (0m32s).
The first page of the Conversion report includes the organization’s name,address, and telephone; Federal ID; State ID; and Local Tax ID (when there’s a local tax). If organization is filing W-2s electronically, you’ll also want to check the electronic filing properties at this time.
Remember! You only need to complete this step if the organization is filing W-2s electronically.
Do this...
1. Go to the first page of the Conversion report.
Alternative option: You can also use the Organization table in Government Reporting to verify this information.
2. Verify the organization’s information.
Organization’s name, address, telephone, and email
Federal ID
State ID
Local Tax ID (if applicable)
Is the organization’s information correct?
Yes, the organization’s information is correct. Continue to next step.
No, the organization’s information is not correct. Use Payroll > Organization > Organization to update the organization’s information. You’ll need to reconvert the year-end tax information.
No, the State ID is not correct. Use Payroll > Organization > Pay Codes to look up and correct the State Withholding Tax (77-00) pay code. You’ll need to reconvert the year-end tax information.
No, the Federal ID is not correct. Use Payroll > Organization > Pay Codes to look up and correct the Federal Withholding Tax (76-00) pay code. You’ll need to reconvert the year-end tax information.
3. Verify the organization’s federal electronic filing information.
Contact information, address, telephone, and email
Preferred method of problem notification
Preparer code (if you’re preparing W-2s for your organization, then select Self Prepared)
Employment code (usually R (Regular (all others)))
Kind of employer (usually S (State and Local Governmental Employer))
Employer/Agent employer identification number (EIN)
Agent for EIN (this can be the same number as the Employer/Agent employer identification number (EIN))
Third party pay (if you have third party pay, enter the amount paid by the third party, and select the checkbox titled Third Party Sick Pay Indicator)
Does my state use state-specific electronic filing information? The only state with state-specific electronic filing requirements is the State of Idaho. If you are filing W-2s electronically for the State of Idaho, make sure you fill in the State of Idaho electronic filing requirements on the States tab > Idaho tab.
4. Verify the organization’s state electronic filing information.
5. Click Save (CTRL+S).
The converted organizational information is ready to go.
Updated 29Nov2017
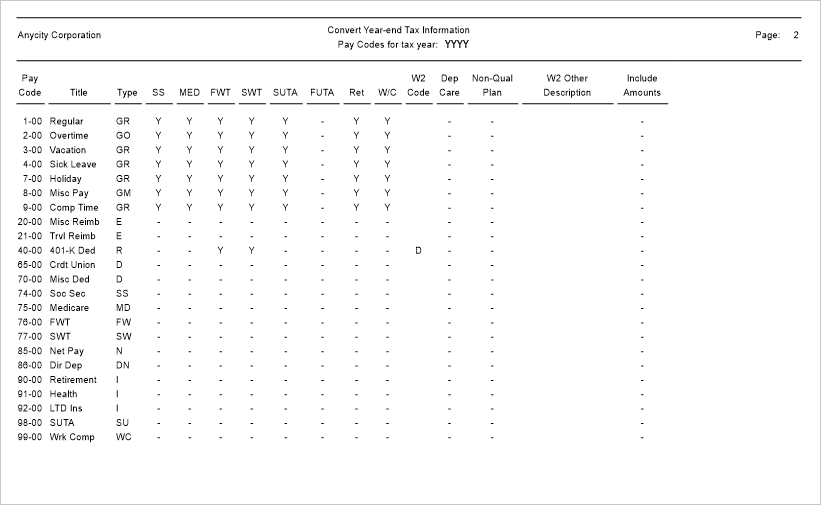
The second page of the Conversion report lists all of your pay codes. There’s a column for each type of tax. If it’s a deduction pay code, a “Y” means the pay code is exempt from tax. The column titled W2 Code lists the code to enter in Box 12 on the W-2.
STOP!
Is each pay code subject to the correct taxes?
Yes, each pay code is subject to the correct tax. That’s good news. Continue to the next step.
No, each pay code is not subject to the correct tax. Review the pay codes that are subject to tax. Use Payroll > Organization > Pay Codes to look up the pay code. Then, check the settings on the Used in Calculation tab to review the taxes on the pay code. You’ll need to reconvert the year-end tax information, go to Convert Year-end Tax Information in the Payroll Year-end Checklist.
Why do I need to repeat steps I’ve already finished? You’ll want to complete all of the steps in the checklist to make sure the changes are updated correctly BEFORE you print the W-2s.
Updated Dec2016
You’ll want to check that the W-2 information that was converted from the Payroll application is correct. The employee’s W-2 information begins after the pay codes, usually about page 3 of the Conversion report.
Do this...
1. Go to employee’s W-2 information ( usually starts around page 3) of the Conversion report.
Alternative solution: You can also use the W-2 Employees table in Government Reporting; however, it may be faster to use the printed Conversion report.
2. Check the converted W-2 information for each employee:
Wages/Tips
Federal Income Tax
Social Security Wages
Social Security Tax
Medicare Wages
Medicare Tax
Box 12 Codes and Amounts
Other Amounts
Is the employee’s converted W-2 information correct?
Yes, the employee’s converted W-2 information is correct. Press F6 to display the next employee record.
No, the employee’s converted W-2 information is not correct. Use Modify Existing Employees to review the W-2 information saved in the employee’s record.
STOP!
Did you make any changes to any employee records or pay codes?
Yes, I made changes to employee records or pay codes. Reconvert the employee information, You’ll need to reconvert the year-end tax information, return to Convert Year-end Tax Information in the Payroll Year-end Checklist.
No, I did not make any changes to any employee records or pay codes. You’re ready to run Checkout W-2 Employees.
Updated Dec2016
Search for errors in the converted W-2 data. This routine will search for errors in the W-2 Employee information.
Videos
Do this...
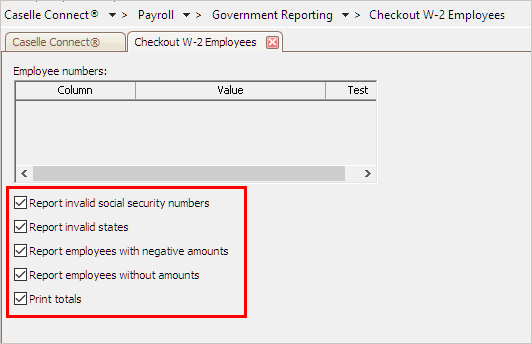
1. Open Connect Payroll > Government Reporting > Checkout W-2 Employees.
2. Select all of the checkboxes on the form.

Checkout W-2 Employees
3. Click GO (Ctrl+G).
4. Click Preview (Ctrl+Q) to preview the report, or click Print (Ctrl+P).
The Checkout report prints your W-3 information and a list of errors.
How do I know when there are no errors on the W-2s? When you run Checkout W-2 Employees, the system checks itself for errors. If the system finds no errors, the note “No W-2 errors found” will be printed in the lower left-hand corner of the report.
Is the Checkout report free from errors?
Yes, the Checkout report is free from errors. Great job! You’re ready to back up the Payroll database, see the help topic titled How do I back up the Payroll database?
No, the Checkout report is NOT free from errors. First, you’ll use Payroll > Employees > Modify Existing Employees to look up the employee record and enter the correct W-2 information. Then you’ll need to run Checkout W-2 Employees again.
Tip! If there are employees at your site with more than one employee number, and who are receiving multiple W-2s, you may wish to provide them with a single W-2. See the help topic titled How do I combine multiple W-2s?
STOP!
Did you make any changes to any employee records or pay codes?
Yes, I made changes to employee records or pay codes. You’ll need to reconvert the year-end tax information, see the help topic titled Convert Year-end Tax Information. .
No, I did not make any changes to any employee records or pay codes. You’re ready to Print Sample W-2s to Scratch Paper. But first, you'll need to back up the Payroll database.
Updated 29Nov2017
Use the W-2s Report to print the W-2 information to plain paper. The W-2s Report will print the information to the boxes on the W-2 Form. You will need to make sure the information is correct and it appears in the correct fields on the W-2 Form. If the W-2 Forms print correctly, you can print the final W-2 Forms right now or you can wait until later.
Videos
Printing the W-3 Summary and W-2s (3m28s). This clip also tells you how to check W-2 Form alignment.
Where can I find a list of W-2 Forms? If you don’t know which report title to select, use the IRS Tax Forms Reference Sheet to find the tax form that you are using. Then, select the tax form name that corresponds to the report title.
Do this...
1. Open Connect Payroll > Government Reporting > W-2s.
2. Select the desired form style from the Report Title drop-down list.
3. Load scratch paper in the printer.
4. Now, click Print (Ctrl+P).
The first printed page is the information that you will use to complete the W-3 Form. The following pages show the information that print on the W-2 Form using the W-2 Form that you have selected.

Sample W-2s printed on plain paper
5. Check if the W-2 information prints in the correct fields on the W-2 Form.
How do I do this? Take a printed sample W-2 and an actual W-2 Form. Place the two pages together and hold them up to the light. Now, you can see where Connect will print the W-2 information on the actual W-2 Form.
Does the information the sample W-2 display in the correct field on the actual W-2 Form?
Yes, the sample W-2 and actual W-2 Form align. That’s good news. You’re ready to verify the employee information that printed on the sample W-2s. Go to Enter Corrections in the Payroll System.
No, the sample W-2 prints above or below the field or too far to the right or left of the field on the actual W-2 Form. You may need to adjust the printer settings and then repeat these steps to test the alignment on the sample W-2s. Call customer service for assistance at (800) 243-8275.
Updated Dec2016
Carefully check the printed sample W-2s to make sure the W-2 information is correct information for each employee.
Videos
What’s the difference between fixing something in Government Reporting vs. Payroll? Fixing something in Government Reporting allows you to shorten the number of steps required to create the actual W-2s. BUT, you will need to manually update the information that you fixed in the Payroll application, too. Fixing something in Payroll means that you’ll need to complete more steps... BUT you won’t have to manually update the employee records in Payroll.
Do this...
1. Review the sample W-2s one by one.
2. Did the correct W-2 information print on the sample W-2?
Yes, the correct W-2 information prints on the sample W-2. That’s good news. You’re ready to print the actual W-2s.
No, the wrong W-2 information prints on the sample W-2 AND I want to make the corrections in the Government Reporting application. Use Payroll > Government Reporting > W-2 Employees to look up the employee record and enter the correct information. Then, go to Checkout for W-2 Employees and complete all of the steps up to this point.
No, the wrong W-2 information prints on the sample W-2 AND I want to make the corrections in the Payroll application. First, you’ll use Payroll > Employees > Modify Existing Employees to look up the employee record and enter the correct information. Start with Step 4: Verify Employee Information to update the employee’s information and then complete all of the steps in the checklist up to this point.
Updated 29Nov2017
When the sample W-2s have the correct information AND the information on the sample W-2s prints in the correct fields on the W-2 Form, you are ready to print the W-2 information to the W-2 Forms. Even though you can wait until later to print the W-2 Forms it’s best to print the W-2 Forms as soon as possible after you complete the Payroll Year-end Checklist.
STOP!
Do you want to print the W-2 Forms now?
Yes, I want to print the W-2 Forms now. Complete this section to print the W-2 information to the actual W-2 Forms.
No, I want to wait to print the W-2 Forms. If the actual W-2 forms will not be printed at this time, go to Step 7: Finishing Up.
When should I print the actual W-2s? If the actual W-2s will not be printed at this time, they should be printed as soon as possible after performing the year-end steps.
Videos
Do this...
1. Load the W-2 Forms into the printer.
You may wish to wait for a time when the print job will NOT be interrupted.
2. Open Connect Payroll > Government Reporting > W-2s.
Skip this step if the W-2s report is still open.
3. Set up the forms exactly the way you set up the sample W-2s.
4. Click Print (Ctrl+P).
The employee’s W-2 information prints on the actual W-2 Forms.
Updated 29Nov2017
Answer these two questions to determine whether or not your organization needs to create an Electronic W-2 File.
Do you use AccuWage (irs.gov) to report W-2 information?
Yes, we use AccuWage. You need to complete this step to create an Electronic W-2 File.
No, we do NOT use AccuWage. You do not need to complete this step unless you wish to file W-2s electronically.
Do you have more than 250 W-2s at your site?
Yes, there are more than 250 W-2s at my site. You may be required to submit your W-2 information electronically. Complete this section to create an Electronic W-2 File.
No, there are less than 250 W-2s at my site. You can submit your W-2 information according to the instructions that have been provided to you by the IRS, or you can file W-2s electronically.
STOP!
Did you answer “yes” to one or both of the questions?
Yes, I answered “yes” to one or both of the questions. Your organization is required to file W-2s electronically by the IRS. You’ll need to complete this section. Go to How Do I Create an Electronic W-2 File?
No, but I want to file W-2s electronically. Complete this section. Go to How Do I Create an Electronic W-2 File?
No, I answered “no” to both questions and I do not want to file W-2s electronically. Go to Step 7: Finishing Up.
Updated 20Dec2017
Videos
Do this...
1. Open Connect Payroll > Government Reporting > Create Electronic W-2 File.
Why can’t I find the link to Create Electronic W-2 File? This module must be purchased separately. You will need to contact Caselle Sales at (800) 228-9851 to request this module.
2. Fill in the Tax Year, File Name, Authorized Employee’s PIN, and select the report type.
Why if I don’t have an Authorized Employee PIN? You can register your organization with the Social Security Administration and they will provide you with an Authorized Employee PIN (8-digits). Or, you can enter 4 zeroes (0000) followed by the 4-digit PIN that you use when you log into the EFTPS website.
3. Click GO (Ctrl+G).
4. Download the AccuWage software from the ssa.gov website to test the Electronic W-2 File.
5. Install the AccuWage software.
6. Use the AccuWage application to test the Electronic W-2 File.
Did the AccuWage application load the Electronic W-2 File correctly?
Yes, the Electronic W-2 File loaded correctly. Wonderful! You’re done with this section.
No, the Electronic W-2 File did not load correctly. Call customer support for assistance at (800) 243-8275. They can help you troubleshoot the problem.
7. Exit the Government Reporting module and return to the Payroll main menu.
The Electronic W-2 File is created and tested. It’s ready to file with the IRS.
IMPORTANT! Be sure ALL current year payroll reports and updates to the General Ledger have been completed BEFORE you continue.
Updated 29Nov2017