How do I enter a manual check?
Checks
In some circumstances, you may find you need to enter a manual check. For example, you may need to enter a manual check when an employee was not paid with the regular payroll, when leave time was not paid with the regular payroll, when a new hire needs to be paid, and so on.
When you enter a manual check, you will record the check amount and the withholding and deductions. The manual check entry does not print.
Step 1. Calculating withholding and deductions on a manual check
Use Enter Payroll Checks to calculate the employee's withholding and deductions. Copy the amounts on to paper or print the screen. Then, cancel the transaction. To learn more, see How do I calculate withholding and deductions on a manual check?
Important! You do not want to save the entry but you need to use the routine to calculate withholding and deductions correctly.
Step 2. Entering a manual check entry
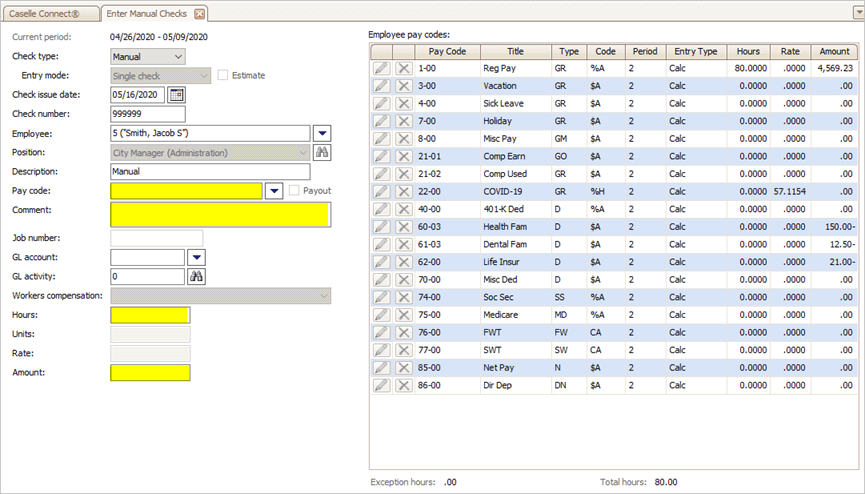
1. Open Connect Payroll > Employees > Enter Manual Checks.
2. Use the Check Type box to select Manual.
What if the Enter Manual Check view is open? You only need to select the check type the first time. If you're entering more than one manual check, you can skip this step.

Check type box
3. Enter the check issue date, check number, employee, position, and description.

Check issue date, check number, employee, position, and description boxes
4. Use the pay codes from the Employee Pay Codes pane to enter the pay codes and then enter the pay code amounts.
Use the pay codes and amounts that you calculated in Step 1: Calculate Withholding and Deductions.

Pay code, comment, hours, and amount boxes
5. Verify the hash total is zero.
What if the hash total is not zero? Make sure the pay codes and amounts have been entered correctly and then check for missing pay codes.
7. Click on the Pay Code box and then press Enter again to save the transaction.
The manual check entry is finished.
202005, 2020May08
Check issue date
The current date is the default date. To use a different date, use the Check Issue date box to enter a new date.
Check number
Use the Check Number box to enter the check number. Even though the manual check will not print, it still needs a check number.
Employee
Enter the employee name or number. This is the check recipient.
Position
If the employee has more than one position, use the Position box to select the position that you will use to record the manual check.
Description
Use the Description box to enter the transaction description. This box is optional.
Example: Manual
Pay code
When you enter an employee's name or number, the pay codes that are assigned to the employee display in the Employee Pay Codes pane, on the right side of the view.
Use the pay codes in the Employee Pay Codes pane to enter the pay code amounts for each pay code.
Note: Deductions will be subtracted automatically. If you key a minus (–) sign after you enter a deduction, Connect will add the deduction to the employee’s net pay.
Comment
If you need to add a note to the manual check, click on the Comment box to enter text.
Job number
If you are using the Project Accounting application to track job expenses, you can add a job number to the manual check.
GL account
Use the GL Account box to enter a GL account if you need to override the normal employee and pay code GL account settings. Connect will record the manual check transaction in the GL account.
GL activity
If you are using the General Ledger application to track activity expenses, you can add a GL activity code to the manual check.
Copyright © 2020 Caselle, Incorporated. All rights reserved.