How do I define override accounts for AR invoices?
When Connect invoices a customer for job costs, Connect will use the revenue and receivables account that have been assigned to the Accounts Receivable category. That is, unless you want to record amounts for revenue and receivables that are tied to the job you are invoicing in a different GL account. In this situation, you would want to change the job properties to include an override revenue and receivables account. When Connect creates invoices for a customer with job costs, it will use the override accounts that are saved in the job properties in Project Accounting instead of using the accounts that are saved in the Accounts Receivable category.
Connect Project Accounting routines that use the override accounts
-
Invoice Customers for Job Costs
-
Create Batch Invoices
Adding a override account for AR invoices
1. Open Connect Project Accounting > Jobs > Modify Existing Jobs.
2. Use the Look Up bar to enter a job number. Press Enter.
3. Click the Job 2 tab.
4. Find the section titled Accounts Receivable GL Account Override.
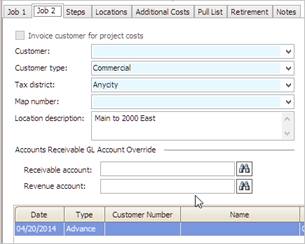
5. Enter the override account for receivables in the Receivable Account field.
If you leave this field blank, Connect will use the GL Receivable account from the category that is assigned to the invoice.
6. Enter the override account for revenue in the Revenue Account field.
If you leave this field blank, Connect will use the GL Revenue account from the category that is assigned to the invoice.
7. Click Save (CTRL+S).
The override accounts for AR invoices are saved.
Changing an override account for AR invoices
1. Open Connect Project Accounting > Jobs > Modify Existing Jobs.
2. Use the Look Up bar to enter a job number. Press Enter.
3. Click the Job 2 tab.
4. Find the section titled Accounts Receivable GL Account Override.
5. Click on an override account to update it.
6. Click Save (CTRL+S).
Your changes have been saved.
Deleting an override account for AR invoices
1. Open Connect Project Accounting > Jobs > Modify Existing Jobs.
2. Use the Look Up bar to enter a job number. Press Enter.
3. Click the Job 2 tab.
4. Find the section titled Accounts Receivable GL Account Override.
5. Click to select on the override account that you want to delete.
`

6. Click the Delete key on the keyboard.
7. Click Save (CTRL+S).
The override account is deleted. Connect will use the account from the assigned category as the GL account to create invoices.
Looking up a category
Connect stores categories in Accounts Receivable. You can find the default GL accounts on a category on the GL Accounts tab in the Category table (Accounts Receivable > Organization > Categories). If you leave the override accounts on a job blank, Connect will use the GL accounts from the category that is assigned to the job.
Copyright © 2025 Caselle, Incorporated. All rights reserved.