How do I view job information?
View job records and accumulated costs and transaction details.
Search for a job
Open Project Accounting > Job Inquiry.

Job Inquiry in Project Accounting
Type in a job number in the Job field located on the Lookup bar.

Lookup Bar in Job Inquiry
You can also Search (F9) for a job name. Pressing Enter will show the job's information as well as any costs, estimates, transactions, steps, locations, pull list, and retirements that are associated with the job.
Updated 20Oct2018
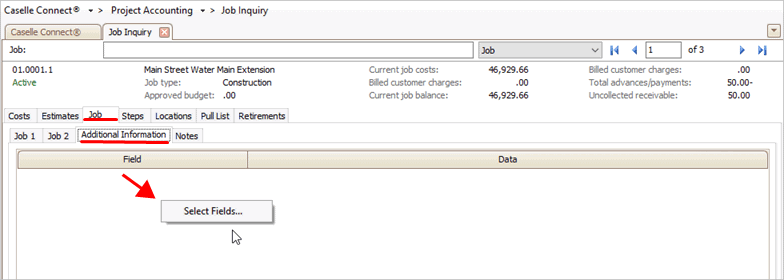
Additional information
You can use the Job > Additional Information subtab to add fields that are not included on another tab in Inquiry. This option comes in handy when you want to group certain fields together.
To add fields, right-click on the Field column heading and choose Select Fields.
Select Fields
Now, use the Selection form to move the fields that you want to display on the Additional Information subtab to the Selected Fields list. You can also use the Selection form to change the order the fields are displayed on the Additional Information subtab.
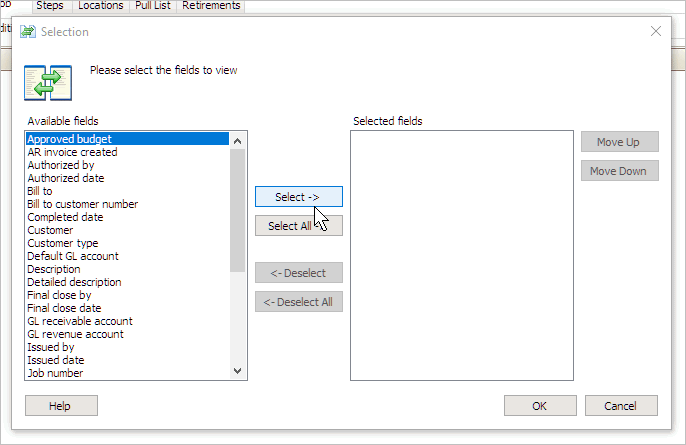
Using the Selection Form to select fields
To remove fields, follow the same process for adding fields except you'll want to move the fields which you don't want to include anymore to the Available Fields list.

Using the Selection Form to remove fields
Updated 29Oct2018
Change Inquiry options
Use Options (F12) to set up the program's default properties.

Options button in Job Inquiry
These properties give you a way to change how information is displayed and choose default settings. You can change the
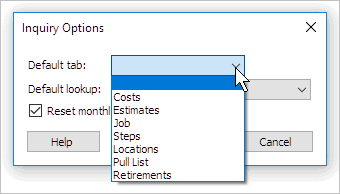
Default tab
Default Lookup Type
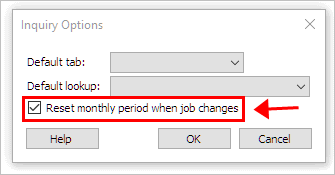
Reset monthly period when job changes
Default tab
The default tab is the tab that will be displayed when you launch Inquiry. Click Options (F12). Use the Default Tab drop-down list to select a tab name. To remove the default tab, select the [blank].
Default Tab in Inquiry Options
Updated 10Jan2018
Default Lookup
The default lookup is the lookup type that will be displayed first when you launch Inquiry. Click Options (F12). Use the Default Lookup drop-down list to select a lookup type. To use the default lookup drop-down list, select [blank].

Default Lookup in Inquiry Options
Updated 10Jan2018
Reset the Monthly Period When the Job Changes
When you open a different job, you can set up the default options to keep the monthly period that you're currently working in, or reset the monthly period to the default period. Click Options (F12). Click to select the Reset Monthly Period When Job Changes checkbox. To use the monthly period selected previously when I view another job, if the period is available. Click Options (F12). Deselect the Reset Monthly Period When Job Changes checkbox.
Reset Monthly Period When Job Changes in Inquiry Options
Updated 10Jan2018
Clear My Options
Click the menu button next to the Options (F12) button.

Menu button next to the Options button
Then, choose Clear My Options.

Clear My Options
Updated 10Jan2018
Locations
The location is the physical address for the job. Use Locations to view the assemblies, additional parts, and estimated costs by location.
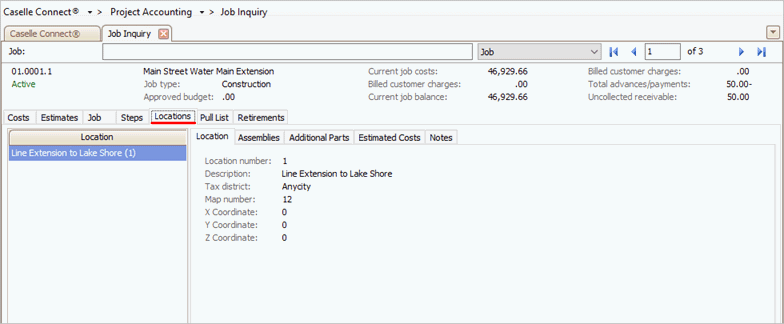
Locations tab in Job Inquiry
Updated 29Oct2018
Manage filters
Use Manage Filters to sort the information that is displayed in Inquiry.
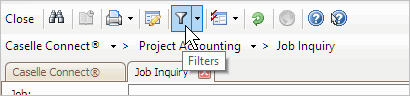
Filter button
Clicking the Manage Filters button (Filters > Manage Filters) will
show the filters that have already been set up, and
allow you to set up new filters.
Click these links to learn more
How do I select my default filter?
Updated 10Jan2018
Make changes to the job properties
If you find yourself looking at outdated information in the job's file, for example, an old email address or telephone number, you can edit the job's record by clicking Modify Existing Jobs (CTRL+M).

Modify Existing Jobs in Job Inquiry
Updated 10Jan2018
Pull List
A pull list is a list of inventory for a job that is sent to the inventory procurement manager. The list tells the manager which items to retrieve for you.
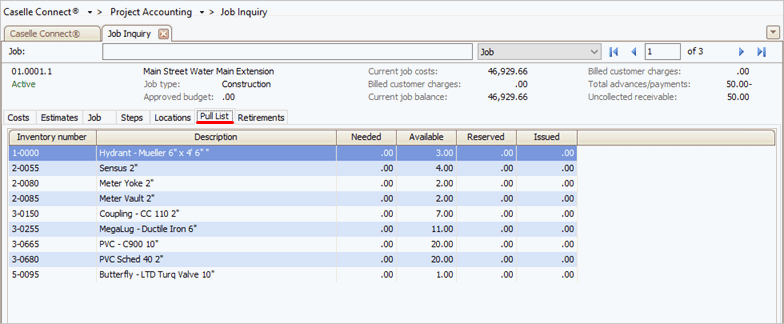
Pull List in Job Inquiry
Updated 30Oct2018
Refresh the displayed information
After changes have been made to other parts of the Project Accounting program, such as changing the job properties or adding a transaction, you may need to update the information that is displayed in Job Inquiry to show the new changes.
Click the Refresh Data button (CTRL+R), it looks like a circle with a circular green arrow, to load the new information.

Refresh Data in Job Inquiry
Updated 10Ja2018
Retirements
A retirement refers to an asset that has been retired from use.
Steps
The Steps show you the tasks in a series, or process, to set up, execute, and complete a job for the department. Use the options on the Steps tab to view the steps checklist.
How do I complete steps?
This grid is view only. If you need to complete a step, click Complete Job Steps or open Connect Project Accounting > Jobs > Complete Job Steps.

Complete Job Steps button in Job Inquiry
Updated 30Oct2018
View job information
Click on the Job tab to show the job properties.
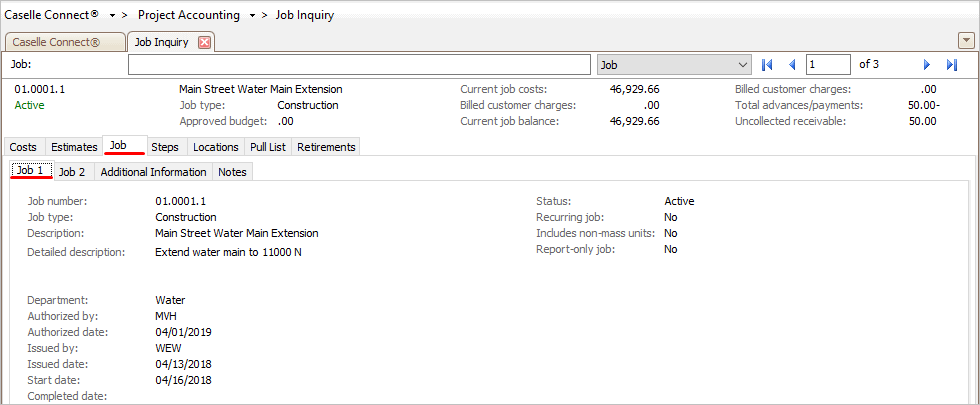
Job information in Job Inquiry
Updated 30Oct2018
View history
Use History to view changes that have been made to tracked fields. When you set up a tracked field in the Organization table, the system will record the field's current content. When the content in the field is updated or deleted, the system will record the date and the new value. History tracking is useful when it is important to keep tabs on critical information.

History Tracking button
Click the History button, located on the main toolbar, to show the history for fields that are being tracked.
Updated 10Jan2018
View fields on the Detail subtab
You can use the Detail subtab to drill down through yearly, monthly, and daily transactions. Clicking [+] will show the transactions in the summary. Click [-] will collapse the expanded section.

Drill-down Capability in Job Inquiry
Updated 30Oct2018
View attachments
Any files, documents, PDF's, images, and so on that have been saved in the job's file, or on transaction that is related to the job, will be available for viewing on the Attachments subtab. All of the filenames will be shown in the Description list and you can click on a filename to view the contents of the file.
View notes
Notes can be attached to the job's file or to transactions that are related to the job. You can view all of the notes, or add a new note, to the selected item by clicking on the Notes subtab.
Where can I find the direct charge transaction?
A direct charge transaction occurs when you use Create Batch Invoices or Invoice Customer for Job Costs in Project Accounting to create an invoice in Connect Accounts Receivable. When you use Cash Receipting to receive the customer's payment for the invoice, the payment posts to Accounts Receivable when you run Update Payments. Next, Connect posts the payment as an advance transaction in Project Accounting.
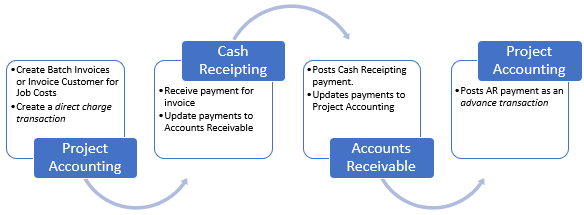
Process: Direct Charge Transaction to Advance Transaction
Looking up the advances/payments
You can use Job Inquiry to view the billed customer charges, total advances/payments, and the advance transaction detail.
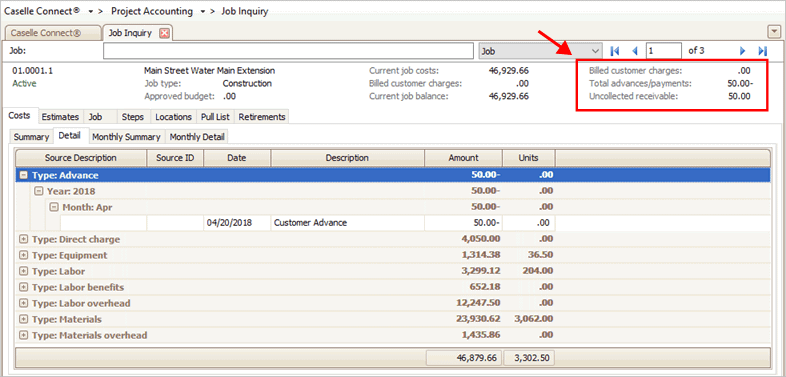
Job Inquiry, Summary section.
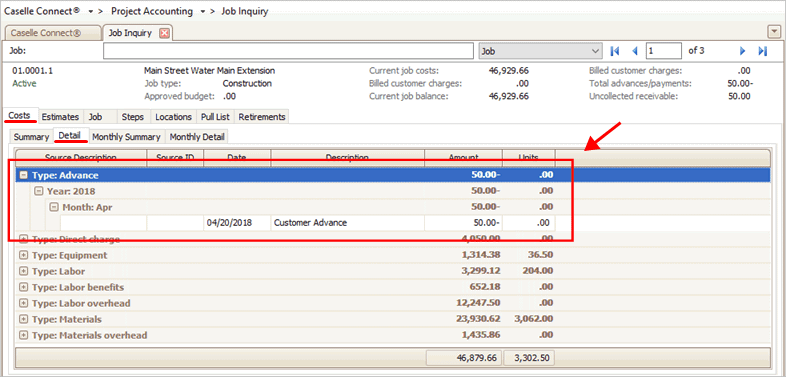
Viewing the advances/payments detail
To view the advance transaction detail, use the Costs tab > Detail tab. Find the section titled Type: Advance and then click + to expand the detail.
Detail tab, Type: Advance
Updated 30Oct2018
Copyright © 2025 Caselle, Incorporated. All rights reserved.