How do I set up my Organization settings?
Organization stores the application's default properties. The default properties include the organization's name and contact information as well as the applications that will interface with Materials Management, passwords, tracking, and user-defined fields.
Contents
- Update the organization's contact information
- Set up the default mask for the inventory number
- Example
- Setting up the default issue type
- Preventing users from changing data
- Deleting inactive inventory
- Allowing issue quantity to exceed quantity on hand
- Interfacing to other applications
- Passwords
- Tracking fields
- User-defined fields
Update the organization's contact information
The organization's contact information is the organization's name, address, telephone, fax, and email. This applications will use the organization's contact information to print on reports and forms.
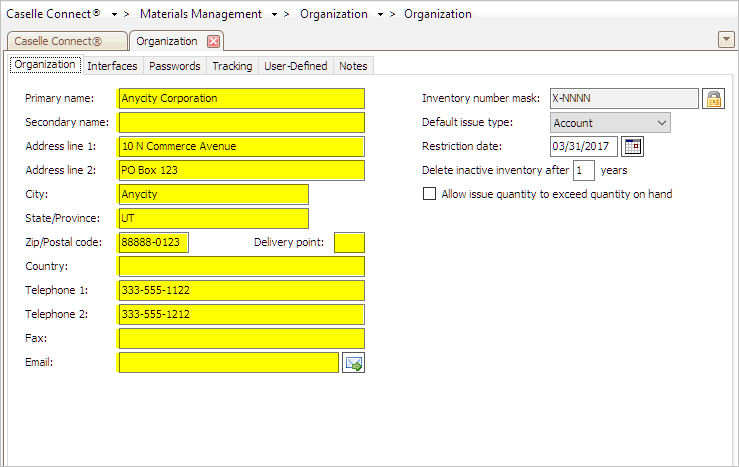
Contact Information in Materials Management
Do this...
1. Open Connect Materials Management > Organization > Organization.
2. Enter the information that is requested.
3. Click Save (CTRL+S) or Close (CTRL+F12).
The organization's contact information is updated and saved.
Updated 17Jan2018
Set up the default mask for the inventory number
The inventory number mask is the default format the Materials Management application will use to display and save inventory numbers.

Inventory Number Mask in Materials Management
You can use the variables N, A, and X to create the Inventory Number Mask for your organization.
Use N to represent a number value of zero (0) to nine (9).
Use A to represent a letter value of A through Z.
Use X to represent numbers (0-9) or letters (A-Z).
Use a separator such as a period (.), dash (-), or slash (/) as needed. These symbols will appear exactly as they are.
Contents
- Update the organization's contact information
- Set up the default mask for the inventory number
- Example
- Setting up the default issue type
- Preventing users from changing data
- Deleting inactive inventory
- Allowing issue quantity to exceed quantity on hand
- Interfacing to other applications
- Passwords
- Tracking fields
- User-defined fields
Example
Here are a few examples of some commonly used inventory number masks.
Inventory Number Mask |
When a user enters this value... |
The application will apply the Inventory Mask and the displayed value will look like this... |
A-NNNN |
Q1234 |
Q-1234 |
AA-NNNN |
Q4 |
Q-0004 |
XXXXXX |
Q1-2345 |
Q1-2345 |
Warning! Changing the current inventory mask will require you to change ALL of the inventory numbers to fit the new inventory mask.
Do this...
1. Open Connect Materials Management > Organization > Organization.
2. The Inventory Number Mask is located on the Organization tab.
3. Click the Lock button.
The Inventory Number Mask is a restricted field because changing the current inventory number mask will update ALL of the existing inventory numbers. You may need to manually fix inventory numbers that do not fit the new inventory number mask.

Lock button for Inventory Number Mask
4. Click OK when the Inventory Mask Change dialog box appears.
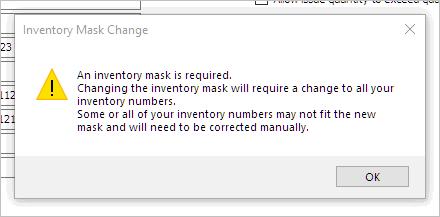
Inventory Mask Change
5. Now, enter or edit the Inventory Number Mask.
Use N to represent a number value of zero (0) to nine (9).
Use A to represent a letter value of A through Z.
Use X to represent numbers (0-9) or letters (A-Z).
Use a separator such as a period (.), dash (-), or slash (/) as needed. These symbols will appear exactly as they are.
Setting up the default issue type
Use the Default Issue Type to select the issue type that will be used most often when a user enters inventory. When a user views a from that uses an Issue Type field the application will display the value that is stored in the Default Issue Type field. The user can override the default value by selecting a new value from the Issue Type field.
Do this...
1. Open Connect Materials Management > Organization > Organization.
The Default Issue Type field is located on the Organization tab.

Default Issue Type menu in Materials Management
3. Click on the drop-down list to select the default value for issuing inventory.
Updated 17Jan2018
Preventing users from changing data
The Restriction Date prevents users from editing transactions in Materials Management that have a transaction date that occurs before or on the date shown in the Restriction Date field. The Restriction Date is updated when you run the Update Period End routine. The routine uses the last day of the next month as the new Restriction Date.
Do this...
1. Open Connect Materials Management > Organization > Organization.
2. Enter the Restriction Date field.

Restriction Date in Materials Management
Updated 17Jan2018
Deleting inactive inventory
Use Delete Inactive Inventory After [ _ ] Years to clean up inactive inventory from the Materials Management database. An inactive inventory has a termination date that has expired. When you use this field the system will wait the allotted time and then the system will delete the inventory item from the Materials Management database.
Do this...
1. Open Connect Materials Management > Organization > Organization.
2. Click the Organization tab.
3. Enter a number (1 to 99) in the Delete Inactive Inventory After [ _ ] Years field.
Delete Inactive Inventory After x Years in Materials Management
Updated 17Jan2018
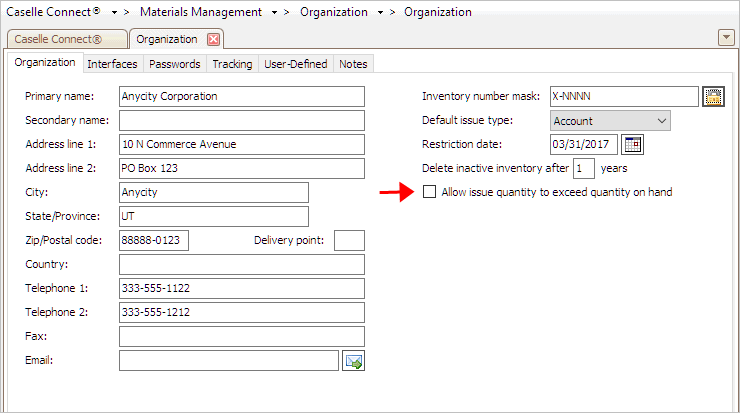
Allowing issue quantity to exceed quantity on hand
Do you want to allow the user to issue a quantity that is greater than the available quantity? For example, if this option is selected when Jane wants to issue 7 pens but there are only 5 pens on hand, the system will let you issue 7 anyway. When this option is not selected and Jane wants 7 pens, the system will prevent the user from entering a quantity that is larger than the quantity on hand.
Allow Issue Quantity to Exceed Quantity on Hand
What do you want to do?
Yes, I want to issue quantities that are greater than the quantity on hand. Select the Allow Issue Quantity to Exceed Quantity on Hand checkbox. In the Issue Inventory and Sell Inventory routines, this option allows the user to enter a quantity that exceeds the quantity on hand.
No, I want to limit the issued quantity to the quantity on hand. Deselect the Allow Issue Quantity to Exceed Quantity on Hand checkbox. In the Issue Inventory and Sell Inventory routines, this option prevents the user from entering a quantity that exceeds the quantity on hand. When the issue quantity exceeds the quantity on hand, the user will be given the option to adjust the issued quantity to match the quantity on hand.
Updated 17Jan2018
Interfacing to other applications
You can set up the Materials Management application to retrieve and post information to other Caselle applications.
Caselle applications that interface to Materials Management:
Accounts Payable
Accounts Receivable
General Ledger
Project Accounting
Setting up the Accounts Payable interface
1. Open Connect Materials Management > Organization > Organization.
2. Click the Interfaces tab.
3. Click the Accounts Payable tab.

Accounts Payable tab in Organization
4. Select Caselle 4.x from the Interface menu.
5. Click Save (CTRL+S).
The Accounts Payable interface is set up in Materials Management.
Updated 17Jan2018
Setting up the Accounts Receivable interface
1. Open Connect Materials Management > Organization > Organization.
2. Click the Interfaces tab.
3. Click the Accounts Receivable tab.

Accounts Receivable tab in Organization
4. Select Caselle 4.x from the Interface menu.
5. Click Save (CTRL+S).
The Accounts Receivable interface is set up in Materials Management.
Updated 17Jan2018
Setting up the General Ledger interface
1. Open Connect Materials Management > Organization > Organization.
2. Click the Interfaces tab.
3. Click the General Ledger tab.
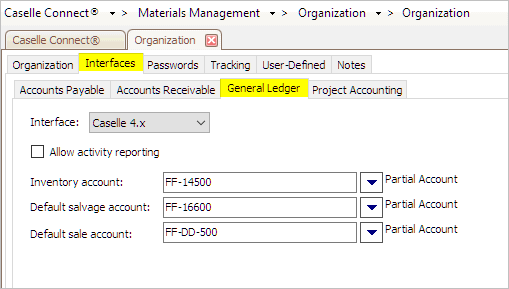
General Ledger tab in Organization
4. Select Caselle 4.x from the Interface menu.

Interface for General Ledger Interface in Materials Management
5. If you are using activity report, click to select the Allow Activity Reporting checkbox.
For more information on activity reporting, see the help topic titled How do I turn on activity reporting?

Allow Activity Reporting for General Ledger Interface in Materials Management
6. Enter the GL accounts for Inventory, Salvage, and Sale.
For instructions on how to set up a partial GL account, see the help topic titled How do I enter a partial GL account?
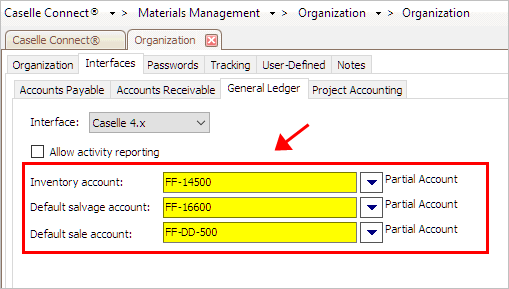
Inventory Account, Default Salvage Account, and Default Sale Account in General Ledger Interface
7. Click Save (CTRL+S).
The General Ledger interface is set up in Materials Management.
Updated 17Jan2018
Setting up the Project Accounting interface
Passwords
See the help topic titled How do I change application-level passwords?
Updated 22Jan2018
Tracking fields
How do I print the Management Tracking Report?
How do I set up Management Tracking?
Updated 08Jan2018
User-defined fields
How do I add a user-defined field?
How do I change the display order of user-defined fields?
How do I change the name of a user-defined field?
How do I change the user-defined field properties?
How do I delete a user-defined field?
How do I test a user-defined field?
How do I test a user-defined field?
Updated 22Jan2018
Copyright © 2025 Caselle, Incorporated. All rights reserved.