How do I add/remove accounts?
An account is an accounting record that shows increases, decreases, and a balance. You have two options for adding accounts: Setup Single Accounts and Setup Batch Accounts. Use Setup Single Accounts to set up accounts one by one. On the other had, use Setup Batch Accounts to set up multiple accounts that belong to the same district.
In this Topic
Add an account
Create a new record for an account.
Do this...
1. Open Connect Property Improvements > Accounts > Setup Single Accounts.
2. Fill in the options on the tabs for Account, Amounts, Alerts, Property/Owner, and Billing Override.
The fields on each tab are listed in alphabetical order, see the other sections in this help topic.
3. Click Save (CTRL+S).
The account is saved.
Change an account
Edit the account properties.
Do this...
1. Open Connect Property Improvements > Accounts > Modify Existing Accounts.
2. Use the Lookup bar to enter an account number. Press Enter.
3. Now, you can edit the account properties.
4. Click Save (CTRL+S).
The account is saved.
Delete an account
You cannot remove an account when related transactions exist.
Do this...
1. Open Connect Property Improvements > Accounts > Modify Existing Accounts.
2. Use the Lookup bar to enter an account number. Press Enter.
3. Click Delete (CTRL+D).
The account is deleted.
Options
Account number
This is the number you assign to identify the account.
Alerts (Payment and Payoff)
An alert is a message that displays on the screen to make the user aware of account-specific information. The payment alert will display when a property owner wants to make an extra payment toward the assessment amount. The payoff alert will display when the property owner wants to pay off the district assessment before the scheduled payoff date.
Do you want to display an alert message when a payment is due?
Yes, display a payment alert. In Accounts > Modify Existing Accounts, click the Alerts tab. Use the Payment Alert field to enter a message that is less than 250 characters.
No, do not display a payment alert. In Accounts > Modify Existing Accounts, click the Alerts tab. Next, delete the message that appears in the Payment Alert field.
Do you want to display an alert message when an account is paid off?
Yes, display a payoff alert. In Accounts > Modify Existing Accounts, click the Alerts tab. Use the Payoff Alert field to enter a message that is less than 250 characters.
No, do not display a payoff alert. In Accounts > Modify Existing Accounts, click the Alerts tab. Now, delete the message that appears in the Payoff Alert field.
Assessment begin date
The Assessment Begin Date is the day the assessment begins billing.
Billing group
A billing group is a list of categories that you can create to filter for tagging and sorting billing groups. The light blue background means that this is a self-validating field, in other words, you can create the values in the list.
What do you want to do?
I want to link the account to an existing billing group. Use the Billing Group drop-down list to select an existing description.
I want to add a new billing group. Use the Billing Group field to type in the name of the new billing group.
Billing options
The billing options lists the amounts to be billed on the account. The billed amounts may include principal, interest, late fee, and other amounts.
What do you want to do?
I want to bill an amount. Click to select the corresponding checkbox to bill the assessment.
I do not want to bill an amount. Deselect the corresponding checkbox to bill the assessment without including the fee.
Billing override
Use the options on the Billing Override tab to set up an alternate billing schedule for the account. When you create a new billing schedule the routine will calculate the new schedule based on the district, property, and account information.
Important! If the account uses a billing override schedule, you must create the billing override schedule BEFORE the district is activated.
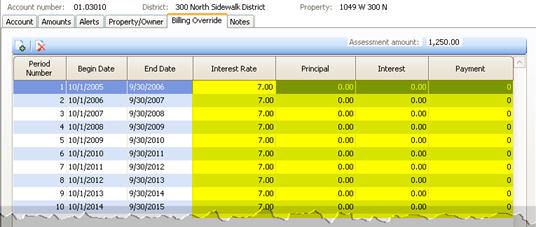
How do I create a billing override schedule?
On the Billing Override tab, click Create a New Billing Schedule. The system will use the district, property, and account information to create the billing override schedule. Next, click on the grid to enter the interest rate, principal, and interest amount.
How do I delete a billing override schedule?
Use delete to remove the entire billing override schedule. Important! You cannot remove a billing override schedule AFTER the district is activated.
On the Billing Override tab, click Delete the Displayed Schedule.
District
A district is an area, region, or section for billing assessments. Use the District field to assign a district to the account.
What do you want to do?
I want to enter a district. Use the District field to enter a district number or name.
Show me more information about the district. Use the District field to enter a district number or name. Then, use the District menu to select Additional Information.
Help me find a district number. Use the District menu to select Search.
I need to add a new district. Use the District menu to select New.
I want to modify the district properties. Use the District field to enter a district number or name. Then, use the District menu to select Modify.
Interest rate override
Use the Interest Rate Override to use the interest rate linked to the account to bill interest instead of setting up a billing override schedule to charge interest.
What do you want to do?
I want to use the default interest rate. Use Interest Rate Override to enter 0 (zero).
I want to use a billing override schedule to bill interest. Use Interest Rate Override to enter a the interest rate as a percentage.
Number of periods
A period is a portion of time, usually equal to a calendar month. The number of periods displays the number of periods in the district that is associated with the account.
How does this field work?
If the Status is Activated or Completed, the Number of Periods is read only.
If the Status is Pending, you can enter the number of periods (0-9999).
Original assessment
The Original Assessment is the amount of the original assessment. Use the Original Assessment field to enter a dollar amount.
Payment alert
An alert is a pop-up box that displays on the screen. You can set up alert messages for payments and payoffs. For example, City XYZ sets up an alert message on account 99 to display a warning when the amount received will pay off the account balance. When it is time to enter payments, the clerk for City XYZ enters a payment of $100. Since the unpaid principal is $100, the alert message displays the payoff alert on the screen.
To set up an alert message, click on the Alerts tab. Then, type in the text to display in the alert dialog. When a user enters the account number, the alert message will display on the screen.
To disable an alert message, click on the Alerts tab and delete the text that displays in the Payment/Payoff Alert field.
Payoff alert
An alert is a pop-up box that displays on the screen. You can set up alert messages for payments and payoffs. For example, City XYZ sets up an alert message on account 99 to display a warning when the amount received will pay off the account balance. When it is time to enter payments, the clerk for City XYZ enters a payment of $100. Since the unpaid principal is $100, the alert message displays the payoff alert on the screen.
To set up an alert message, click on the Alerts tab. Then, type in the text to display in the alert dialog. When a user enters the account number, the alert message will display on the screen.
To disable an alert message, click on the Alerts tab and delete the text that displays in the Payment/Payoff Alert field.
Period amount
The period amount is the amount billed per period. This field calculates based on the Period Amount Method. If the Period Amount Method is Calculated, this field will display the calculated amount. On the other hand, if the Period Amount Method is Manual, use this field to enter the period amount.
Period amount method
The period amount method is way which the routine will use to complete the period amount. Use calculated to allow the system to calculate the period amount. Use manual to calculate the period amount by hand.
What do you want to do?
I want the system to calculate the period amount. Use the Period Amount Method field to select Calculated.
I want to calculate the period amount. Use the Period Amount Method field to select Manual.
Primary owner
The Primary Owner field displays the mailing address of the primary owner on the account.
Property
A property is a piece of land or real estate that is owned by an individual or organization. Use the Property field to assign a property to the account.
What do you want to do?
I want to enter a property. Use the Property field to enter a property address.
Show me more information about the property. Use the Property field to enter a property address. Then, use the Property menu to select Additional Information.
Help me find a district number. Use the Property menu to select Search.
I need to add a new property. use the Property menu to select New.
I want to modify the district properties. use the Property menu to select Modify.
Property/owner
A property owner is the individual, group, or organization that owns a piece of land or real estate. Use the options on the Property/Owner tab to add, edit, or remove property owners from the account.

The primary owner is the majority stakeholder on the property. For example, Jane owns 65% and Pat owns 35%. Jane is the primary owner because she owns the majority of the property.
How do I add a property owner?
On the Property/Owner tab, click Add an Existing Owner. Use the Search form to select an owner. Then, click OK.
If the owner does not appear on the Search form, use Connect Property Improvements > Owners > Setup New Owners to add a new owner record.
How do I select the primary owner?
On the Property/Owner tab, click to select the primary owner from the list of owners on the left side of the screen. Then, click to select the Primary Owner checkbox.
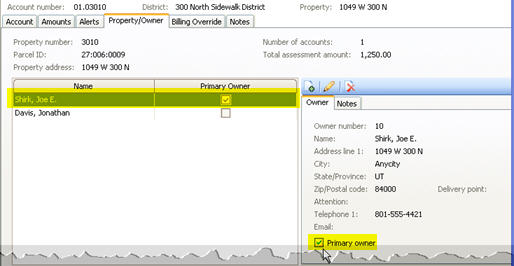
How do I edit properties on an existing owner?
On the Property/Owner tab, click to select an owner from the Owners list. Then, use the Owner subtab to edit the owner properties.
How do I remove an owner?
On the Property/Owner tab, click to select an owner from the Owners list. Now, click Remove the Selected Owner. This action will remove the owner from the account; however, the owner record is still saved in the Setup/Modify Owners.
Remaining principal
The remaining principal is the unbilled principal.
Is this a new account?
This is a new account. Use the Remaining Principal field to enter the full principal amount on the account.
This is an existing account. Use the Remaining Principal field to enter the outstanding principal amount on the account.
Set up amounts as of
The Set Up Amounts As Of is the date the routine will use to create the billing override schedule.
Status
The status is state or condition of the account. An account is activated when the account is in the payment phase. An account is completed when the account has been paid off. An account is pending when the account has been set up but has not yet been activated.
What is the account status?
The account is active. Select Activated as the Status.
The account is paid off. Select Completed as the Status.
The account is set up but not active. Select Pending as the Status.
Unbilled principal
The unbilled principal is the remaining principal minus the delinquent principal. The amounts in this grid are read only.
Unbilled Principal = Remaining Principal – Delinquent Principal
Copyright © 2025 Caselle, Incorporated. All rights reserved.