Print a report or export a file.
A trial balance is a list of the accounts in the general ledger and the corresponding account balance in the appropriate debit or credit column. The total of the amounts in the debit column should equal the total of the amounts in the credit column. Use the Trial Balance Report to view the trial balance on an account from the beginning of the year through the selected period.
1. Open Connect General Ledger > Reports > Trial Balance.
2. Select a report title.
3. Enter the Report Dates.
4. Select the Amount Type.
The actual amount is the real amount. The encumbrance amount is refers to amounts that will cover obligations that arise from purchase orders that are unpaid. The budget type amount is an amount for planning and projecting revenues, expenses, and capital expenditures for future fiscal periods.
What is the amount type?
Use the Amount Type field to select an option.
5. Select the Accounts to Include.
Use Accounts to Include to filter the accounts on the report. Use All to include all accounts in the General Ledger. Use With a Zero Balance to limit the account summary to show only accounts that have neither a positive or negative balance. Use With Balances to only include accounts that have a positive or negative balance. Use With Balances or Activity to include only accounts that have a balance and have transactions recorded during the report date range.
Which accounts do you wish to include?
Use the Accounts to Include drop-down list to select and apply a filter.
6. Set up the checkbox titled Include Net Income Total.
The net income is the income left in an accounting period after all expenses have been deducted from revenues. The term net income is used only if the revenues exceed the expenses.
Net Income = Revenues – Cost of Goods Sold – Expenses – Losses
When net income is a negative amount, it is referred to as a net loss.
Do you want to print the net income total on the report?
Yes, print the net income total on the report. Click to select Include Net Income Total.
No, do not print the net income total on the report. Click to deselect Include Net Income Total.
7. Click Print (CTRL+P).
The report prints.
Create a file to export the trial balance from Caselle to use it in Microsoft Excel.
Do this...
1. Open Connect General Ledger > Reports > Trial Balance.
2. Set up the report options to choose the trial balance to export.
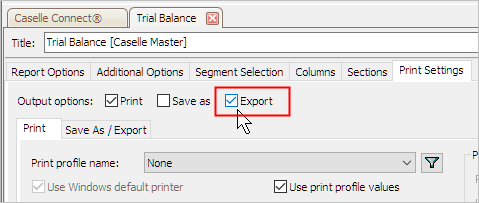
3. Click to select the Print Settings tab.
4. Click to select the Export checkbox.
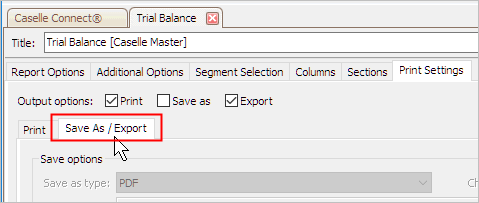
5. Click to select the Save As/Export tab.
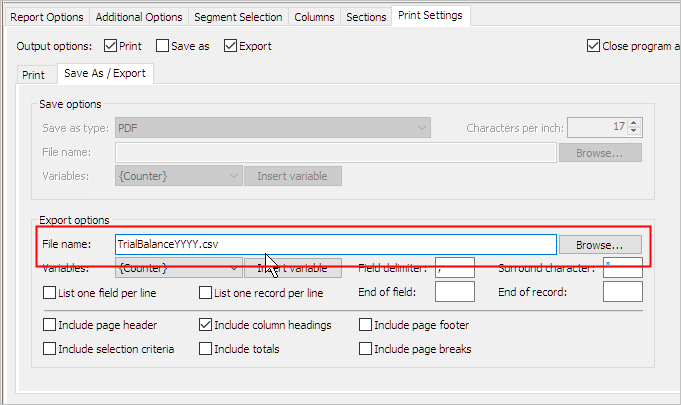
6. Use the section titled Export Options to enter the File Name.
This is the export file name followed by .csv. To save the export file in the default directory, enter the [filename].csv. To save the export file in a different directory, enter the drive and path followed by the filename, like this: [drive][path][filename].csv or c:\desktop\TrialBalanceYYYY.csv
7. Click Print (CTRL+P).
The trial balance is saved as a file that you can open in Microsoft Excel.