Activity Detail Ledger
Activity reports
Use this report to generate transaction details for activities. An activity is a code that is created in the General Ledger application for tracking transactions across multiple Connect applications. For example, you can create an activity to track expenses, revenue, and materials for a St. Patrick's day parade. The activity code let's you see the transactions that were created in Accounts Payable, Accounts Receivable, and Materials Management without launching reports in the individual applications.
What if I want to print the old version of the report? When a new version of a report is released, you have the option of using the old version of the report. To access the old version of the report, go to the Reports menu and click the link titled "Old Reports". Let us know if there is an issue with the new report, use CIMS or call customer support at (800) 228-9851.
Printing the Activity Detail Ledger will help you view the transactions that have been tagged with an activity code.
Some organizations print the Activity Detail Ledger report each week to monitor transactions for activities. You can print the report as often you need it. This report shows information and it will not create any transactions.
Contents
- Activity Detail Ledger
- Printing Activity Detail Ledger
- Amount type
- Balance option
- Accounts to include
- Include pending accounts
- Include report only transactions
- Select journal codes
- Select segment selection
- Total with leading segments or by each segment
- Provide running total by account type
- Include AP comments
- Include non-AP comments
- Print running balance
- Bold total lines
- Summarize payroll detail
- Print period totals
- Print budget summary totals
- Print YTD totals
- Printing Activity Detail Ledger
Printing Activity Detail Ledger
1. Open Connect General Ledger > Reports > Activity Detail Ledger.
2. Set up the report date range.
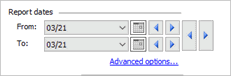
Report dates
3. Set up the report options.
Include report only transactions
Total with leading segments or by each segment
Provide running total by account type
4. Set up the columns and print settings.
5. Click Print  (CTRL+P).
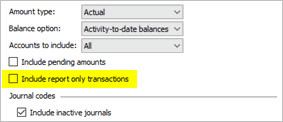
Amount type
You can print the detail ledger for actual amounts, encumbrance amounts, or budget type amounts. An actual amount is the real amount. The encumbrance amount is the amount that covers obligations that arise from open purchase orders. The budget type amount is an amount for planning and projecting revenues, expenses, and capital expenditures for future fiscal periods.

Amount type
Balance option
Choose how the report will calculate balances.

Balance option
Select an option:
-
Use activity-to-date balances to total transactions from the beginning GL period to the ending GL period. This option may include prior year transactions.
-
Use year-to-date balances to total to total transactions from period 0 (zero) of the selected year to the GL period in the selected year.
Accounts to include
Filter data to include or exclude it.

Accounts to include
Select an option:
-
Use All to include all accounts in the General Ledger.
-
Use With a Zero Balance to limit the account summary to show only accounts that have neither a positive or negative balance.
-
Use With Activity to include only accounts with at least one record with activity.
-
Use With Balances to only include accounts that have a positive or negative balance.
-
Use With Balances or Activity to include only accounts that have a balance or have transactions recorded during the report date range.
Include pending accounts
A pending amount is an amount that has been submitted for approval but has not been approved.

Include pending amounts
Include report only transactions
Include report only transactions in the report. A report only transaction is a transaction that is entered in a Report Only type journal code.
Include report only transactions
Select journal codes
To include active journal codes, use the Journal Codes grid to select the checkbox next to a journal code. The grid only includes active journal codes.
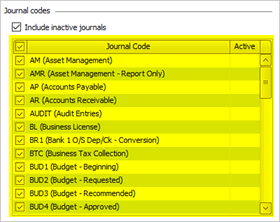
Active journal codes
To include inactive journal codes, select the Include Inactive Journals checkbox.

Include inactive journals
To learn more, see How do I activate/deactivate a journal code?
Select segment selection
These are the segments that your organization uses to format accounts. You can use the tools on the Segment Selection grid to filter accounts by segment, show the segment detail, or summarize the segment and show only the segment summary.
Filtering by segment
You can apply an additional filter to sort by segment. To apply a selection criteria to a segment, click Filter  and then enter the segment numbers to include on the report.

Additional Options tab, Segment Selection
Showing segment detail or summary
Choose how much information to include on the report. Use detail to show each transaction or use summary to summarize the transactions into a one-line summary.

Segment detail vs. segment summary
-
To print the segment detail, do no check the Summarize checkbox.
-
To summarize the segment into a one-line summary, check the Summarize checkbox.
Total with leading segments or by each segment
Use total with leading segments to print a total when the leading segment changes to a new leading segment. Use total by each segment to print a total when any segment changes to a new segment.
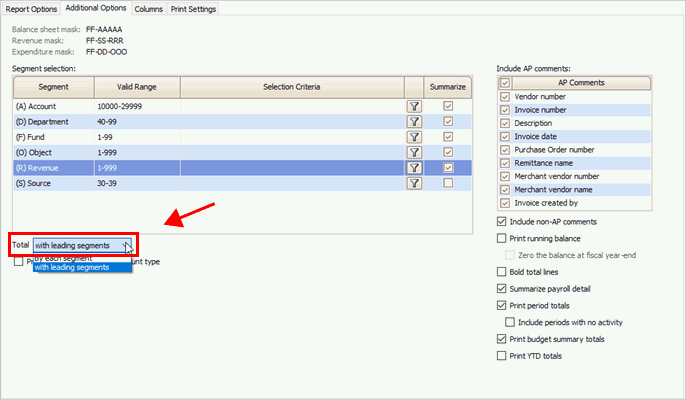
Total with [x]
Provide running total by account type
Select the checkbox to insert a running total every time the account type changes to a new account type.
Include AP comments
The AP Comments box lists every comment type that can be created in the Accounts Payable application. Selecting the checkbox will print the selected comment on the report with the segment it's attached to. Two asterisk (**) will print before a comment, like this...
**Vendor No: 100: This is a comment about the vendor number.
Include non-AP comments
If you are using the interface to another Connect application, selecting this checkbox will print the comments from the subsystem on the report. Selecting this option will not print comments from the Connect Accounts Payable application.
Print running balance
Total the balance after each transaction and print the new total in the balance column. The balance will not return to zero at the end of a period or year.
To zero the balance at the fiscal year end, click to select the Zero the Balance at Fiscal Year-end checkbox.
Bold total lines
Apply bold formatting to lines that print a total.
Total lines with bold formatting
Summarize payroll detail
Total payroll transactions in CDP type journals and print the total on one line instead of printing one line for each payroll transaction.
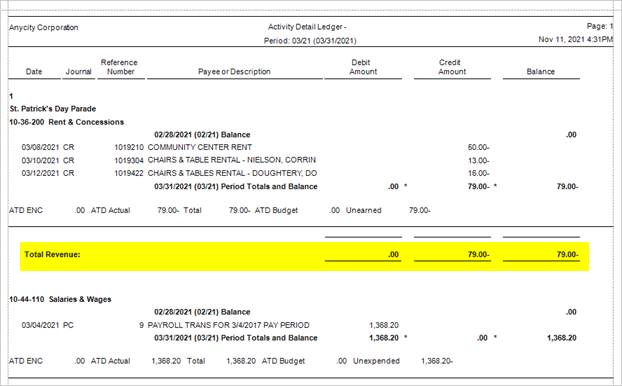
Print period totals
Print period totals for all debits, credits, and balances for the specified report range.
mm/dd/yyyy (mm/yy) Period Totals and Balance
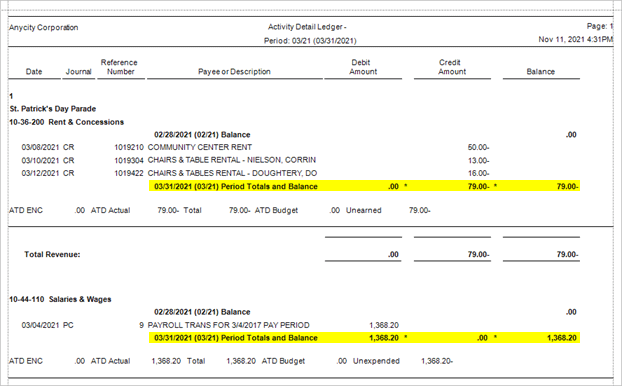
With period totals
To include periods without transactions, click to select the Include Periods With No Activity checkbox. Selecting this checkbox will include period totals and balance for every period in the selected date range even when there isn't any activity recorded for the period.
Print budget summary totals
Print budget summary information for expenditures and revenue type accounts. Selecting this option will include budget summary information for expenditure and revenue type accounts for each activity.
To hide the summary row for both expenditures and revenue type accounts for each activity, remove the checkmark from the checkbox.
Print YTD totals
Print year-to-date totals on the last page of the report.
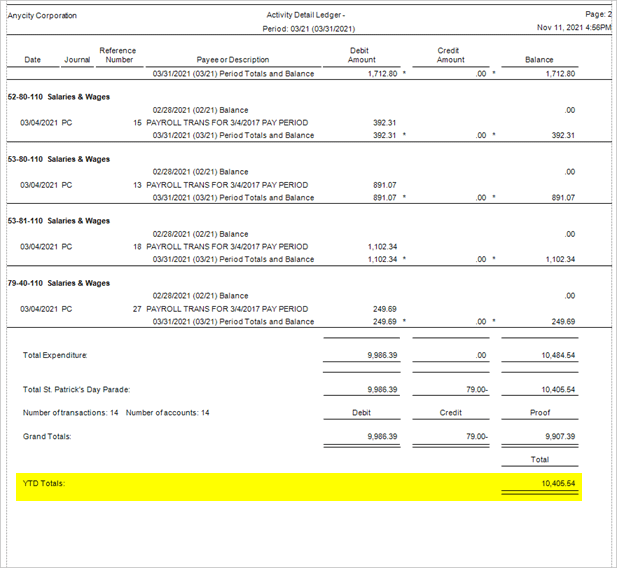
YTD Totals
202202, 2021Nov11
Copyright © 2020 Caselle, Incorporated. All rights reserved.