How do I reconcile bank accounts?
Reconciliation Checklist
If you don't balance the bank statement to the latest journal entries, you can use this routine to verify that the cleared deposits/check total match the deposit/check total on the bank statement. If the totals do not match, you need to find the missing item and either record it or clear it. Make sure the correct ending bank balance has been recorded. If you make any changes, you'll need to run Recalculate.
Note: If you have multiple checking accounts, you will need to perform this task for each one.
Watch a video
Learn how to reconcile bank accounts. [MP4]
Reconcile Bank Accounts Overview
The information on the left side of the screen is the bank's side. Use this section to enter the amounts from the bank statement, cleared deposits, cleared checks, etc. You want the values on this side to look exactly like the bank statement. There are times when the amounts in this section will not match the bank statement, see the section titled Exceptions.
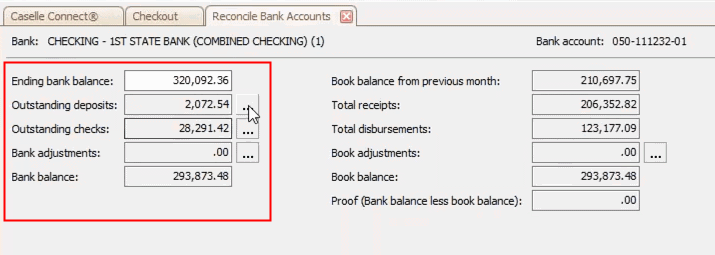
Bank's side
The information on the right side of the screen is the organization's side. Use this section to view the amounts from the GL account. When you finish reconciling, the proof will equal zero.
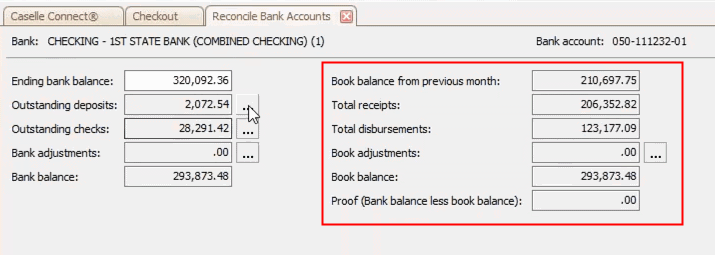
Organization's side
Reconciling a bank account
Compare the bank balance on the bank statement with the book balance in Caselle.
Do this...
1. Open Connect General Ledger > Reconciliation > Reconcile Bank Accounts.
The Options form displays.

Options form
Enter the bank account and period to reconcile. Click OK.
The Reconciliation Not Found dialog box displays. This dialog box will display the first time you start a reconciliation for a new period.

Reconciliation Not Found warning
Click Yes to continue.
The bank reconciliation for the selected bank account and period displays on the screen. Connect fills in all of the amounts except for the Ending Bank Balance.
Book Balance from the Previous Month: This is the bank reconciliation for the prior month. If you view the bank reconciliation for the prior month, you'll see the same amount in the Book Balance field.
Total Receipts: This amount comes from your journal entries, Cash Receipting, and Manual CRJE entries.
Total Distributions: This amount comes from all of the checks that you have written.
Ending Bank Balance
2. Enter the Ending Bank Balance.
This is the ending bank balance from the bank statement.
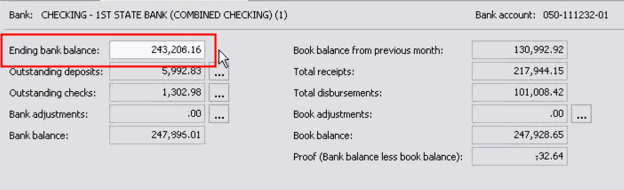
Ending Bank Balance
Outstanding Deposits
An outstanding deposit is a deposit that has not yet been returned for processing by the bank in the selected period.
3. Enter Outstanding Deposits by clicking the Outstanding Deposit button.

Outstanding Deposits button
The Cleared Deposit Entry screen shows you a list of all of the deposits in the system that could be cleared for the month.
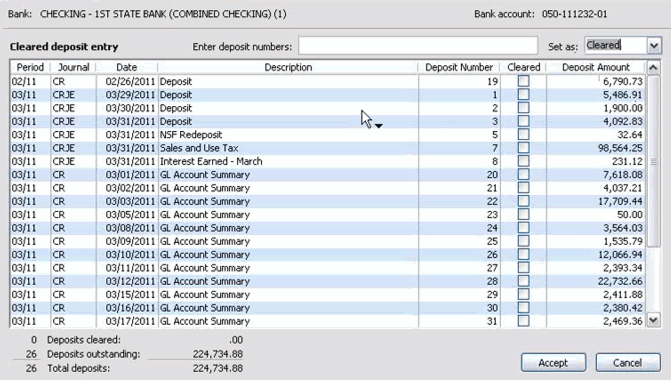
Cleared Deposit Entry screen
Use the list of cleared deposits on the bank statement to mark the cleared deposits in Caselle.
Deposits: Clearing a deposit may be challenging because you may have two deposits in Caselle for one deposit on the bank statement. You will still clear the deposits in Caselle that match the deposit on the bank statement.
To clear a deposit, you can
-
clear deposits one by one. Click to select a checkbox.

Cleared Checkbox
-
use the keyboard to clear deposits one by one. Press the spacebar to clear a deposit or press the down arrow to skip a deposit that has not cleared.
-
clear all of the deposits showing on the current screen. Click Set Screen (CTRL+SHIFT+F5). Now, review the cleared deposits on the bank statement and remove the checkmark in Caselle from the deposits that didn't clear.

Set Screen button
-
clear all of the deposits in the reconciliation period. Click Set All (CTRL+SHIFT+F3). Now, review the cleared deposits on the bank statement and remove the checkmark in Caselle from the deposits that didn't clear.

Set All button
Tip! Clicking on the Date column header will sort the deposits by date in ascending or descending order.

Does the amount showing as the Deposits Cleared match the deposits cleared on the bank statement?
Typically, the bank statement will include the total deposits or total credits. You want to match the Deposits Cleared in Caselle to the total deposits or total credits on the bank statement. If you don't clear the same deposit amount as the bank statement, the bank reconciliation will never balance.
 .
.
Deposits Cleared in Caselle
If the Deposits Cleared matches the total deposits or total credits on the bank statement, click Accept to continue.
If the Deposits Cleared does not match the total deposits/total credits on the bank statement, review the cleared deposits on the bank statements again. Make sure all of the cleared deposits are selected and none of the uncleared deposits have been cleared.
How do I troubleshoot deposits that don't balance?
Outstanding Checks
An outstanding check is a valid check that has not yet been returned for processing to the issuing bank.
4. Enter Outstanding Checks.
Click the Outstanding Checks button.

Outstanding Checks
The Cleared Check Entry screen shows you a list of all of the checks in the system that could be cleared for the month.
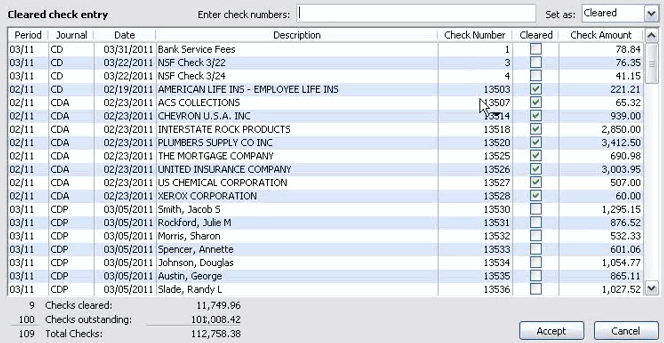
Cleared Check Entry screen
Use the list of cleared checks on the bank statement to mark the cleared checks in Caselle.
Checks: Clearing a check may be challenging because you may have two check transactions in Caselle for one check on the bank statement. You will still clear the check transactions in Caselle that match the checks on the bank statement.
To clear a check, you can
-
clear checks one by one. Click to select a checkbox.
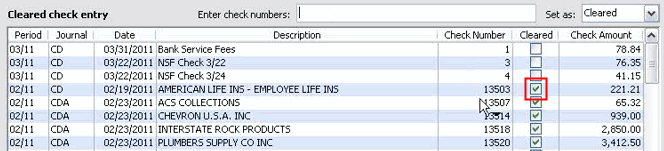
Cleared checkbox
-
use the keyboard to clear checks one by one. Press the spacebar to clear a check or press the down arrow to skip a check that has not cleared.
-
clear all of the checks showing on the current screen. Click Set Screen (CTRL+SHIFT+F5). Now, review the cleared checks on the bank statement and remove the checkmark in Caselle from the checks that didn't clear.
Set Screen button
-
clear all of the checks in the reconciliation period. Click Set All (CTRL+SHIFT+F3). Now, review the cleared checks on the bank statement and remove the checkmark in Caselle from the checks that didn't clear.
Set All button
-
clear a range of checks. Use the Enter Check Numbers field to enter a range (##### - #####) and then press Enter. You can also use this tool to enter a single check number and clear it.

Enter Check Numbers field
-
import cleared check file. Use a cleared check file from the bank to clear checks in Caselle. See the help file titled How do I import cleared checks?
Tip! Clicking on the Date column header will sort the checks by date in ascending or descending order.

Does the amount showing as the Checks Cleared match the checks cleared on the bank statement?
Typically, the bank statement will include the total checks. You want to match the Checks Cleared in Caselle to the total checks cleared on the bank statement. If you don't clear the same check amount as the bank statement, the bank reconciliation will never balance.
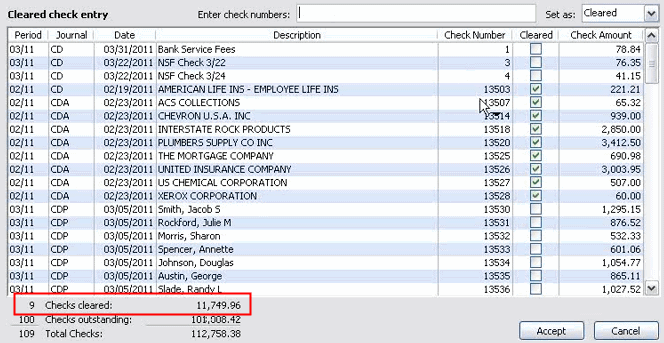
Checks Cleared in Caselle
If the Checks Cleared matches the total checks on the bank statement, click Accept to continue.
If the Checks Cleared amount do not match the total checks cleared on the bank statement, review the cleared checks on the bank statements again. Make sure all of the cleared checks are selected and none of the uncleared checks have been cleared. If the checks don't balance, see the help topic titled How do I troubleshoot checks that don't balance?
Bank Adjustments
A bank records an adjustment when an error occurs, for example, the wrong amount is recorded as the deposit amount, the account number is transposed, a customer stops payment on a check, the account has insufficient funds, the account closes before the check clears, and so on. The bank adjustments are the adjustments that have been made to the account balance by the bank.
5. Record bank Adjustments.
Important! Most fees and bank changes should be reconciled in the appropriate CD or CRJE journal and cleared with the checks or deposits.
Important! Bank adjustments recorded in bank reconciliation should only be done in rare cases. For example, the bank cleared a deposit or check for the wrong amount and the bank will correct it in the next period. In this case, you'll enter the reason for the adjustment and the amount being adjusted.
Use the bank statement to look for transactions that are not listed as cleared deposits or checks. You'll need to enter these transactions into Caselle before you can clear them. For example, an NSF check that was processed by the bank but the NSF paperwork from the bank has not yet arrived.
Click the Bank Adjustments button.

Bank Adjustments button
The Bank Adjustment Entry screen shows you a bank adjustment entry screen. .
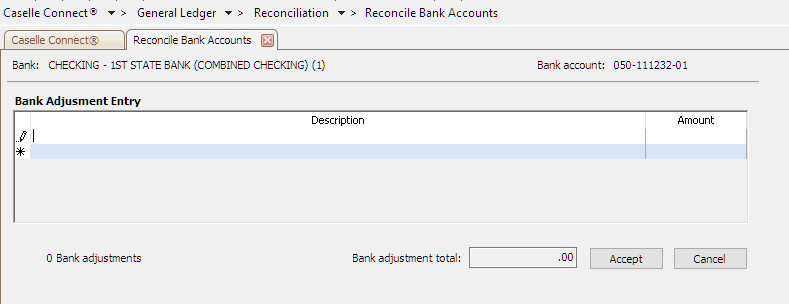
Bank Adjustment screen
Finishing Up
When the proof on the bank reconciliation equals zero, you're ready to print the Bank Reconciliation Report. It's nice to have a printed copy of the bank reconciliation just in case something changes and you need to find out what happened.
6. Print the Bank Reconciliation Report.
Click Print (CTRL+P).

Print button
Select Bank Reconciliation.

Bank Reconciliation
The Bank Reconciliation Report opens. The Report Dates default to the reconciliation period.
Select the bank account that was reconciled.
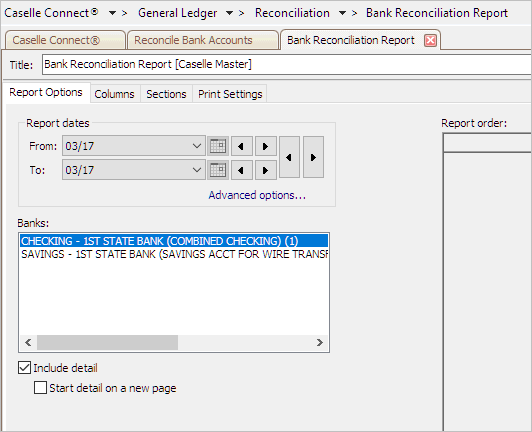
Banks list
Click Print (CTRL+P).
You can also preview the report or save the report as a PDF.
You're done!
Exceptions
The bank statement may not balance with the book balance when
-
there are book adjustments. Use a book adjustment when you're starting a new bank and you need to enter a book balance from a previous month to balance the bank statement to the book balance. Usually, this field is left blank.

Book Adjustments
-
If you need to enter an adjustment and you're not starting a new bank, then you should enter a bank adjustment.

Bank Adjustments
Searching for bank reconciliation errors
Set up Checkout to only check for errors in bank reconciliation. Using these options will help Checkout run faster.
Do this...
1. Open Connect General Ledger > Reconciliation > Checkout.
2. Change Check Through Period to select the bank reconciliation ending period.

Check Through Period
3. Select the checkbox titled Verify Bank Reconciliations and then select all of the checkboxes listed below it.
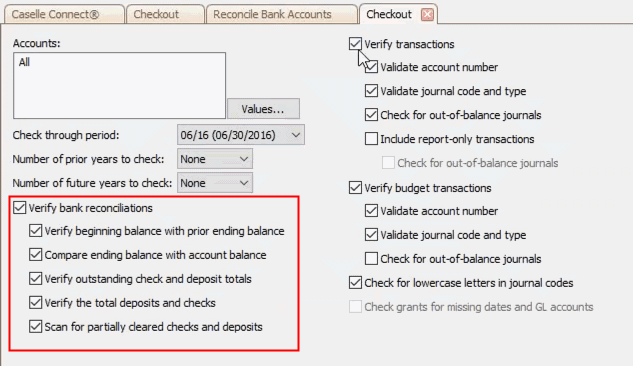
Verify Bank Reconciliations
4. Remove the checkboxes from Verify Transactions, Verify Budget Transactions, and Check for Lowercase Letters in Journal Codes.
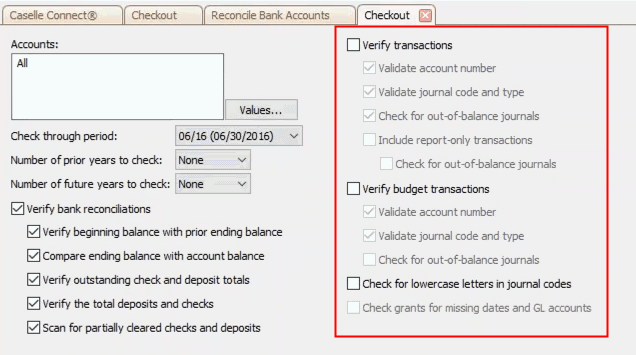
Verify Transactions, Verify Budget Transactions, and Check for Lowercase Letters in Journal Codes
5. Click GO (CTRL+G).
If the Checkout Report shows no errors found, you're ready to continue. If the Checkout Report lists any errors, make sure to fix the errors before you continue.
Error: Book balance from previous month does not match the prior bank ending balance
If the bank balance from the previous month does not match the prior bank ending balance, recalculate the balances. To recalculate, click the Recalculate button (CTRL+SHIFT+F1).

Recalculate button
Warning Message: Bank balance does not match book balance
Are you including Periods 13 and 14 for bank type journal entries?
The bank only recognizes months 1 to 12. When you record the bank type journal entries in periods 14 and 14 in the bank balance, the bank balance will not match the book balance. You may need to talk with your auditor and Caselle support to find the best way to record journal entries in Period 13 and 14 for your organization.
Updated 08Jan2018
Error: Recompute Beginning Balances
The prior year transactions may have changed. Would you like to recompute beginning balances for all accounts?
This error occurs when the prior year GL account ending balance does not match the current year GL account beginning balance. To find this error, run the Checkout Report to see if beginning balances match prior year ending balances. See the section titled Searching for Bank Reconciliation Errors.
Updated 08Jan2018
If the Bank Balance equals Book Balance why am I still receiving an error message?
You may receive this error on the Checkout Report. This is one of those errors where you've done everything that you are supposed to do to balance the month. Connect shows you a message that says the bank balance equals the book balance and yet,, the Checkout Report includes a items with an ending bank balance that does not balance with the ending book balance or GL account. You know there's something wrong in the period being reconciled, but you don't know how to find it.
To track it down, start by using Account Inquiry to look up the transactions for the Cash - Checking account in the period being reconciled.
Recalculating Bank Reconciliation
When you make changes to bank reconciliation, you'll want to click Recalculate to refresh the amounts on the bank reconciliation.
Recalculate button
This dialog box displays. Use option 1 to only update the amounts for the current period or use option 2 to update the amounts for the current period and future periods. Type 1 or 2 in the field titled Enter Recalculate Option and then press OK.

Recalculate Bank Reconciliation
Updated 11Sep2017
Copyright © 2020 Caselle, Incorporated. All rights reserved.