How do I import cleared checks?
Reconciliation
You can use the cleared check file from the bank to reconcile cleared checks. Some banks offer a service that lists the cleared check numbers and amounts for in a file format. After you import the cleared check file, Connect can use it to clear the check numbers in the bank reconciliation view for you. To automatically clear a check, the check number and amount in the cleared check import file must exactly match the check number and amount in Connect.
Warning: Importing a cleared check file will not clear items that are not assigned to a check number, for example: Automatic Withdraws, Bank Fees, NSF checks, etc.
These changes are included in the 2023.08 release.
What's new?
-
Updated the look and feel of the view. The view will automatically assign the check number and check amount fields to the data in the import file. The view also supports the following file types: Caselle delimited, Caselle fixed-length, User-defined delimited, and User-defined fixed length. (2023.08)
Watch a video
-
Learn how to import cleared checks from a bank, import cleared checks from a spreadsheet, and use the imported cleared checks to reconcile a bank account (8m23s). This webinar uses an earlier version of Connect, but the process is the same for importing cleared checks.
Before you get started
-
Download the cleared check file for the bank account. A csv file type usually works best. You'll need to know the file location of the cleared check file and the file type.
First, print the cleared checks report
This step is optional.
Printing a report that shows the cleared checks in the import file is a quick and easy way to review the import file contents. The report shows if the cleared check amount from the import file matches the cleared check amount in the application.
Do this...
1. Open Connect General Ledger > Reconciliation > Import Cleared Checks.
2. Set up the form with the options that you'll use to import the cleared check file.
Import file type
Select the import file type. You may need to contact the bank that send the cleared check file to determine the file type.
Delimiter
If the import file type is a delimited file (not a fixed-length file), enter the symbol the file uses to mark the end of each value.
Import file name
Enter the path and file name with the file extension.
Period
Select the period to use to create the cleared check transactions.
Bank
Enter the bank.
Lines to skip
Does the import file include a header row? A header row is when the first record in the import file is used to to display the column name instead of showing a value. Importing a header row will generate an error message.
Example: The display pane shows the first few records from the import file. When the display pane shows column headers instead of showing a record, mostly likely there's a header row in the import file. In this example, changing the lines to skip to 1 will skip the first row and then import the remaining information.

Import Cleared Checks,
Does the import file have a header row?
-
If the import file does not include a header row, enter 0.
-
If the import file includes a header row, enter the number of header rows in the Lines to Skip box.
Select Report Only as the print option. Using the report option will import the cleared checks and print a report to show the imported cleared checks.
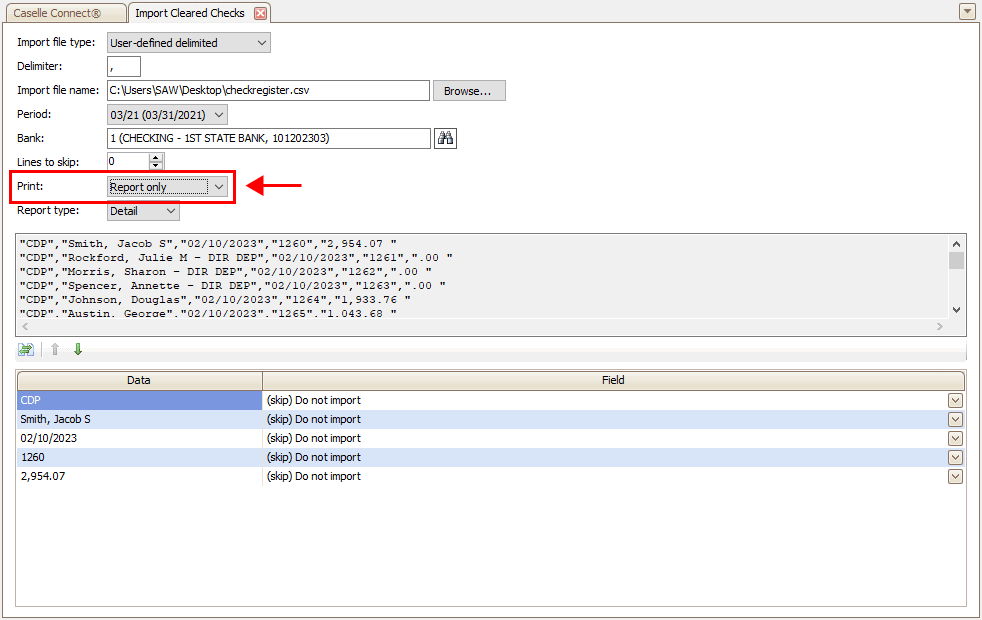
Print Report checkbox
Report type
Print the detail or summary.
3. Assign the fields in the import file to the field names in the application.
The check number and amount are required fields. The check date will print on the report but but it won't be included when checks are imported

4. Click GO ![]() (CTRL+G).
(CTRL+G).
The cleared checks are imported and the report prints a list of the cleared checks. Use the status column on the report to find out which cleared check amounts from the import file match the cleared check amounts in the application.
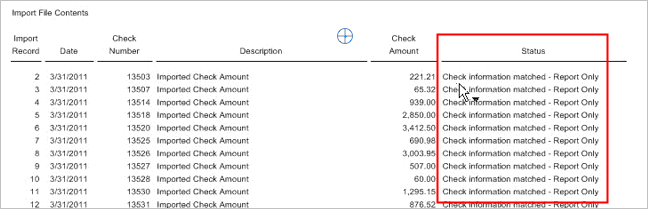
Status column on the Import Cleared Checks Report
If the cleared check amount in the import file does not match the cleared check amount in the application, the status column will show the warning message: Check Information Not Matched. To troubleshoot this error, click here.
Second, import cleared checks
When you import cleared checks, Connect will compare the check number and amount in the import file against check number and amount in the application. If there's a match and the check was not cleared, this routine will clear the check amount.
Tip! If you printed the report in the previous step, you should use the same settings that you used to print the report.
Do this...
1. Open Connect General Ledger > Reconciliation > Import Cleared Checks.
2. Use the same settings that you used in the previous step.
3. Use the Print menu to select Report or No Report.
Choosing Report will import cleared checks and print a report. Using No Report will import cleared checks without printing a report.
4. Click GO ![]() (CTRL+G).
(CTRL+G).
Connect uses the cleared check import file to clear checks into the General Ledger application. Next, open Reconcile Bank Accounts to view the cleared checks (open Reconcile > Reconcile Bank Accounts and then click the Outstanding Checks button). The Checks Cleared Total on the bank statement should exactly match the Checks Cleared Total in the application.

Bank Reconciliation, Cleared check entry
202308, 2023Mar31
If needed, you can manually clear non-check items
Importing a cleared check file will not clear items that are not assigned to a check number: Automatic Withdraws, Bank Fees, NSF checks, etc. You'll need to clear these items. For example, an NSF check may show up on the bank statement even though you have not received the NSF paperwork yet.
Before you get started
-
You may need to enter a journal entry for the non-check item (NSF check).
Do this...
1. Open Connect General Ledger > Reconciliation > Reconcile Bank Accounts.
2. Open the bank reconciliation that you're working on.
The non-check items usually display at the top of the list.

3. Use the section on the bank statement for other debits and other withdraws to clear the non-check items in Connect.
The Checks Cleared Total updates to include the cleared non-check items.
202208, 27Jul2017
Copyright © 2020 Caselle, Incorporated. All rights reserved.