How do I create a positive pay file? (2024.08)
Positive Pay File
Send transactions to the bank as an export file, printed report, or electronic transfer file. Positive Pay is a fraud prevention tool that consists of an electronic file (usually ASCII text. The electronic file contains check information for issued checks, which is then transmitted to the bank. When a check is received by the bank, the bank compares the data on the check to the issued check information provided by the client. If the check information does not match the issue file, the check is set aside for the organization to review for accuracy. The Positive Pay File is protected from check fraud because criminals cannot cash fraudulent checks.
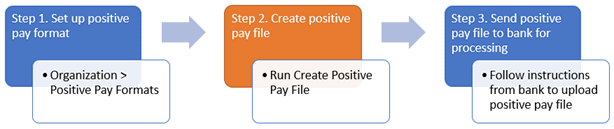
Positive Pay Process
Before you get started
-
If you are using a positive pay format that was created in 2024.05 or earlier, you will need to carefully review the positive pay format definition before you use it in 2024.08.
-
You will need to set up a positive pay format. This is the format that you will use to send the positive pay file to the bank. See How do I add a positive pay format?
First, set up a positive pay file (report)
Set up the positive pay file, and the print and review a report of the transactions that will be created when you generate the actual positive pay file.
Do this...
1. Open Connect General Ledger > Organization > Create Positive Pay File.
2. Fill in the following options.
Export definition
Select a positive pay format definition. Connect will use the selected positive pay format definition to create the positive pay file. If the menu is blank, you will need to create a positive pay format definition before you continue. [More]
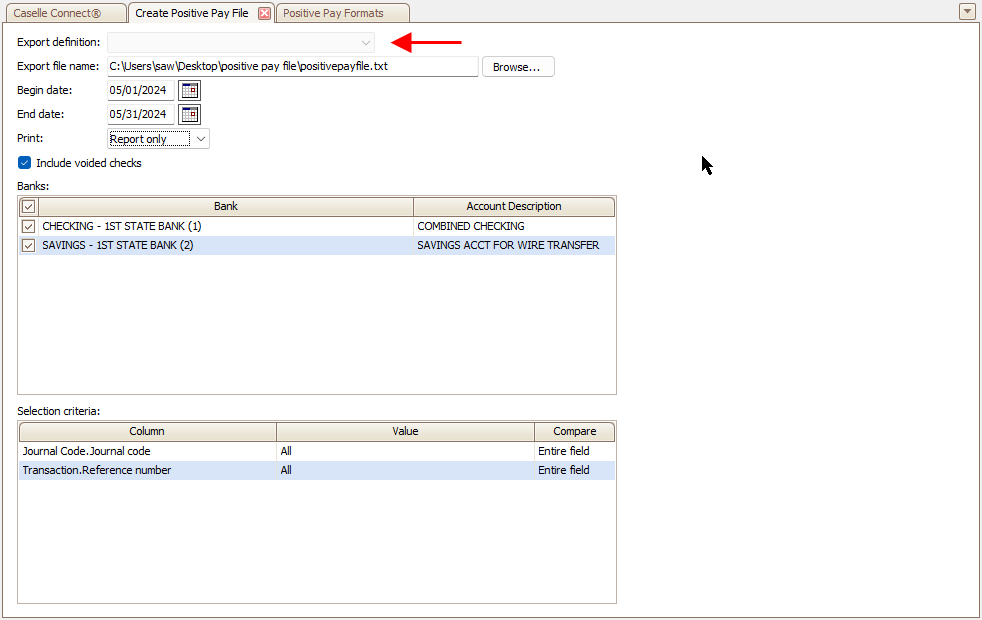
Export file name
Enter the path and filename of the positive pay file. Example: c:\exportfilename.txt

Begin date
Enter the first date in the date range for the checks to include in the positive pay file.

End date
Enter the last date in the date range for the checks to include in the positive pay file.

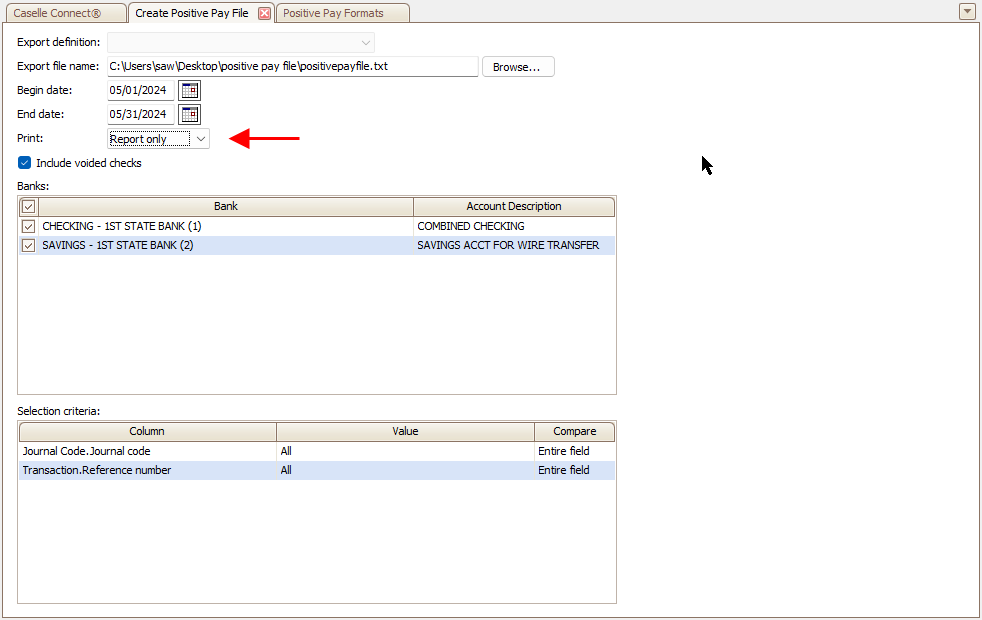
Select Report Only as the print option. This option will print a report of the checks that will be included in the positive pay file without creating the actual positive pay file.
Include voided checks
A check is void when the check amount is less than or equal to zero. This option is selected by default.

Banks
Select a bank. Checks for the selected bank will be included in the positive pay file. The menu will include active and inactive banks. The default setting will select all banks.

Selection criteria
(Optional) Set up additional options to filter checks by transaction and journal code.

3. Click GO  (CTRL+G).
Second, review the positive pay file report
Make sure the report
-
includes all checks that should be included.
-
excludes checks that should not be included.
-
shows the correct bank account number, void indicator, check number, check amount, check date, payee, and company name.
Is the positive pay file report correct?
-
Yes, the positive pay file is correct. If the positive pay file report is free of errors, continue to the next step to create the positive pay file.
-
No, the positive pay file is not correct. If you find any issues, you will need to update the check transaction, and then recreate and review the positive pay file report.
Third, create a positive pay file
Create the positive pay file that will be sent to the bank.
Do this...
1. Use the same settings that you used to create the positive pay file report.
2. From the Print menu, select Report or No Report.
3. Click GO (CTRL+G).
4. Follow the instructions from the bank to upload the positive pay file.
If you're not sure, contact the bank to request instructions for sending the positive pay file to them. You will need to use the banking portal provided by your bank. The portal should have a positive pay or check fraud prevention section, which will have an option to Upload File or Submit Positive Pay File or something similar. Follow the on-screen instructions to upload the positive pay file.
Troubleshooting
Warning: Field length too short for value
Issue: The positive pay format uses a fixed-length format. The value in the field is greater than the value of the fixed-length field.
Solution: Use the error message to look up the check transaction. The error message will print above the check with the issue requiring your attention. Find the invalid value and replace it with a valid value. Now, start at step and reprint the positive pay file report.
Warning: Invalid format string: <format>
Issue: The positive pay file has a field that is not formatted correctly.
Solution: Use the error message to look up the check transaction. The error message will print above the check with the issue requiring your attention. Find the invalid value and replace it with a valid value. Now, start at step and reprint the positive pay file report.
202408, 2024May01
Copyright © 2025 Caselle, Incorporated. All rights reserved.