Importing amounts from a spreadsheet.
Use Import Amounts to add information from a comma-delimited text file into the General Ledger database. For example, if you have been preparing budget information in a spreadsheet, you can use this routine to import the information in the spreadsheet.
In this Topic Hide
1. Open Connect General Ledger > Journals > Import Amounts.
2. Fill in the import file properties.
3. Use the options in Import File Layout to select the fields that you wish to import from the import file.
4. Next, use the options in Amount Options to select the default properties for the imported fields.
5. Click GO (CTRL+G).
Connect creates journal entries for the imported amounts.
Use Amount Options to select the default properties for the content in the imported fields.
If the imported amounts are not budget amounts, which periods will you use to copy the imported amounts to?
Click Periods. Use the Selection form to select the period or periods.
If the imported amounts are budget amounts, which budget level will you use to copy the imported amounts to?
Use the Budget Level field to select the name of the selected budget level. When you click GO (CTRL+G), the routine will copy the imported amounts to the selected budget level.
Do you want to round amounts to the nearest whole dollar?
Yes, I want to round amounts to the nearest whole dollar. Example: this option will round $24.67 to $25. Click to select Round Amounts to Nearest Dollar.
No, I want to use the exact amount in the import file. Example: this option will import $24.67 as $24.67. Click to deselect Round Amounts to Nearest Dollar.
Do you want to divide the imported amount between the selected periods?
A description is a word or phrase that describes the character or features of the record.
What is the description?
Use the Description field to enter a word or phrase (50 characters or less).
Use Import Amounts to create transactions.
Do you want to import amounts?
Yes, I want to import amounts. Click to select Import Amounts.
No, I do not want to import amounts. Click to deselect Import Amounts.
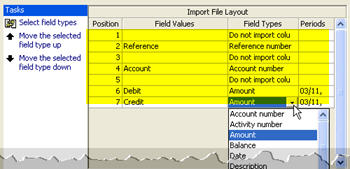
The Import File Layout maps the fields of the import file to the columns in the database. Use the options in Import File Layout to select the field names and the order the fields are saved in the import file.
First, select the field types.
Click Select Field Types. The Selection form shows the field types that are in the import file. Move the name of the fields that you wish to import to the Selected Fields List.
Second, move the field types in the order in which they will be imported.
Use the Import File Layout grid to select a field type. Then, click Move the Selected Field Type Up/Down.
Third, set the properties on each field type.
Use the Field Types column to select the type of information that is stored in the field. If the row is blank, select Do Not Import Column (Skip) as the Field Type.
The import filename is the filename and file location.
What is the import filename?
The import file is located in the Connect directory. All of the Connect applications are located in the default d:\Connect directory, where you replace d:\ with the appropriate drive letter. If the import file was created and saved to the Connect default directory, then you only need to enter the import filename and extension. For example, ImportFileName.txt
The import file is located in a local or network directory. If you are importing a file that is stored on a disk or hard drive, type in the drive letter and path followed by the import filename and extension. Example: d:\my documents\ImportFileName.txt
The journal is the place where you will record transactions for imported amounts.
In which journal do you wish to create transactions for investments?
I know the journal code. Use the Journal drop-down list to select a journal code.
Help me find the journal code. Click Search. Use the Search form to find the journal code.
Use Print Report to print the transactions that will be imported as a printed report.
What do you want to do?
I want to print a report of the positive pay file. Click to select Print Report.
I do not want to print a report of the positive pay file. Click to deselect Print Report.
A line is a single row in a spreadsheet. When a row contains the names of column headings, you may prefer to not create a record for the column headings. Use Lines to Skip to not import the column headings, or other unnecessary data.
Does the import file contain column headers or extra information that you do not want to import?
Yes, the import file contains headers or extra information. Click on the Lines to Skip field, then enter the number of rows to omit from the import file.
No, the import file does not contain headers or extra information. Enter 0 (zero) in the Lines to Skip field.