How do I copy journal entries? (New)
Journal Entries
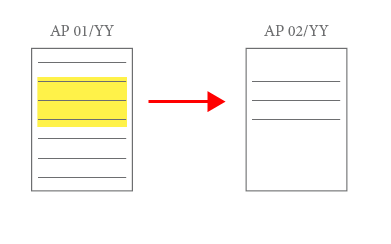
Copy journal entries from one journal to another journal. When you use this routine, Connect will copy journal entries from one journal and then create identical journal entries in another journal. Copying journal entries saves you the time required to manually enter the journal entries in a different journal or period.
Can I uses this routine to copy budget journals? No, budget journals use a special budget routines to copy budget entries. Do not use this routine to copy budget journal entries. [More]
This routine is for any organization who wants to create the same journal entries in another journal or create the same journal entries in the same journal for several periods. If you need to copy journal entries to more than one journal, you will need to run the routine once for each journal.
The Copy Journal Entries routine was updated in the 2022.08 release.
-
To use the updated routine, download and install the 2022.08 release. You (or the application administrator) will need to update your user rights to access Copy Journal Entries. [MP4]
-
To use the old version, go to the Journals menu and select Copy Journal Entries (Old).
What's new?
-
The routine will create approval activity when a journal entry is copied to a journal code that's tied to an approval process (2023.05).
Copying journal entries to a single period
Copy the journal entries from the source journal to the destination journal.
Do this...
1. Open Connect General Ledger > Journals > Copy Journal Entries.
2. Set up the source journal.
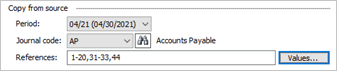
Copy from source
Copy from source
-
Period. Select the source period.
-
Journal code. Select the journal code. The entries for the selected period and journal will be displayed in the Source Journal Entries transaction grid.
-
References. Select the reference number. Changing this control will filter the reference numbers that display in the Source Journal Entries transaction grid. (You can enter a reference number (###), reference number range (###-###), or reference number series (###-###, ###, ###...). Use a comma to separate multiple entries.)
Review source journal entries
Use the Source Journal Entries transaction grid to review the entries that have been selected to copy to the destination journal. You can use the checkbox to include or exclude journal entries from the selection.
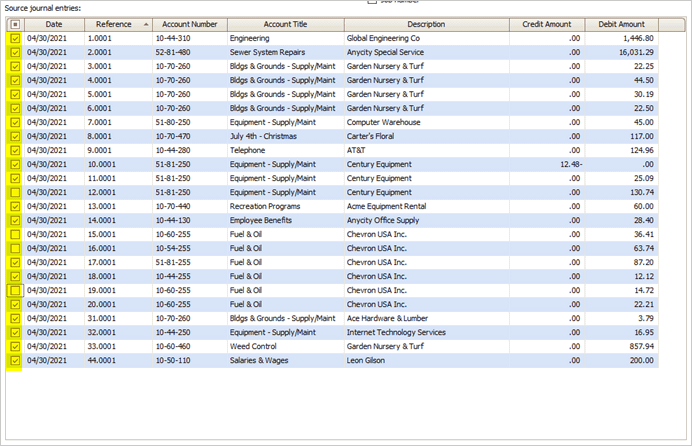
Source journal entries transaction grid
3. Set up the destination journal.

Copy to destination
Copy to destination
-
Period. Select the destination period.
-
Journal code. Select the destination journal code.
4. Set up the journal entry details.
5. Click GO  (CTRL+G).
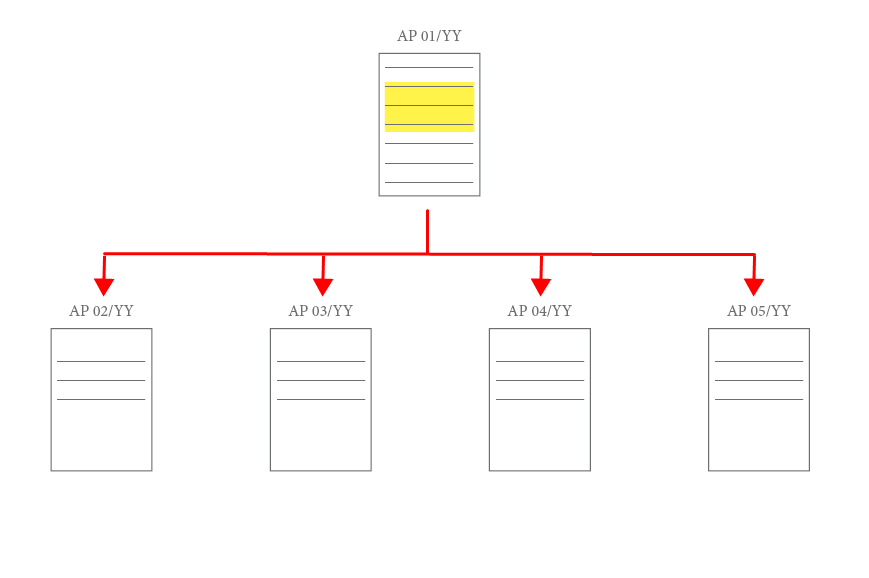
Copying journal entries to multiple periods
Copy the journal entries from the source journal to multiple periods in the destination journal.
Do this...
1. Open Connect General Ledger > Journals > Copy Journal Entries.
2. Set up the source journal.
Copy from source
Copy from source
-
Period. Select the source period.
-
Journal code. Select the journal code. The entries for the selected period and journal will be displayed in the Source Journal Entries transaction grid.
-
References. Select the reference number. Changing this control will filter the reference numbers that display in the Source Journal Entries transaction grid. (You can enter a reference number (###), reference number range (###-###), or reference number series (###-###, ###, ###...). Use a comma to separate multiple entries.)
Review source journal entries
Use the Source Journal Entries transaction grid to review the entries that have been selected to copy to the destination journal. You can use the checkbox to include or exclude journal entries from the selection.
Source journal entries transaction grid
3. Set up the destination journal.
Copy to destination
Copy to destination
-
Period. Click Multiple Periods. When the Multiple Periods window displays, select the periods from the destination journal.
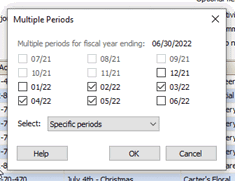
Multiple Periods window
-
Journal code. Select the destination journal code.
4. Set up the journal entry details.
5. Click GO (CTRL+G).
The routine copies the selected journal entries from the source journal to the selected periods in the destination journal.
Assigning reference numbers
You can use the same reference number as the reference number that's assigned to the journal entry in the source journal. If those reference numbers are already being used by journal entries in the selected journal, choose to use the next available reference number in the destination journal, or you can choose to enter the first reference number in the destination journal for the new journal entries.

Reference number
Warning: Reference numbers in use
A warning icon will display if the option that you have selected will use reference numbers in the destination journal that have already been assigned to another journal entry.

Warning icon
If you receive this warning, you can choose to change the reference number or you can run the routine as is. Running the routine without fixing the warning will use the next available reference number in the destination journal that has not been assigned to a journal entry.
Choosing the transaction date
When the journal entry is copied to the destination journal, choose how the routine will record the transaction date.

Transaction date
-
You can use the same date as the journal entry in the source journal.
-
You can assign the same transaction date to the copied entries.
-
Or you can use the period end date as the transaction date on the copied entries.
Selecting the default description
Do you want to use the same description from the source journal entry on the copied journal entry? Or would you prefer to use a generic description as the description for the journal entries that are copied to the destination journal?

Description
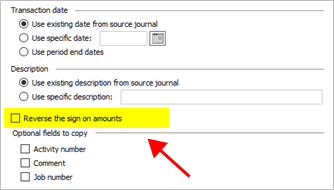
Reversing the sign on amounts
The journal entries in the source journal are recorded with a sign. The sign may be specific to the journal code and you may want to change the sign on the journal entry when it's copied to the destination journal.
Reverse the sign on amounts checkbox
Choose an option:
-
To use the same sign that's assigned to the journal entry from the source journal, leave the checkbox blank.
-
To use the opposite sign from the source journal, click to select the checkbox.
Copying activity number, comment, or job number
In addition to the columns that will be copied, you can also copy the activity number, comment, and job description to the journal entry in the destination journal.
Activity number
If you're using activity numbers in the General Ledger, you can copy the activity number that's tied to the source journal entry to the destination journal entry.
Comment
If a comment is saved for the journal entry, use this option to copy the comment to the destination journal entry.
Job number
If the interface to the Project Accounting application is set up and you're linking journal entries to job numbers, use this option to copy the job number to the destination journal entry.
202208, 2022Apr07
Copyright © 2020 Caselle, Incorporated. All rights reserved.