Use a profile routing to send a file through a workflow based on the profile data saved with the file. That means you can add a conditional statement to a workflow. The conditional statement allows you to insert an "If, then" statement that executes based on the information that is saved in the file's data profile. That may be helpful if the item being reviewed only needs to be approved by one manager in contrast to an item that needs to be approved by all managers or an item, for example, that needs to be approved by three of six managers.
You can set up profile routing to route a file to another workflow. You can make the workflow as simple or complex as you need it to be to fulfill the needs of your organization.
Example
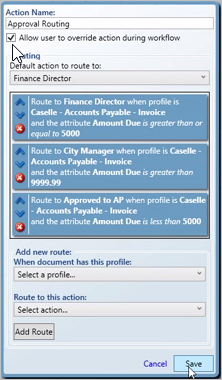
Here's an example of a profile that routes invoices based on the amount due. This example shows a profile routing for approving invoices. If the amount due is greater than $5,000, Document Management will route the item to the Finance Director. If the amount due is greater than $9,000, the item will be routed to the City Manager. But if the invoice is less than $5,000, the item will be routed to Accounts Payable for processing.
Profile routing lets you route files to a workflow based on the:
Owner (Vendor name or number)
Type (Invoice number)
Date (Invoice date)
Amount (Amount due)
Department
Preparation:
Use a pencil and paper to sketch out the routing process. You need to know what the routing process looks like on paper before you set it up in Document Management. Where does the routing process begin? What are the necessary steps? Who needs to complete each step? And so on. The entire routing process should be mapped out before you get started. Mapping the routing process will save you a lot of time when you recreate the routing process in Document Management.
1. Open Connect Document Management.
2. Click the Administration tab.
3. Click the button titled Manage Workflows.
The Workflow page displays.
4. Select the workflow name.
The workflow icons display on the workspace. Make sure you have more than one workflow path set up before you continue.
5. Click the icon titled Profile Routing.
6. Enter the Action Name.
This is the name that you will assign to the profile routing. This is helpful in case you want to set up more than one profile routing in the future. For example, Approval Routing.
7. Click to select the checkbox titled Allow User to Override Action During Workflow.
This option sets up the workflow dialog to include all of the options you will create in the workflow process.
Important! Make sure you select the checkbox titled Allow User to Override Action During Workflow if you are setting up a profile route.
8. Select the Default Action to Route To.
The default action is the action you want Document Management to execute first.
9. Select the When Document has This Profile.
This is the step where you define the route the file will take in the workflow process when the file's profile data meets the criteria for routing.
10. Select the And This Attribute (Optional).
This is the field where you define which workflow process Document Management will use when the file is assigned to the profile data that you selected in step 8. You may need to fill in additional fields based on the field you have selected.
11. Click Add Route.
The profile route is saved. The saved profile route displays in the Routing section of the form.
12. Repeat steps 7 - 10 to add another route.
When all of the alternative routes are set up, continue to the next step.
13. Click Save.
The profile route is set up.
The default action is the action you want Document Management to execute first. This is the user who will review the item and the workflow assigned to the item by Document Management.
When a user stores a file in Document Management, the system creates a data profile based on the type of information that is saved in the document.
An attribute refers to the type of information in the document. Examples of attributes in the Accounts Payable application may include the vendor name or number, invoice number, invoice date, and amount due. You can use these attributes to build a conditional statement that Document Management will use to determine which workflow to assign to it.
If you select a date, number, or amount as the attribute, the conditional statement may include: Is equal to; Is less than or equal to; Is greater than; or Is greater than or equal to.
Next, you'll need to enter the conditional value. For example, If the amount due is greater than or equal to $5,000, ...
Use the Route to This Action to choose the workflow where the item will be routed if it the conditional statement is true. For example, If the amount due is greater than or equal to $5,000, route the item to the Finance Director.
This example shows a profile routing for approving invoices. If the amount due is greater than $5,000, Document Management will route the item to the Finance Director. If the amount due is greater than $9,000, the item will be routed to the City Manager. But if the invoice is less than $5,000, the item will be routed to Accounts Payable for processing.