How do I import business tax returns from a delimited file?
Importing from a delimited file
1. Open Connect Business Tax Collection > Businesses > Import Business Tax Returns.
2. Select User-defined Delimited as the Import File Type.
3. Enter a Delimiter.
A delimiter is a character that marks the beginning or end of a unit of data. A delimited file is a variable-length field where the field length is based on the field's contents. Commonly used delimiters in export files include the comma (,), semicolon (;), and colon (:).
4. Enter the Import File Name.
What is the import filename?
-
The import file is located in the Connect directory. All of the Connect applications are located in the default d:\Connect directory, where you replace d:\ with the appropriate drive letter. If the import file was created and saved to the Connect default directory, then you only need to enter the import filename and extension. For example, ImportFileName.txt
-
The import file is located in a local or network directory. If you are importing a file that is stored on a disk or hard drive, type in the drive letter and path followed by the import filename and extension. Example: d:\my documents\ImportFileName.txt
The fields in the import file display in the large field in the middle of the form.

5. Enter the Lines to Skip.
A column heading that describes the data in a column but is not necessarily data that you want to use to create an invoice record is a line to skip. In this example, the yellow line is the column-heading row.

Does the import file contain column headers or extra information that you do not want to import?
-
Yes, the import file contains headers or extra information. Click on the Lines to Skip field, then enter the number of rows to omit from the import file.
-
No, the import file does not contain headers or extra information. Enter 0 (zero) in the Lines to Skip field.
6. Set up the output option.
All of the following options will process the update file. The report prints the Update General Ledger properties and lists any processing errors.
What do you want to do with the transactions?
-
I want to post transactions. Select No Report as the Print option.
-
I want to post transactions AND print a report. Select Report as the Print option.
-
I want to print a report. Select Report Only as the Print option.
7. Select the Tax Return Type.
A tax return is a form for calculating tax liability. A tax return type defines the accounting behavior for the related tax return. Use the Tax Return Type menu to select the tax return type to assign to tax returns in the import file.
8. Set up the checkbox titled File Includes Payments.
A tax return may include amounts that have been paid on the tax return before it will be imported into the database. If this situation applies to you, use File Includes Payments to import the payment detail with the tax return.
Does the import file include payments?
-
Yes, the import file includes payment information. Click to select File Includes Payments.
-
No, the import file does not include payment information. Click to deselect File Includes Payments.
9. Set up the section titled Import File Fields.
A sample value in the fields in the import file displays in the Import File Fields grid. Use the tools in this section to assign the field type in the Business Tax Collection application to the fields in the import file.
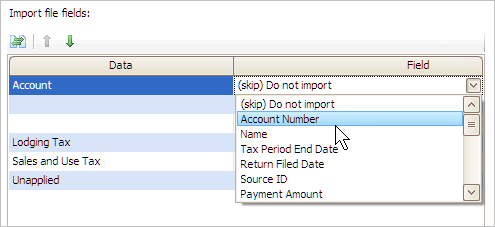
First, select the field types.
Click Select Field Types. The Selection form shows the field types that are in the import file. Move the name of the fields that you wish to import to the Selected Fields List.
Second, move the field types in the order in which they will be imported.
Use the Import File Layout grid to select a field type. Then, click Move the Selected Field Type Up/Down.
Third, set the properties on each field type.
Use the Field Types column to select the type of information that is stored in the field. If the row is blank, select Do Not Import Column (Skip) as the Field Type.
10. Click GO (CTRL+G).
Connect uses the import file to create tax return records in Business Tax Collection.
Copyright © 2025 Caselle, Incorporated. All rights reserved.