How do I split an invoice?
Invoices
Use Split mode to add more than one invoice detail to an invoice. The individual line items on an invoice show how many and how much of each item. This section is the invoice detail. When you're using Split mode, the entry screen stays on the invoice detail portion until you click the Save button.

Invoice, Showing invoice detail section
Split mode is available in the 2023.02 release.
Turning on Split mode from the Enter Invoices view
There are two ways to turn on Split Mode when you're entering invoices. You can use the Options window or the Split Mode button on the toolbar.
Changing my default options
When you launch the Enter Invoices view, the Options window will pop up. Click the Split Mode checkbox to start the session using Split Mode. If you only want to use Split Mode for the current session, when you click OK, choose No, do not save them permanently.
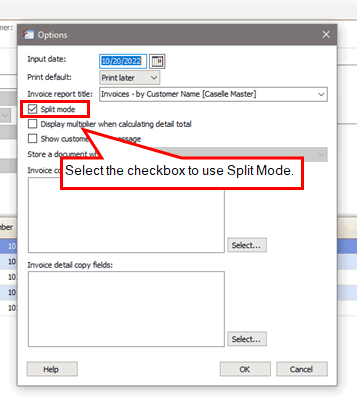
Enter Invoices, Options window - Split Mode checkbox
Using the Split mode button
Click the Split Mode  button (F11) on the toolbar to turn on Split mode. When you're done entering the invoice detail, click Save
 .gif) (CTRL+S) to save the invoice and enter the next invoice.
(CTRL+S) to save the invoice and enter the next invoice.
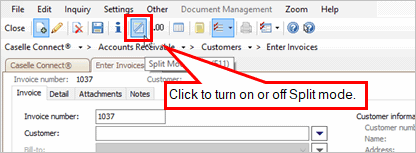
Enter Invoices view, Split mode button.
Changing the default setting to use Split mode
Change the default preferences for the Enter Invoices view to always use Split Mode. Click Options .gif) (F11) to open the Options window and then click to select the Split Mode checkbox.
(F11) to open the Options window and then click to select the Split Mode checkbox.

Enter Invoices, Save Options window
When you click OK and choose
-
Yes, and save them for the entire organization to save the default preference for anyone who will enter invoices.
-
Yes, but save them only for me to save the default preference for the current user.
2023.02, 2022Oct20
Copyright © 2025 Caselle, Incorporated. All rights reserved.