How do I print checks? (Forms)
Checks
Learn how to print checks. Use the Print Checks view when you are printing checks for the first time.
-
If you need to reprint a check that has not been updated to the General Ledger, use the help topic titled How do I reprint checks not updated to the GL?
-
On the other hand, if you need to reprint a check that HAS been updated to the General Ledger, follow the instructions in How do I reprint checks updated to the GL?

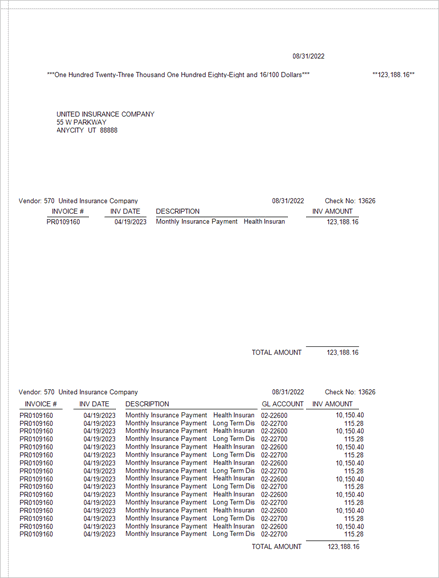
Sample check form
Printing checks
1. Open Connect Accounts Payable > Reports > Print Checks.
2. Use the Bank box to select the bank and checking account issuing the check.
Selecting the bank will show the check issue date(s) for unprinted checks.

Checks list
3. Click to select Include Regular Checks Beginning With Check Number.
The next available check number displays in the check number box.
-
To change the default check number for this check run, click on the check number and then enter the new check number.
-
To change the default check number, open Organization > Banks and then update the Next Check Number box.
4. Click to select the checkbox next to a check issue date to select it.
The quantity column shows the number of unprinted checks available on the check issue date. The checks that print will share the check issue date.
5. Click to select the Forms tab.
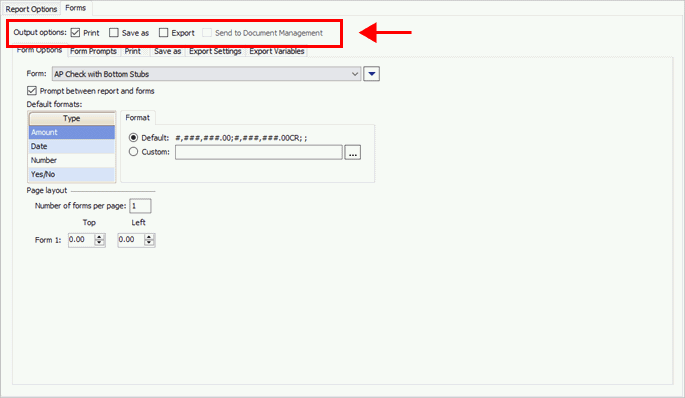
6. Click to select the Print checkbox.

Forms tab, Output options
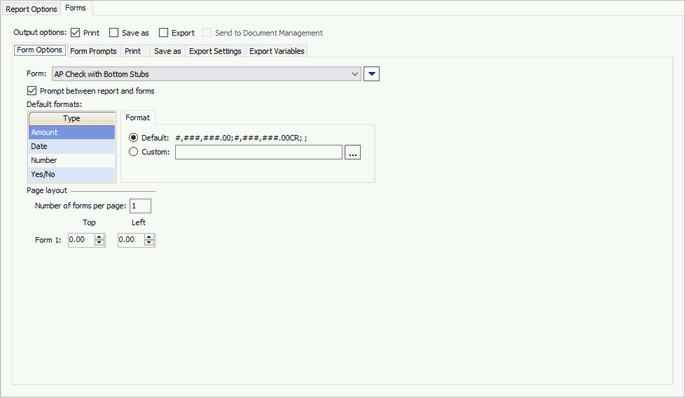
7. Select the form options (Form Options tab).
Select the check form definition; default formats for amounts, date, number, and yes/no values; and number of forms to print per page.

Forms tab > Form Options tab
8. Enter the form prompts (Form Prompts tab).
Set up variables that ask you to enter more information. This is where you will find variables that ask for the mailing date, due date, shutoff date, delinquent date, and billing date. Only the variables that are included on the form layout will be shown in the list.

Forms tab > Form Prompts tab
9. Set up the print options (Print tab).
Manage the print profile, printer, page range, and copies. The Print checkbox must be selected as the output option.

Forms tab > Print tab
10. Load the check stock in the printer.
11. Click Print  (CTRL+P).
202211, 2022Aug31
Printing checks
1. Open Connect Accounts Payable > Reports > Checks.
2. Select a report title.
3. Select the Check Issue Dates.
The Check Issue Date field displays the check issue dates for checks that are ready to print. All of the checks with a check issue date that matches this date will be included in the selection criteria.
4. Enter the Beginning Check Number.
The beginning check number is the first number that is printed on the check stock, or will be printed on the check stock.
5. Set up the option to Include Regular Checks.
A regular check is a check that is usually printed or written on printed check stock. This option will include all checks except direct payment checks.
Do you want to print regular checks?
-
Yes, print regular checks. Click to select Include Regular Checks.
-
No, do not print regular checks. Click to deselect Include Regular Checks.
6. Set up the option to Include Direct Payment Checks.
A direct payment check is a check that was paid electronically using an ACH program. This option includes all direct payment checks except regular checks.
Do you want to print direct payment checks?
-
Yes, print direct payment checks. Click to select Include Direct Payment Checks.
-
No, do not print direct payment checks. Click to deselect Include Direct Payment Checks.
7. Click the Forms tab.
A form layout is a document that has been set up to print information, such as text, titles, or variables. Use the options on the Forms tab to select the form layout to print checks.
8. Load the printed check stock in to the printer.
9. Click Preview (CTRL+Q).
Assigning the correct check numbers is very important. It's much easier to assign the correct check number when you print checks than it is to fix checks that printed with the wrong check number.
Is the first check assigned to the correct check number?
-
Yes, the first check number is correct. Continue to the next question.
-
No, the first check number is not correct. Close the Preview screen and use the field titled Beginning Check Number to enter the correct check number to print on the first check.
Are the check numbers assigned to the remaining check numbers correct?
-
Yes, the remaining check numbers are correct. Close the Preview screen. Now, you're ready to print checks.
-
No, the remaining check numbers are not correct. Click the Print button at the bottom of the Preview screen and use the field titled Beginning Check Number to enter the correct check number to print on the first check. The checks print.
Beginning check number
The beginning check number is the first number that is printed on the check stock, or will be printed on the check stock.
What is the beginning check number?
-
Use the Beginning Check Number field to enter the first check number on the batch of checks to be printed.
Check issue dates
The check issue date is the date the check was issued. This report will print all of the checks that were issued on the check issue date.
What is the check issue date?
-
Use the Check Issue Dates field to select a date.
Include regular checks
A regular check is a check that is printed. This option will include all checks except direct payment checks.
Do you want to print checks for regular checks?
-
Yes, print regular checks. Click to select Include Regular Checks.
-
No, do not print regular checks. Click to deselect Include Regular Checks.
Include direct payment checks
A direct payment check is a check that was paid electronically using an ACH program. This option includes all direct payment checks except regular checks.
Do you want to print checks for direct payment checks?
-
Yes, print direct payment checks. Click to select Include Direct Payment Checks.
-
No, do not print direct payment checks. Click to deselect Include Direct Payment Checks.
Spool forms
Spooling allows you to send multiple documents to a printer in a manner that allows you to continue working on tasks even though the print job is not finished printing.
Related Topics
How can I void and reissue a check that has been updated to the General Ledger?
How do I print checks if I accidentally closed the Preview screen?
How do I reprint checks not updated to the GL?
How do I reprint checks updated to the GL?
I voided a check but forgot to mark the Reverse Invoices box. How can I void the
What if I assigned the wrong beginning check number when I printed checks?
What if I have more than one date in the Check Issue Date field?
Why are checks still showing on the Reprint tab?
Copyright © 2025 Caselle, Incorporated. All rights reserved.