Step 4. Correct 1099 amounts
Accounts Payable Year End
Follow these instructions to correct vendors with incorrect 1099 amounts. Make sure the 1099 vendor type is set to 1099.
Correcting 1099 IDs and types
If a 1099 vendor wasn't included on the 1099 Reconciliation Report, you may need to check the 1099 vendor information that's saved in the vendor record. The 1099 Reconciliation Report will only include a 1099 vendor if the 1099 vendor type is selected. If the 1099 vendor type is set to none, the vendor won't be included on the 1099 Reconciliation Report. Changing the 1099 vendor type to any 1099 type except None will fix this issue.
How do I verify 1099 vendor information?
Use the Modify Existing Vendors routine in the Accounts Payable application to verify or correct the 1099 vendor type, ID number, vendor name, and vendor secondary name.
Do this...
1. Open Connect Accounts Payable > Vendors > Modify Existing Vendors.
2. Look up a vendor.
3. Use the 1099 Information section on the Vendor tab to verify the vendor's 1099 type, ID number, Name, and Secondary Name.
You must assign a 1099 vendor type to a 1099 vendor. If the 1099 vendor type is None, the 1099 vendor will not be included on the 1099 Reconciliation Report.
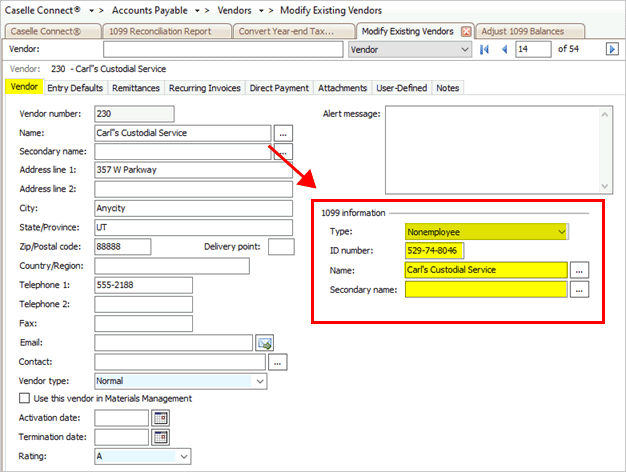
1099 Information on the Vendor tab in Modify Existing Vendors
4. Click Save ![]() (CTRL+S).
(CTRL+S).
The 1099 vendor information is saved. If you updated the 1099 vendor type, you will also need to update the 1099 vendor type that is saved on the vendor's invoices.
How do I change the 1099 vendor type?
Only 1099 vendor with a 1099 vendor type will be included on the 1099 Reconciliation Report. If the 1099 vendor type is None, you will need to choose a different 1099 vendor type.
Do this...
1. Open Connect Accounts Payable > Vendors > Modify Existing Vendors.
2. Look up a vendor.
3. Use the Type box to select a 1099 vendor type.
You must assign a 1099 vendor type to a 1099 vendor. If the 1099 vendor type is None, the 1099 vendor will not be included on the 1099 Reconciliation Report.
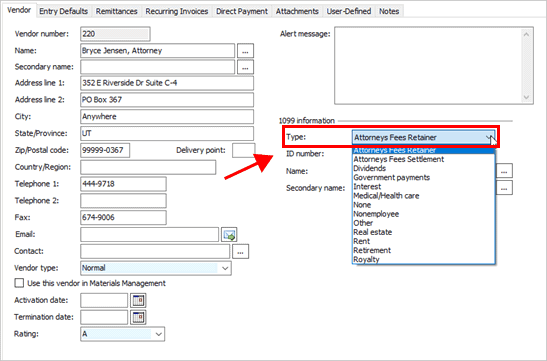
1099 Type box
4. Click Save ![]() (CTRL+S).
(CTRL+S).
The 1099 vendor type is saved.
How do I remove the 1099 type from a vendor?
If a vendor is listed as a 1099 vendor and the vendor is not a 1099 vendor, the last step after you adjust the 1099 type and amount on each invoice is to change the 1099 vendor type to None in Modify Existing Vendors. Assigning None as the 1099 vendor type will remove the vendor from the 1099 vendor list. After you change the 1099 vendor type, routines and reports that process 1099 vendor information will not include the vendor, transactions tied to the vendor, or invoices that reference the vendor.
Do this...
1. Open Connect Accounts Payable > Vendors > Modify Existing Vendors.
2. Look up a vendor.
3. Use the Type box to select None.

1099 Type box
4. Click Save ![]() (CTRL+S).
(CTRL+S).
The 1099 vendor type is saved as none. The vendor will not be listed as a 1099 vendor.
Correcting 1099 amounts
When you review the 1099 Reconciliation Report, you may find invoices for 1099 vendors that show the wrong invoice amount or 1099 vendor type. You can use Adjust 1099 Balances to correct the invoice amount and 1099 vendor type. You can also use this routine to change the 1099 type to none and remove 1099 amounts from a non-1099 vendor.
How do I adjust the 1099 amount on an invoice for a 1099 vendor?
Change the 1099 amount on an invoice for a 1099 vendor.
Do this...
1. Open Connect Accounts Payable > Vendors > Adjust 1099 Balances.
2. Use the Year box to select the tax year.
Year
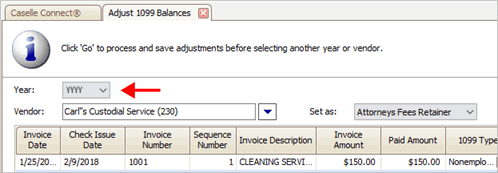
3. Use the Vendor box to select a 1099 vendor.
What if the 1099 vendor can't be selected or entered? Only vendors that have been assigned to a 1099 vendor type will be included in the Adjust 1099 Balances routine. If a vendor is missing, update the 1099 vendor type in the vendor record. To learn more, see Step 3a. Correct 1099 IDs and types.
Vendor box
The invoices created for the vendor display on the screen.

1099 vendor invoice list
4. Scroll down the invoice list to find the invoice with the wrong amount.
5. Click GO  (CTRL+G).
The 1099 vendor amount is saved.
How do I adjust the 1099 type on an invoice for a 1099 vendor?
Enter the correct 1099 vendor type on an invoice. If you make changes to the 1099 vendor type in Modify Existing Vendors, you will also need to update the 1099 type that's saved on the invoice.
Do this...
1. Open Connect Accounts Payable > Vendors > Adjust 1099 Balances.
2. Use the Year box to select the tax year.
Year
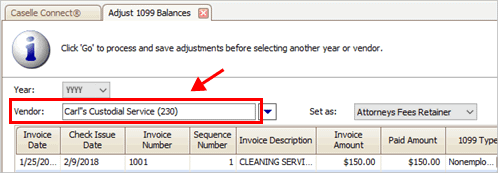
3. Use the Vendor box to select a 1099 vendor.
What if the 1099 vendor can't be selected or entered? Only vendors that have been assigned to a 1099 vendor type will be included in the Adjust 1099 Balances routine. If a vendor is missing, update the 1099 vendor type in the vendor record. To learn more, see Step 3a. Correct 1099 IDs and types.
Vendor
The invoices created for the vendor display on the screen.
1099 vendor invoice list
4. Scroll down the invoice list to find the invoice that's assigned to the wrong 1099 type.
5. Click on the 1099 Type box and then select the correct 1099 type from the menu.

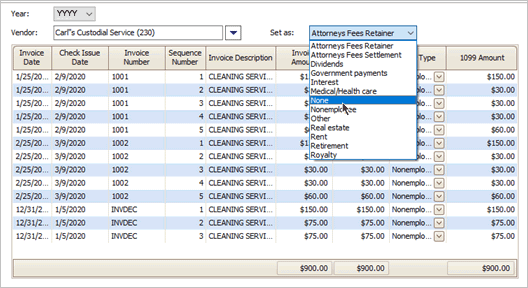
Changing the 1099 Type assigned to an invoice
What if I want to change the 1099 type on every invoice assigned to the 1099 vendor? Use the Set As box to change the 1099 type on the selected invoices to match the 1099 type that is selected in the Set As box. After you select the 1099 type from the Set As box, click Set All  .
.
6. Click GO (CTRL+G).
The changes to the 1099 vendor type are saved.
How do I remove the 1099 type and amount from a non-1099 vendor?
If you need to make a 1099 vendor into a non-1099 vendor, the first step is to remove the 1099 type and amount on each invoice that's tied to the 1099 vendor.
Do this...
1. Open Connect Accounts Payable > Vendors > Adjust 1099 Balances.
2. Use the Year box to select the tax year.
Year
3. Use the Vendor box to select a 1099 vendor.
Vendor
The invoices created for the vendor display on the screen.
1099 vendor invoice list
4. Use the Set As box to select None.
Set as menu
5. Click Set All  .
.
The 1099 Type changes to None and the 1099 Amount is set to zero (0.00).
6. Click GO (CTRL+G).
The changes to the 1099 vendor type are saved.
202311, 2023Dec20
Copyright © 2025 Caselle, Incorporated. All rights reserved.