How do I delete checks?
Checks
You can permanently remove a check from the database. Deleting a check will not leave a delete check transaction, so you should call customer service at (800) 228-9851 to work through the advantages and disadvantages of keeping or deleting the check. They may have another way to complete the task that will leave the audit trail intact.
Warning! Call Customer Service before you attempt to use this program. This routine will delete check transactions without leaving an audit trail.
The view has a new user interface in the 2023.08 release.
Before you get started
-
Make sure you have a current backup before you continue. This routine will modify or delete transactions. If you need to restore the modified or deleted transactions, you will need to use a current backup. [More]
Deleting checks
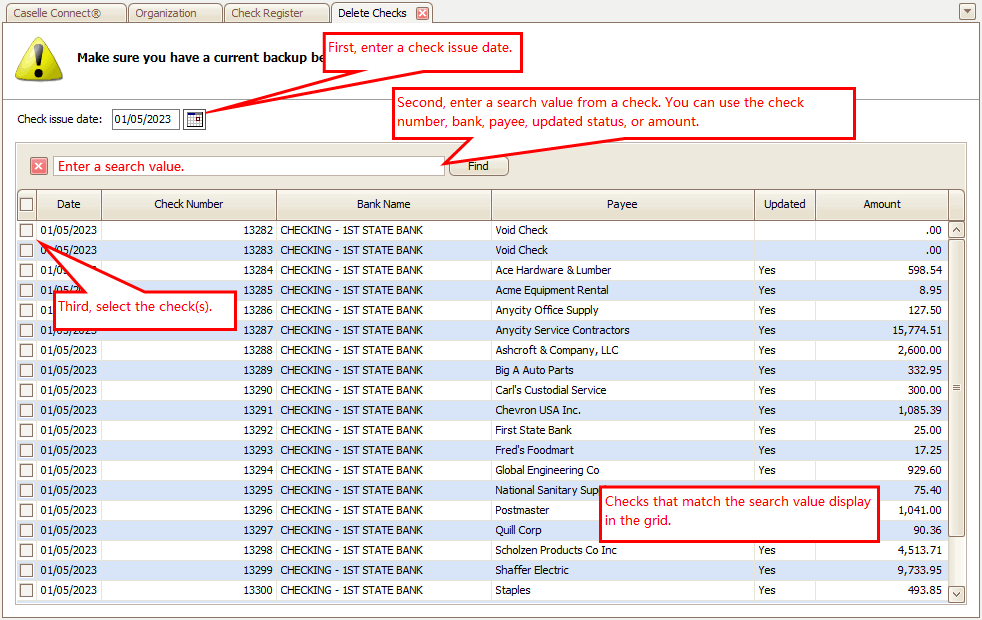
1. Open Connect Accounts Payable > Organization > Delete Checks.
2. Enter the Check Issue Date.
When you enter a check issue date, all of the checks that match the check issue date will be displayed in the grid.

Delete Checks
3. Select the checks.
Use the grid to select the checks to delete from the database. You have a few options.
-
Use the search box to look up a check by entering the check number, bank name, payee, updated status, or amount. As you type in a value, the grid will show the checks that match the search value. Clicking
 will remove the search box from the view. To restore the search box, exit the view and then open it again.

Search box
-
Sort the grid contents by clicking on a column heading (A-Z, Z-A, 0-9, 9-0). Clicking the column heading again will reverse the sorting order.

Sort order on a column heading
-
Use the column filter to refine the search criteria. Clicking the mini-filter button on a column header will show additional search values that you can apply to the selection grid.

Mini-filter button on a column heading
-
Click to select the checkbox next to a check to delete it. Checks that have not been selected will not be deleted when you run the routine.

Checkbox to select a check
4. Click GO  (CTRL+G).
The selected checks are deleted from the database.
.
Verify the check has been deleted
Use Vendors > Vendor Inquiry. Look up the vendor number. Then, click the Checks tab to verify the check has been deleted
Troubleshooting
Warning: Selected checks have been updated to General Ledger.
One or more of the selected checks have been updated to the general ledger. Clicking yes will delete the checks. Clicking No will return you to the selection screen. Usually, checks that have been updated to the general ledger would not be deleted from the application because the checks will leave an audit trail.
A control or authorization password may be required to continue.
202308, 2023May24
202308, 2023Apr04
Copyright © 2025 Caselle, Incorporated. All rights reserved.