Disposition Report
Reports
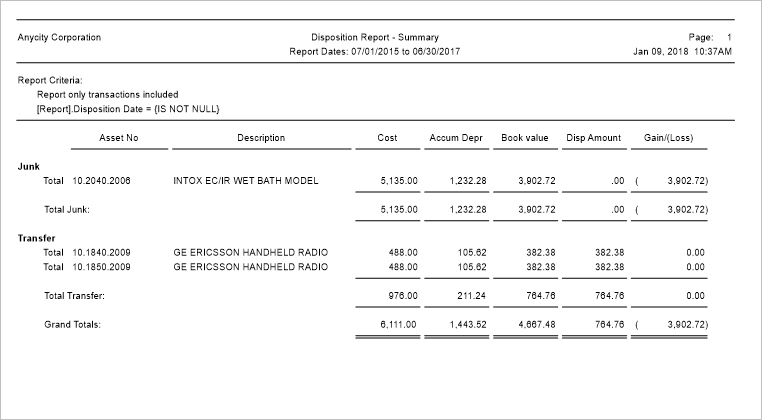
Depreciable assets are disposed of by retiring, selling, trading, or transferring them. When a depreciable asset is disposed of, an entry is made to track depreciation expense up the disposition date. Print the disposition report to verify the transactions that have been created using the Enter Dispositions routine.
Disposition Report
Printing a Disposition Report
1. Open Connect Asset Management > Reports > Disposition Report.
2. Set up the Report Dates.
3. Set up the Include Report-Only Transactions checkbox.
A report-only transaction is created for capitalization and depreciation based on the user-defined settings for the assigned asset types. Governmental assets are reported differently to depreciate assets; usually, the depreciation transactions are reported as report-only transactions. The report-only transactions allow you to see the differences in the reporting requirements.
Do you want include report only transactions?
-
Yes, I want to include report only transactions. Select the Include Report-Only Transactions checkbox.
-
No, I do not want to include report only transactions. Deselect the Include Report-Only Transactions checkbox.
4. Click Print (CTRL+P).
The report prints. If there are any errors on the Disposition report, use the appropriate routine to delete and correct it.
09Jan2018
Adding disposition comments column
To view when a disposition transaction includes any additional notes, add the disposition comments column to the disposition report.

Disposition Report with disposition comments
Do this...
1. Open Connect Asset Management > Reports > Disposition Report.
2. Click to select the Columns tab.
3. Click Modify Columns For This Report Line.
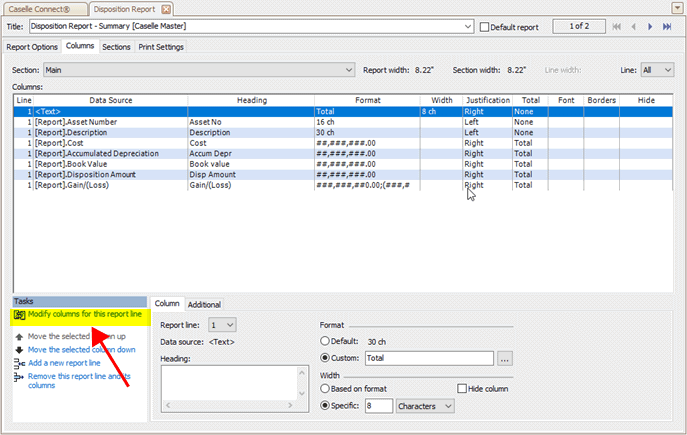
Tasks, Modify columns for the report line
4. Move [Report].Disposition Comments to the Selected Columns list, and then click OK.
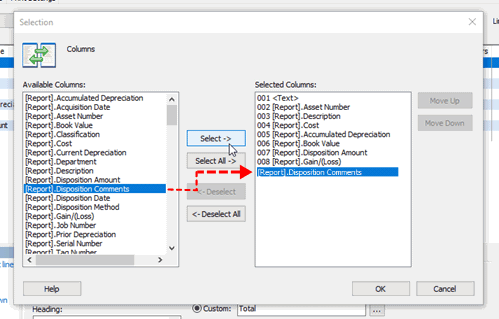
Selection window
The [Report].Disposition Comments report line is added to the Columns grid. You may need to adjust the column width on one or more columns so the report columns will fit on a single page. If you're printing in portrait mode (8.5 inches by 11 inches), the report width needs to be equal or less than 8.5 inches. Another solution is to change the page orientation to landscape mode (11 inches by 8.5 inches). You can change the page orientation on the Print Settings tab.

Columns grid
If the comment is longer than the column width, the report will truncate the comment. To allow the entire comment to print on the report, change the column properties to allow the comment to wrap to the next line. It's on the Additional tab. Use the Align box to select Wrap Lines.
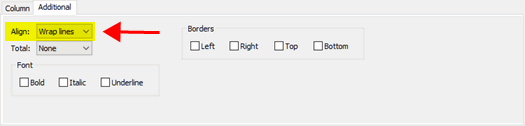
Align box
202205, 2022Jan21
Copyright © 2020 Caselle, Incorporated. All rights reserved.