How do I turn on the interface to Accounts Payable?
Use vendors and create assets from invoices.
You can use the Vendor table from Accounts Payable to add, modify, or delete vendor information.
You can also use the Accounts Payable interface to create an AP (Accounts Payable) asset from an invoice. For example, City XYZ buys a new asset. City XYZ uses Accounts Payable to enter an invoice to buy the asset. When the Accounts Payable Interface is set up in Asset Management, Connect will ask the AP clerk, "Is this an asset?" The AP clerk says, "Yes, this is an asset," and then Connect will prompt them to enter some additional information about the asset. (Filling in the additional asset information is optional.) Connect will create a pending asset that you can use to set up the asset in Asset Management.
One benefit of using the Accounts Payable application to create assets, is it allows you to create asset records throughout the year.
Contents
Step 1: Turn on the Accounts Payable interface
1. Open Connect Asset Management > Organization > Organization > Interfaces tab.
2. Click the Accounts Payable subtab.

3. Use the Interface menu to select the version of Accounts Payable that you're using.

4. Click Save (CTRL+S).
The Accounts Payable interface is turned on. You can use the Vendor table from Accounts Payable to add, modify, or delete vendor information.
Updated 03Jan2018
Step 2: Set up General Ledger
Set up the GL accounts that you use to buy new assets.
Note: Asset Management does not need to interface with General Ledger to use the Accounts Payable Interface.
Do this...
1. Open Connect General Ledger > Organization > Chart of Accounts.
2. Find the GL accounts that you use to buy a new asset.
Example: Capital Outlay Expenditure Accounts
3. Select the checkbox titled Prompt for Fixed Asset Information.
Selecting this checkbox will prompt a user to add the asset management information.

Prompt for Fixed Asset Information checkbox in General Ledger
Updated 03Jan2018
Step 3: Set up Accounts Payable
Setting up the Asset Management interface in Accounts Payable tells the Accounts Payable application to create pending assets as you enter invoices.
First, set up the Asset Management interface in Accounts Payable
1. Open Connect Accounts Payable Organization > Organization.
2. Click the Interfaces tab
3. Click the Asset Management subtab.
4. Use the Interface menu to select Caselle 4.x.
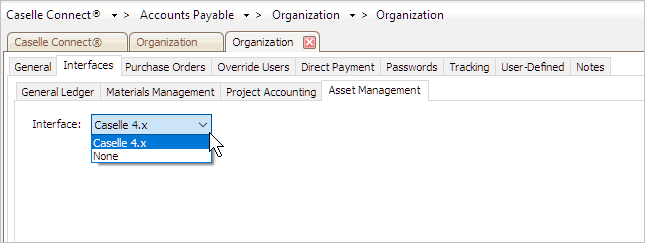
Asset Management Interface menu in Accounts Payable
5. Click Save (CTRL+S).
Now, when you enter an invoice, Accounts Payable will show a dialog box that will prompt the user to add a new asset.
Updated 03Jan2018
Second, set up the options in Enter Invoices to add assets
You can set up the default options (Accounts Payable > Invoices > Enter Invoices > Options (F12)) to prompt each time, yes to always add a new asset, or no to never add a new asset. For more information, see the help topic titled How do I create new asset records from an invoice?
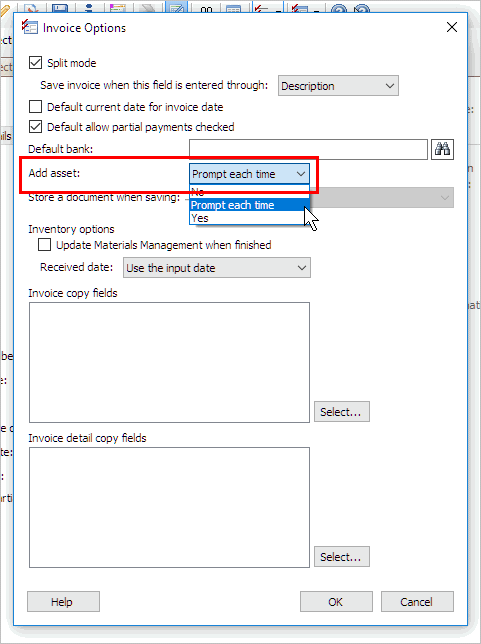
Add Asset in Invoice Options in Accounts Payable
Updated 03Jan2018
Now, what happens when I enter an invoice for an asset?
When you enter an invoice for an asset, the Add Asset Information dialog box displays on the screen.

Add Asset Information dialog box in Accounts Payable > Enter Invoices
Clicking Yes, will launch the Pending Asset Information form.
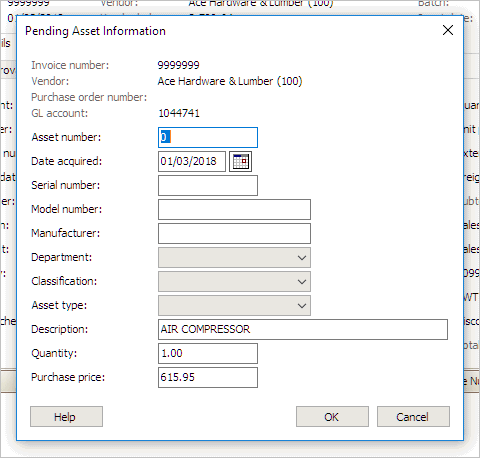
Pending Asset Information form in Accounts Payable > Enter Invoices
When you add the pending asset information, this is optional, and click OK, Connect will set up a pending asset for the item in Asset Management. To learn how to process pending assets, see the help topic titled How do I manage pending assets?
Updated 03Jan2018
Copyright © 2025 Caselle, Incorporated. All rights reserved.