How do I synchronize Connect users with Windows user name and password?
Synchronize Active Directory Users
If you're setting up the option to use the Windows user name and password to log in, first you will set up the option to use the Active Directory in Modify Security Settings and then you will be prompted to link each Connect user to their Windows user name. These instructions will show you how to (1) link your existing Connect users to their Windows user name; and (2) link a new Connect user to their Windows user name.
Contents
Before you get started
-
Set up Connect Security to allow users to use their Windows user name and password to log into Connect applications. See How do I use my Windows user name and password to log in?
Updating active user ID for existing Caselle users
Run this option the first time you set up the option to use the Windows user name and password to log in. It will link the user's Windows user name and password in the Windows Active Directory to the user's user ID in Connect.
Do this...
1. Open Connect System Management > Security > Synchronize Active Directory Users.
If you just finished setting up the Active Directory options in Modify Security Settings and you clicked Yes to synchronize users, Connect will launch the Synchronize Active Directory Users view and you can skip this step.
2. Use the Synchronize Option box to select Update Caselle Users.
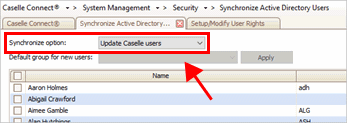
Synchronize Option box
3. Skip the Default Group for New Users box.
Since you're linking Connect users that already have a Connect user rights record set up and the user may already be assigned to a group, you can skip this option.

Default Group New Users box
4. Review if the Connect users are assigned to the correct Windows user ID.
Use the grid to verify each Connect user is matched to the user's Windows user ID in the Active Directory.
What if the Connect user does not show the correct Windows user ID?
In some instances, more than one user may be assigned to the same network user ID. You will manually change the network user ID of one of the users to a different network user ID. Use Setup/Modify User Rights to review the user ID, network user ID, and active directory user ID that are assigned to the user are correct.
5. When the Connect users are linked to the Windows user ID, click GO  (CTRL+G).
The Windows user ID in the active directory is assigned to the Connect user in Setup/Modify User Rights. The next step is to verify the synchronized user IDs in Setup/Modify User Rights.
Importing active user ID for new Caselle users
Use this option when you add a new user to Connect. It will link the user's Windows user name and password in the Windows Active Directory to the new user's user ID in Connect.
Do this...
1. Open Connect System Management > Security > Synchronize Active Directory Users.
2. Use the Synchronize Option box to select Import New Users.
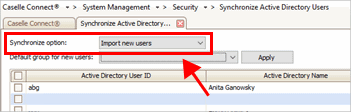
Synchronize Option box
3. Use the Default Group for New Users box to assign a group.
When you assign a group, the new user will inherit the user rights from the group to access Connect applications, views, and reports.

Default Group New Users box
4. Review if the Connect users are assigned to the correct Windows user ID.
Use the grid to verify each Connect user is matched to the user's Windows user ID in the Active Directory.
What if the Connect user does not show the correct Windows user ID?
In some instances, more than one user may be assigned to the same network user ID. You will manually change the network user ID of one of the users to a different network user ID. Use Setup/Modify User Rights to review the user ID, network user ID, and active directory user ID that are assigned to the user are correct.
What if I want to assign a new user to another group?
To override the default group that will be assigned to new users, use the Group Name column to assign a different group to a new user.

Group Name box
5. When the Connect users are linked to the Windows user ID, click GO (CTRL+G).
The Windows user ID in the active directory is assigned to the Connect user in Setup/Modify User Rights. The next step is to verify the synchronized user IDs in Setup/Modify User Rights.
Verifying synchronized user IDs
When you're finished synchronizing user IDs, use Setup/Modify User Rights to verify the Windows user ID for the each synchronized Connect user displays in the Active directory box. To learn more, see How do I link a user to a Windows user name?
Do this...
1. Open Connect System Management > Security > Setup/Modify User Rights.
2. Look up the user who was assigned to a Windows user ID in the active directory.
3. Use the Active Directory box to check to see if the Windows user ID that was assigned to the Connect user is correct.
If the Active Directory box is not showing the correct username, you can click on the field and enter the username that should be displayed.
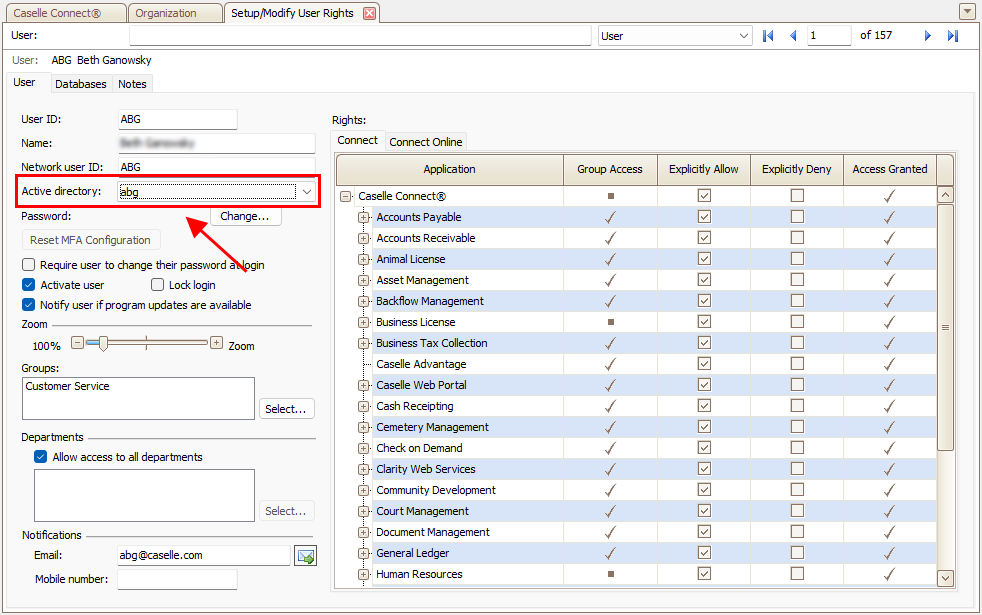
Setup/Modify User Rights, Active Directory box
4. Repeat to check Windows user ID assigned to the next Connect user.
Troubleshooting
I can't find the Windows user ID in the Active Directory. Where is it?
Warning: No Active Directory Interface
Warning: Cannot Connect to Domain
202105, 2021Feb25
Copyright © 2025 Caselle, Incorporated. All rights reserved.