How do I change the report date range?
Report Dates
Connect uses the report date range to select which transactions to include on the report. There are several options you can use to change the report date range. You can use one option or a combination of options.
Contents
Changing the report starting date
The From menu
The From menu displays report dates based on the date type assigned to the report. For example, if the date type is calendar day, then the From menu will display a date for each day of the month.
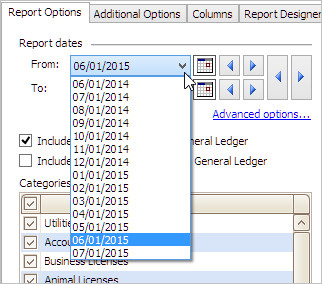
On the other hand, if the date type is calendar year date the From menu would display a list of years: 1/1/2015, 1/1/2014, 1/1/2013...

You can use the drop-down list to view a list of report starting dates that are selected based on the date type.
The Calendar button
You can use the Calendar button to select a custom date. A custom date is any date without regard to the date type.

When you select a custom date, the From field changes from a drop-down list to a normal field. To remove a custom date, click the link titled Advanced Options.
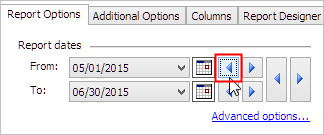
The Little Forward and Backward buttons
The Little Forward and Backward buttons use the date type to adjust the date displayed as the starting date range.

For example, if you click the Backward button that's on the same row as the From date, Connect will use the report date type to move the From date backward to the prior date. Since this screenshot uses the calendar month date as the report date type and the starting date is 6/1/2015, the prior date would be 5/1/2015 because 5/1/2015 is one calendar month ahead of 6/1/2015.
On the other hand, if you click the Forward button and the starting date is 6/1/2015, Connect will advance the starting date one calendar month forward to 7/1/2015.
Changing the report ending date
The To menu
The From menu displays report dates based on the date type assigned to the report. For example, if the date type is calendar day, then the From menu will display a date for each day of the month.
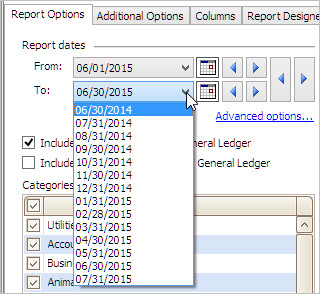
On the other hand, if the date type is calendar year date the From menu would display a list of years: 12/1/2015, 12/1/2014, 12/1/2013...

You can use the drop-down list to view a list of report ending dates that are selected based on the date type.
The Calendar button
You can use the Calendar button to select a custom date. A custom date is any date without regard to the date type.

When you select a custom date, the To field changes from a drop-down list to a normal field. To remove a custom date, click the link titled Advanced Options.
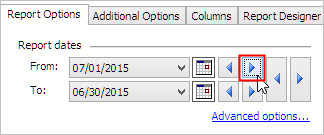
The Little Forward and Backward buttons
The Little Forward and Backward buttons use the date type to adjust the date displayed as the starting date range.

For example, if you click the Backward button that's on the same row as the From date, Connect will use the report date type to move the From date backward to the prior date. Since this screenshot uses the calendar month date as the report date type and the starting date is 6/30/2015, the prior date would be 5/31/2015 because 5/31/2015 is one calendar month ahead of 6/30/2015.

On the other hand, if you click the Forward button and the starting date is 6/30/2015, Connect will advance the starting date one calendar month forward to 7/31/2015.
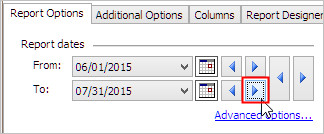
Changing the report starting and ending date at the same time
You can also use the Big Forward and Backward buttons to change both of the report dates at the same time. Using the large buttons will use the report date type to adjust the date in the From and To date.

For example, if you click the Big Backward button and the report date type is calendar month date, Connect will roll the dates in the From and To fields to the report date range in the prior calendar month. The screenshot would look like this where the From date would be 5/1/2015 and the To date would be 5/31/2015.

And clicking the Big Forward button will advance both the From and To dates to the next calendar month: 7/1/2015 and 7/30/2015.

Copyright © 2025 Caselle, Incorporated. All rights reserved.