How do I export a report?
Generate a report as an export file.
Connect can save a report as a comma-delimited file or fixed-length file. Both of these file types are different from saving a report as a file type for a third-party application. You can save a report as a comma-delimited file or fixed-length file so you can import the information saved in the report into another Connect application.
Contents
Watch a video
-
Exporting a financial statement. Click this link and then navigate to 0m13s.
-
Exporting a report that looks exactly like the printed report. Click this link and then navigate to 21m26s.
-
Viewing an exported report that uses one line per cell. Click this link and then navigate to 26m04s.
-
Seeing how the columns on the printed report are transferred to a spreadsheet. Click this link and then navigate to 28m04s.
-
Creating an export file for recurring journal entries. Click this link and then navigate to 31m21s.
12Sep2018
Exporting a report as a delimited file
1. Click the Print Settings tab.
2. Click to select the Export checkbox.
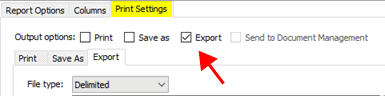
Export checkbox
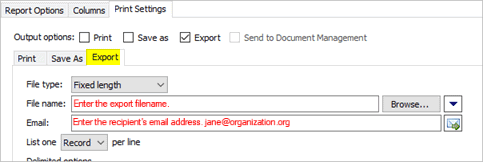
3. Click the Export tab and then set up the following options.

Export tab for delimited file
File type
Select Delimited.
File name
Enter the file name for the export file. Include the directory and path.
To send the export file to a recipient, enter an email address. When you create the export file, the report will open in the preview pane and then Connect will use the default email application to create the email.
List one field/record per line
Select the information that should be included in each row of the export file. Use Field to create a new row for the value in each field. Use Record to place all of the fields in a record on the same row.
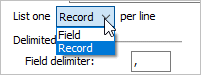
List one field/record per line
Delimited options
Enter the symbol or character to use as the delimiter.

Delimited options
Include
Select the Column Headings checkbox to include the column headings at the beginning of the export file. Select the Selection Criteria checkbox to include the options that were selected to set up the export file in the export file.

Include
4. Click Print (CTRL+P).
The export file is saved as a delimited file.
2020Jan24
Exporting a report as a fixed-length file
1. Click the Print Settings tab.
2. Click to select the Export checkbox.

Export checkbox
3. Click the Export tab and then set up the following options.
Export tab for a fixed-length file
File type
Select Fixed Length as the File Type.
File name
Enter the file name for the export file. Include the directory and path.
To send the export file to a recipient, enter an email address. When you create the export file, the report will open in the preview pane and then Connect will use the default email application to create the email.
List one field/record per line
Select the information that should be included in each row of the export file. Use Field to create a new row for the value in each field. Use Record to place all of the fields in a record on the same row.
List one field/record per line
Include
Select the Column Headings checkbox to include the column headings at the beginning of the export file. Select the Selection Criteria checkbox to include the options that were selected to set up the export file in the export file.
Include
4. Click Print (CTRL+P).
The export file is saved as a delimited file.
2020Jan24
Using date variables
When you set up the export options, you can add a date variable to the export file name. Enter the path and file name, select {Date} as the Variable, and then click the Insert Variable button to add the date variable to the file name. The date variable is YYYYMMDD. In this example, the file name generated by the report is "UM_CustomerHistory_2018-12-19.txt" where 2018-12-19 is the date variable.
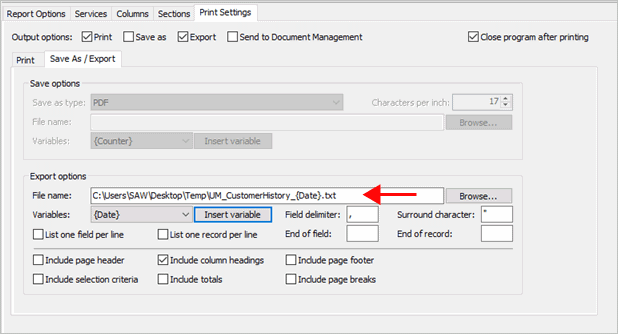
File Name with date variable
2019.02, 2018Dec19
Copyright © 2025 Caselle, Incorporated. All rights reserved.