Columns
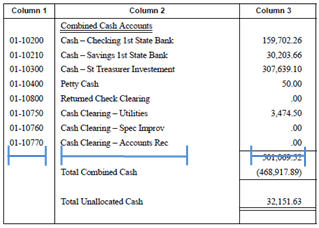
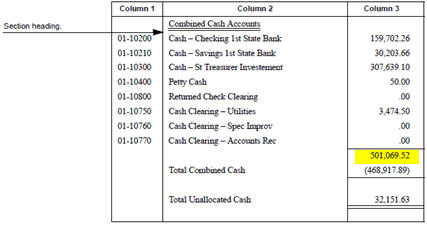
A report uses sections and columns to organize information. A section organizes data in horizontal blocks, while a column organizes data in vertical blocks. In this image, Column 1, Column 2, and Column 3 are examples of columns on a report. This is an example of a section on a report that contains three columns. Column 1 displays the account number. Column 2 displays the account title. And Column 3 displays the current year-to-date amount.
The options on the Columns tab are listed in alphabetical order in this help topic.
Adding a new report line
Insert a report line into the report layout.
Do this...
1. Click Add a New Report Line on the Columns tab.
2. Fill in the options on the Column and Additional subtab. Use the other sections in this help topic to fill in the forms.
Modifying columns for this report line
Edit the contents of a report column.
Do this...
1. Use the Columns grid on the Columns tab to select a report column. The selected column is highlighted.
2. Click Modify the Columns for This Report Line on the Columns tab.
Moving the selected column up/down
Reposition the column on the report layout.
Do this..
1. Use the Section field to select a report section. The Columns grid uses the selected section to filter the information that displays in the grid.
2. Use the Line field to select the report line. The Columns grid uses the selected line to filter the information that displays in the grid.
3. Click to select a report line. The selected report line is highlighted.
4. Click Move the Selected Column Up/Down.
Removing this report line and its columns
Delete the report line and the column contents from the report layout.
Do this...
1. Use the Section field to select a report section. The Columns grid uses the selected section to filter the information that displays in the grid.
2. Use the Line field to select the report line. The Columns grid uses the selected line to filter the information that displays in the grid.
3. When you click Remove This Report Line and Its Columns all of the information that is displayed in the grid will be deleted.
4. Click Remove This Report Line and Its Columns.
Options
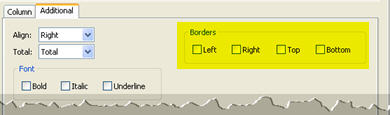
Align
Use align to line up the field contents to the right, center, or left.
Borders
A border is a plain or decorative margin. You can differentiate a column by adding a border.
What do you want to do?
First, use the Columns list to select a column.
Second, use the section titled Borders, located on the Additional subtab, to add a border to the left, right, top, or bottom of a column.
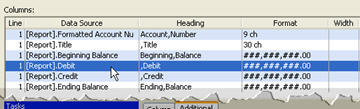
Columns grid
The Columns grid displays the columns from the selected section. The grid summarizes the properties that you have selected for each column. When you click on a row in the Columns grid, the column properties will display on the Column and Additional subtabs.
Data source
The Data Source field displays the location of the data that is being used to fill in the report column.
Font
A font refers the formatting applied to a font, such as bold, italic, or underline.

What do you want to do?
-
Apply bold formatting. Use the Additional subtab to select the Bold checkbox.
-
Apply italics. Use the Additional subtab to select Italic checkbox.
-
Underline the values. Use the Additional subtab to select Underline checkbox.
Format
Use the default format to use the system settings to format the width of the printed line inside a column. Use the custom format to define the number of characters allowed in a printed line.
What do you want to do?
-
Use the system default. Use the Columns grid, on the Columns tab, to select a column. The column properties will be displayed in the Column subtab. Now, use the options listed under Format to click Default. The value next to the Default control is the number of characters the report will use to format the column width.
-
Let me define the column width. Use the Columns grid, on the Columns tab, to select a column. The column properties will be displayed in the Column subtab. Now, use the options listed under Format to click Custom. Use the Custom field to enter the number of characters across the width of the column.
Heading
A heading is a title that is located at the beginning of a section.
What do you want to do?
-
Add a heading to a column. Use the Columns grid to select a column. Then, use the Heading field, on the Column subtab, to type in the heading name.
-
Change a column heading. Use the Columns grid to select a column. Then, use the Heading field, on the Column subtab, to edit the heading name.
-
Delete a column heading. Use the Columns grid to select a column. Then, use the Heading field, on the Column subtab, to remove the column heading.
Line
The Line field displays the line number for the report column that is displayed on the screen. Use this field to switch between the different lines on a report.
Section
A section is a portion of the report. The Section drop-down list will display the sections that you can select in the report.
Total
A total is the sum of all of the values in the column. Use count to indicate the number of items in the column.
What do you want to do?
-
Sum the values in the column. Use Total to select Total.
-
Tally the number of values in the column. Use Total to select Count.
-
Sum and tally the values in the column. Use Total to select Both.
Report line
A report contains sections, each section is composed of one or more report lines, and each report line contains one or more columns.
Width
Use Width to based the column width on the contents of the widest column. Use Based on Format to use the widest column as the default width. Use Specific to set the column width to a specific number of characters. Use Hide Column to suppress a column from printing on the report. For example, when you use a column a calculate an amount but you do not need to show the column contents on the report.

What do you want to do?
-
Use the system default. Use the Columns grid, on the Columns tab, to select a column. The column properties will be displayed in the Column subtab. Now, use the options listed under Width to click Based on Format.
-
Let me defined the column width. Use the Columns grid, on the Columns tab, to select a column. The column properties will be displayed in the Column subtab. Now, use the options listed under Width to click Specific. Use the Specific field to enter a number. Then, use the drop-down list to define the column width in terms of characters or inches.
-
Suppress the column. Use the Columns grid, on the Columns tab, to select a column. The column properties will be displayed in the Column subtab. Now, use the options listed under Width to click the Hide Column checkbox.
Copyright © 2025 Caselle, Incorporated. All rights reserved.